Have you tried to upload your 3D model files on Gambody and got stuck at the first step, not knowing exactly what is required from you? No worries. We’re here to help you and make everything clear so that every upload you make becomes an easy and enjoyable experience.
We will take you through every step of the model’s publishing process on the site, assisting you with tips and advice, making it an effortless adventure. At the end of the day, you will be having your online shop of 3D models put into order and ready to lure in potential buyers.
To make everything intelligible, we will base our article on Malcador Infernus 3D model, inspired by Warhammer 40k video game.
Create your 3D model
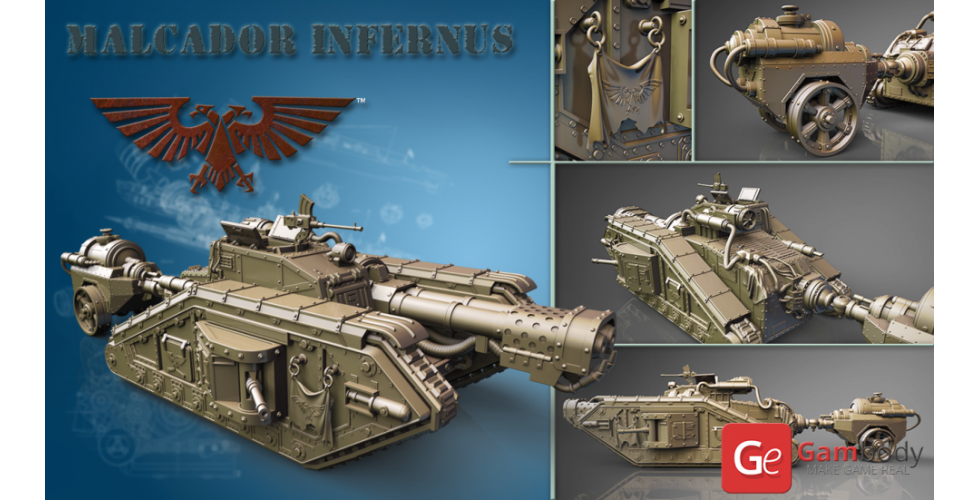
The entire process of modeling Malcador Infernus tank for 3D printing took about 21 hours. The 3D modeler took inspiration from the video game’s graphics and sketches from the Internet. We’ve recorded the entire process and put up a 2-hour video which you can watch below.
Remember, that modeling objects for 3D printing is a creative activity. Therefore, every 3D modeler has his own approach and tricks. The purpose of the video is to show you the hard and time-consuming work that goes into making a model for 3D printing, depending on your expertise and experience with 3D modeling software.
Export modeled objects in STL files
When you’re done with modeling the object, it is time to get the objects in STL files, a format that enables to print 3D models. In the images below you can see the process of exporting the objects from .ma or .mb format (Autodesk MAYA) in STL format, explained step-by-step.
Step 1. Choose File in the toolbar
Step 2. In the drop down menu click Export Selection
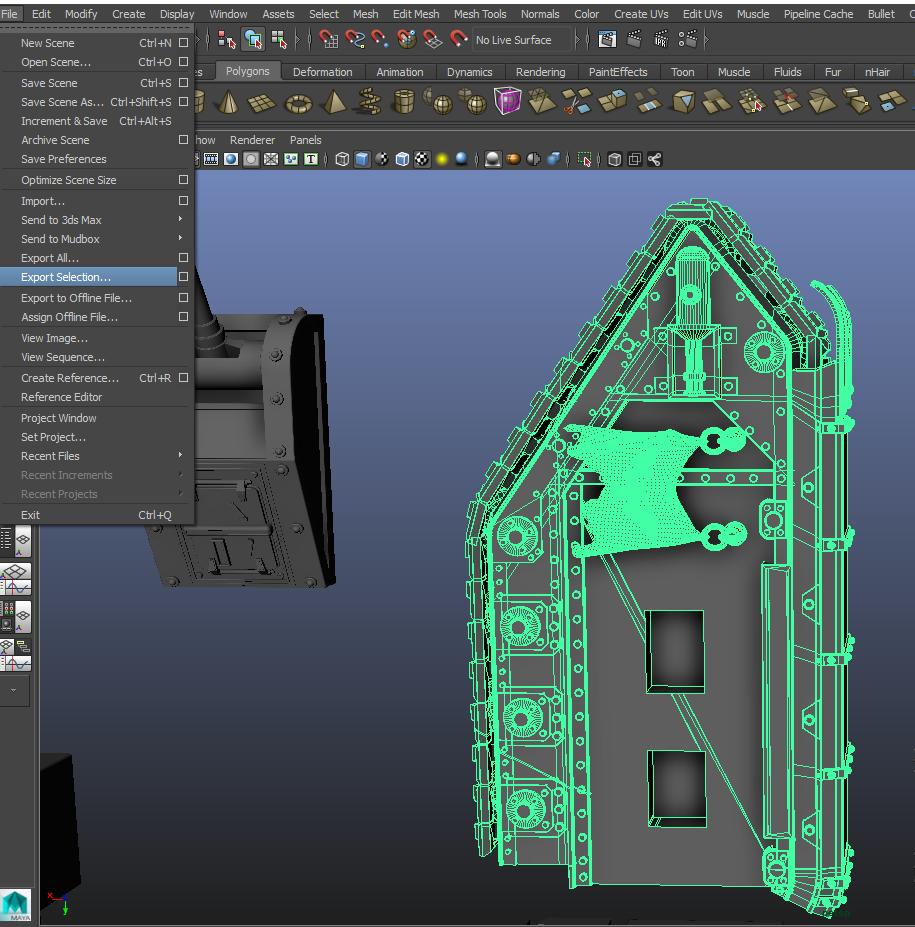
Step 3. Choose STL_DCE to export the model
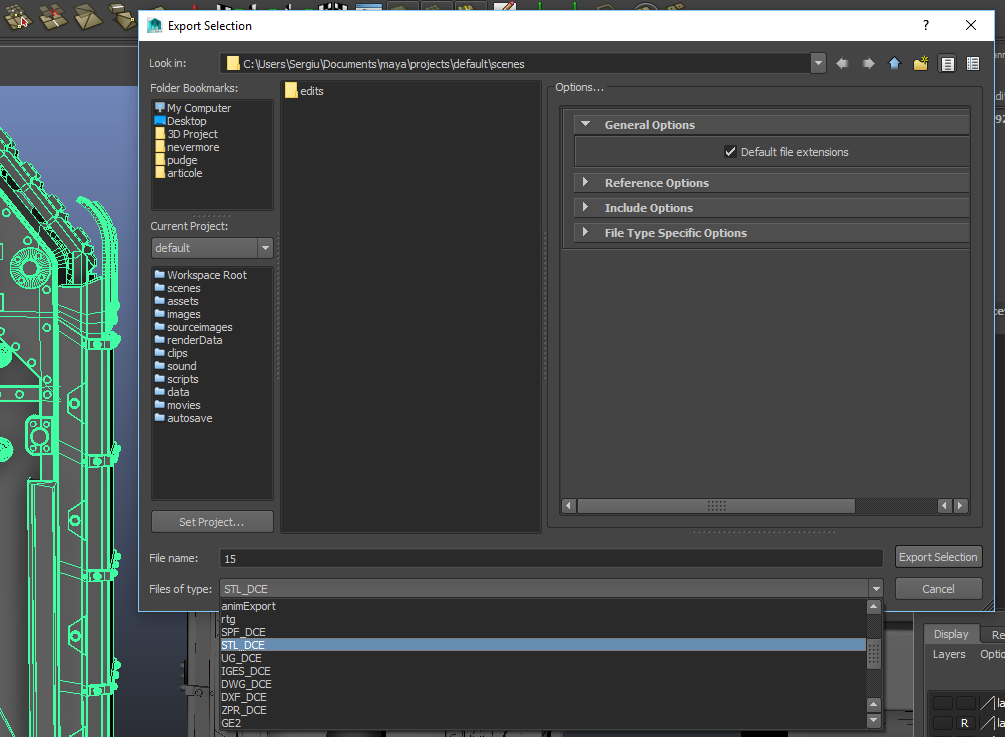
This is how all parts that a 3D model consists of are exported in STL file format. Malcador Infernus 3D model is made up of 23 separate parts, which means that after the export we have 23 separate STL files. All these separate parts are assembled after printing.
Check every STL file for errors
Every STL file needs to be checked for potential errors, which, if present, affect the quality of the 3D printed model. One of the best tools that identify and correct most errors in STL files you, as a 3D modeler, missed during the modeling process, is Netfabb.
Open the part’s file in Netfabb, click Repair and follow the instructions that the software generates. When all steps are successfully completed, export the repaired STL file. This time, the file will export as – filename(repaired).stl.
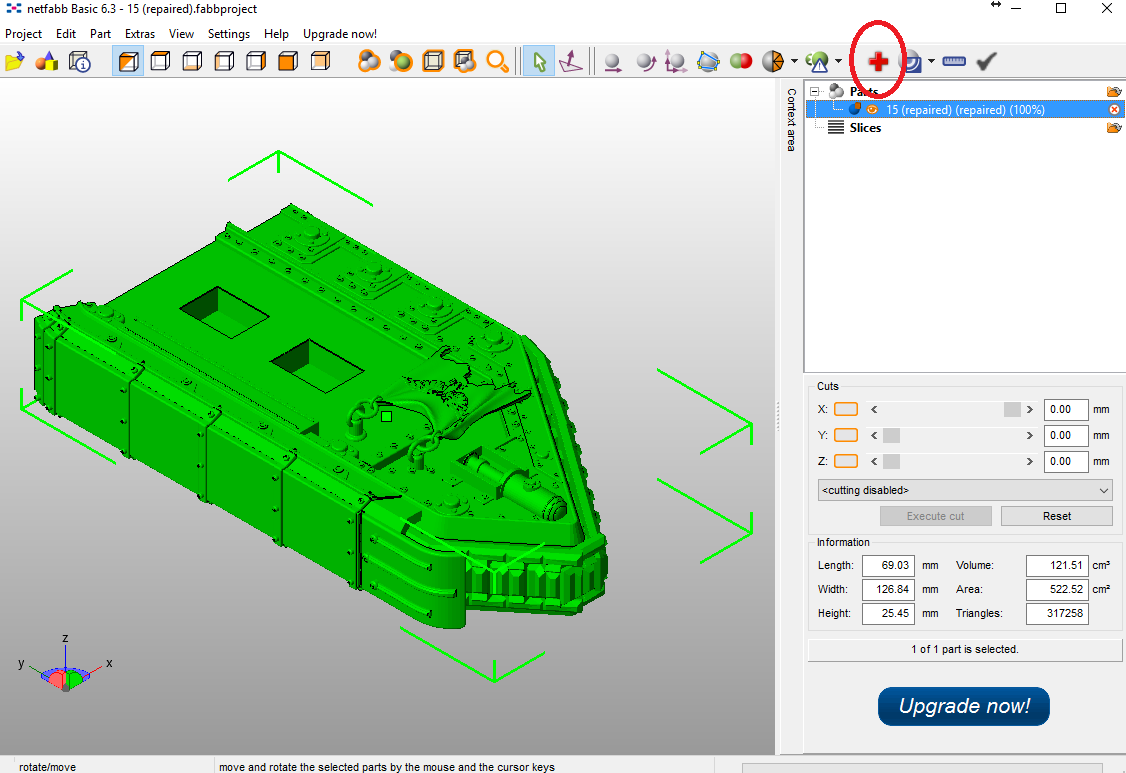

You can check our Guide on How to Export 3D Models in STL Files and Prepare for 3D Printing to see the detailed description of Netfabb STL file repair procedure.
Prepare STL file for printing
You already know that an STL file is printable only after having undergone one more step – opening it into a slicer. The slicer software generates the G-code – a language that your 3D printer speaks. Drag STL files into the slicer’s window (we use CURA 15.06 for Ultimaker 2 3D Printer).
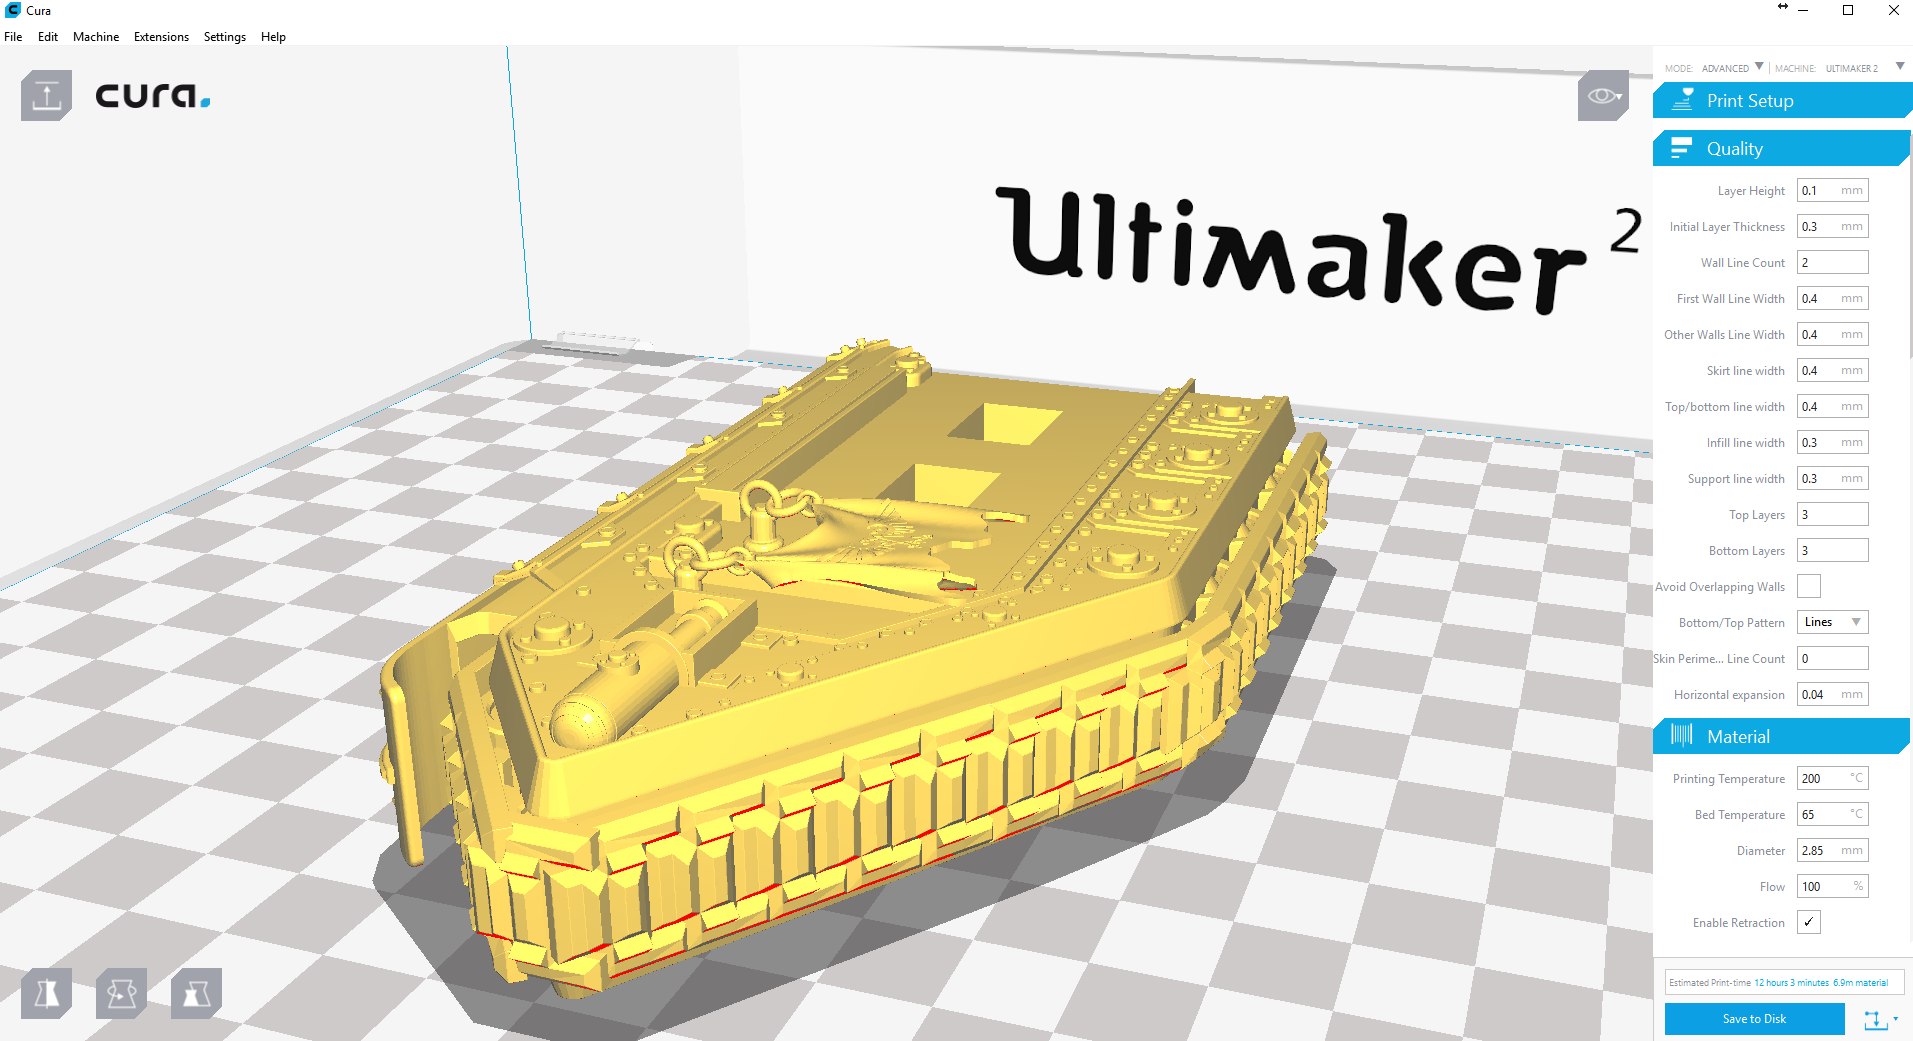
Cura 15.06 chops the part into hundreds of layers, enabling you to see every layer of your 3D model.
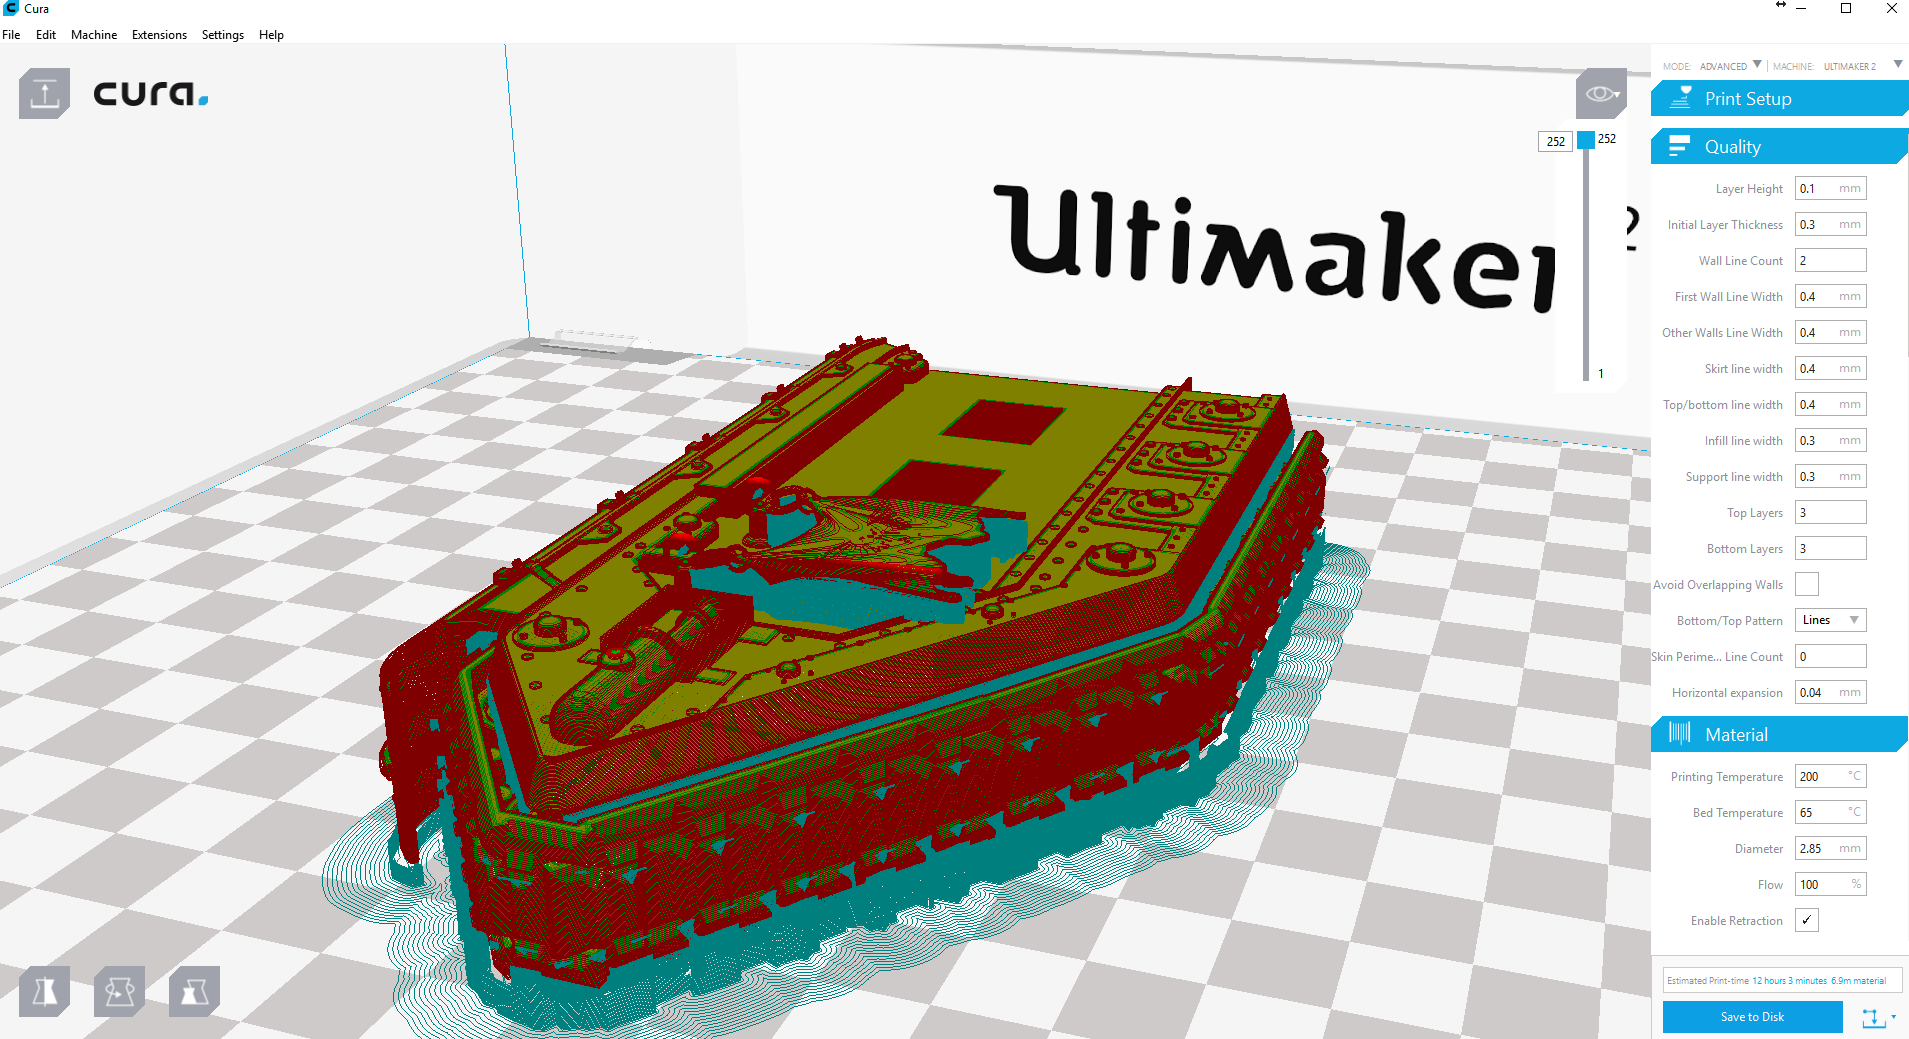
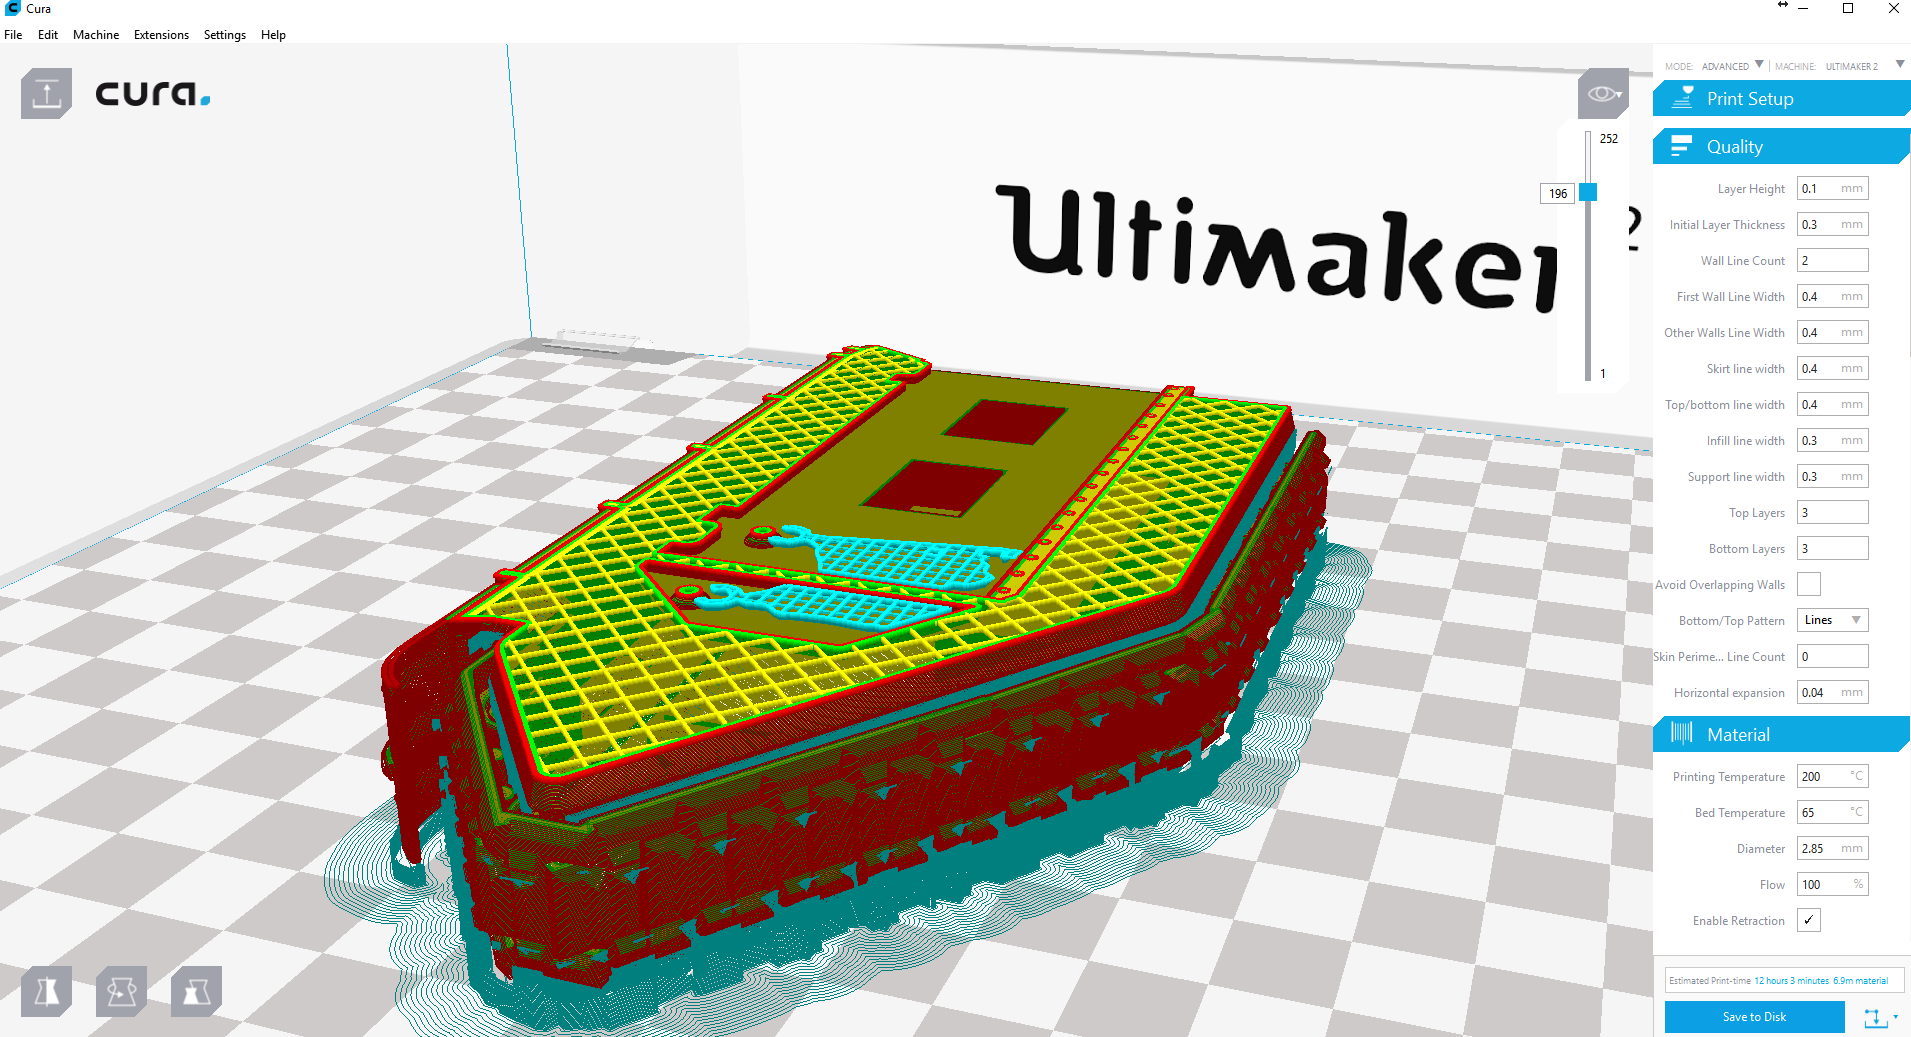
Make sure that every part of the 3D model is ready for printing, i.e. it lacks potential gaps in the mesh. If you see that the parts are modeled correctly and that every small detail will print accurately, you can move to the next step. If, however, the part shows signs of holes or errors, edit the part and repair it, to avoid any potential complaints from your buyers.
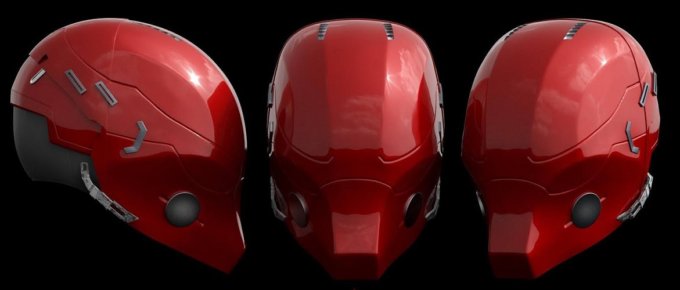
Prepare high-quality pictures of the 3D model
Now that you have all the STL files of the model in order, you want to begin working on the marketing material. High-quality pictures of the model are a great tool to let the clients see what they are buying, to show off your model in a creative way, showcasing all the surface details and emphasizing the strong points of the 3D model from different angles. To prepare this type of pictures for our Malcador Infernus 3D model we use KeyShot and Adobe Photoshop programs.
Picture showing the top of the tank
Picture of the side of the tank
Make sure you have pictures showing the entire model and close-ups, emphasizing the important details of the model.
If you are about to upload a model in assembly mode, prepare a picture showing all the parts that the model consists of.
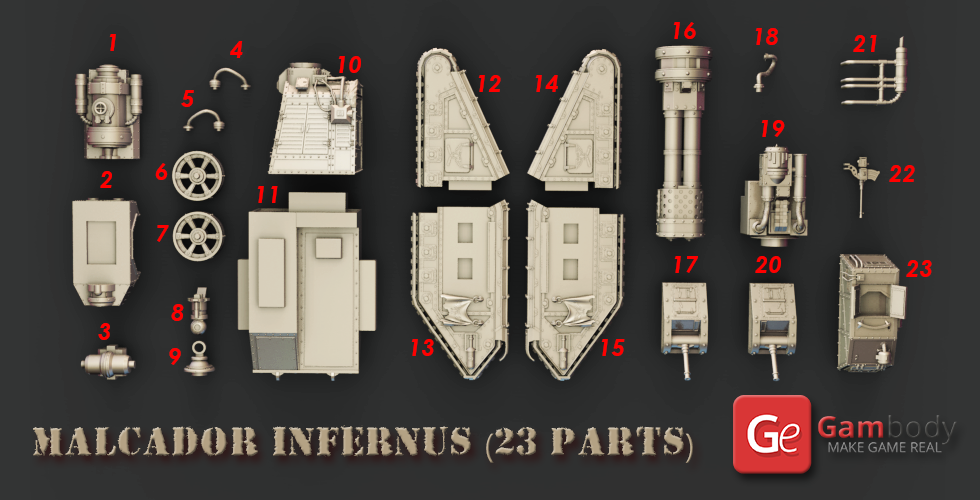
Picture showing all the parts of the model
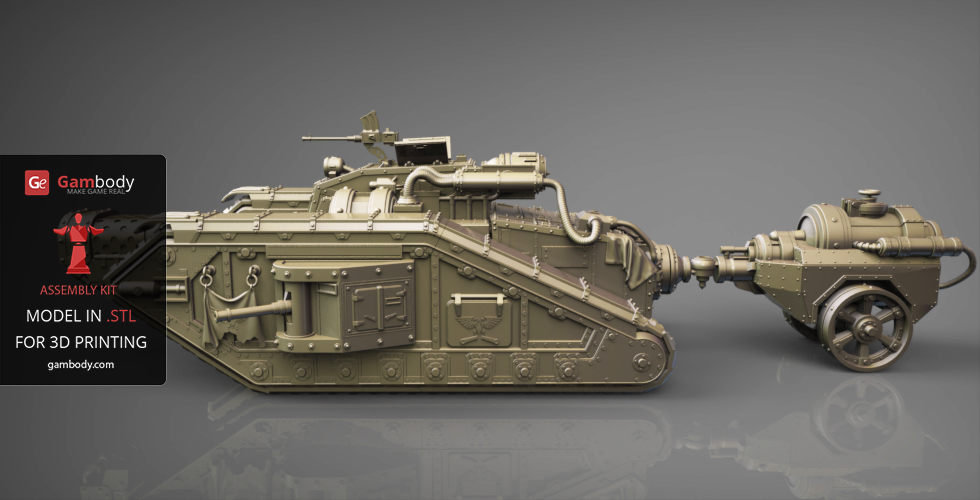
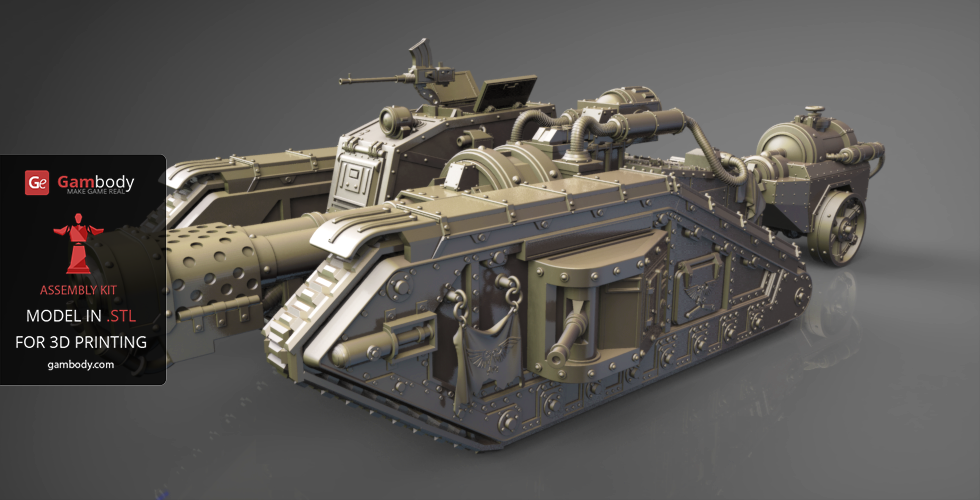
Picture of the side of the tank with the fuel trailer towed behind
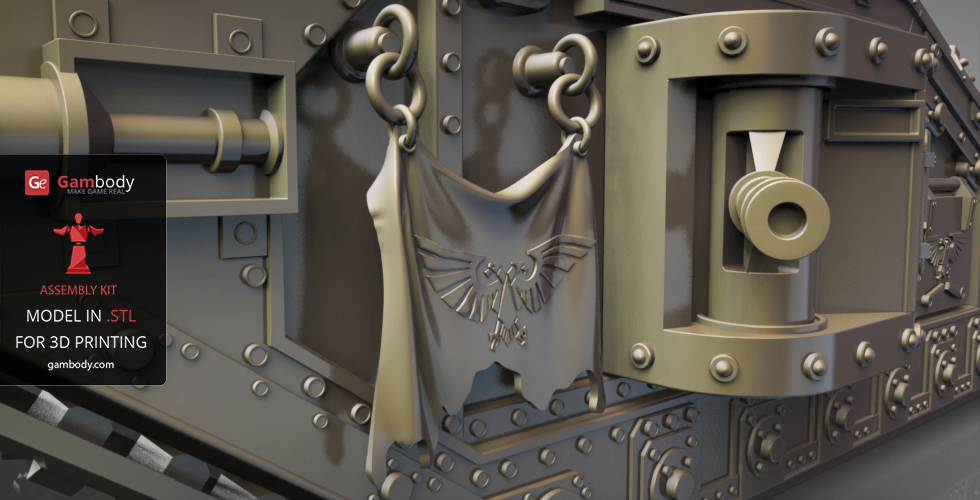
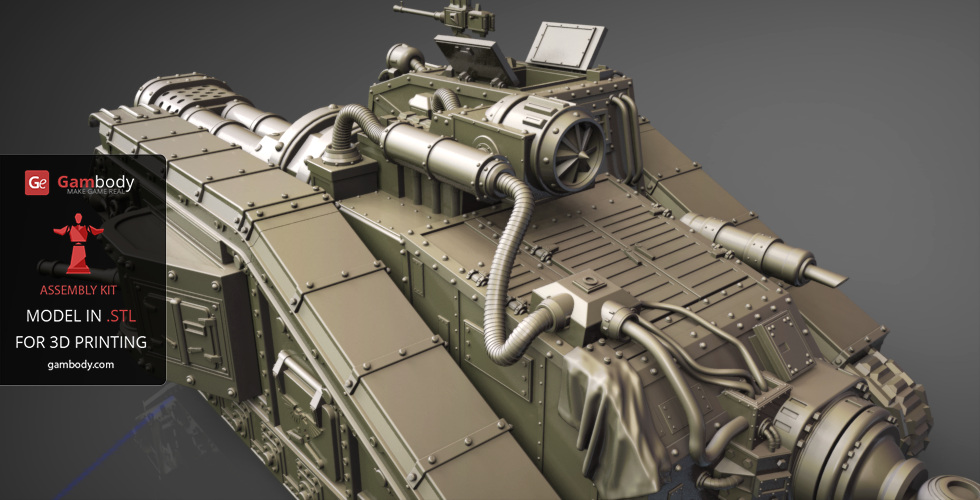
A close-up picture of Malcador Infernus outer details
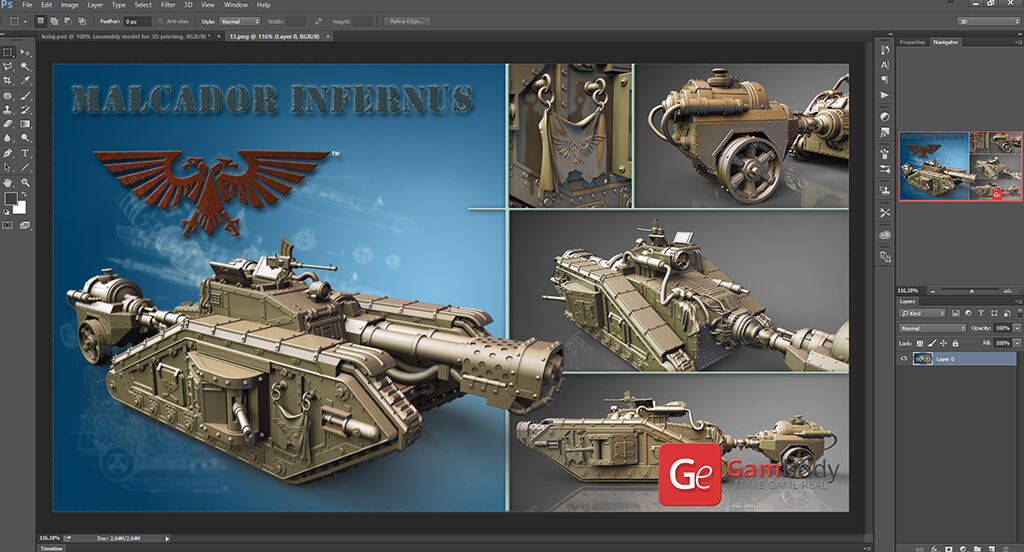
Collages are well received by potential buyers
Create a video of the 3D model’s assembly process
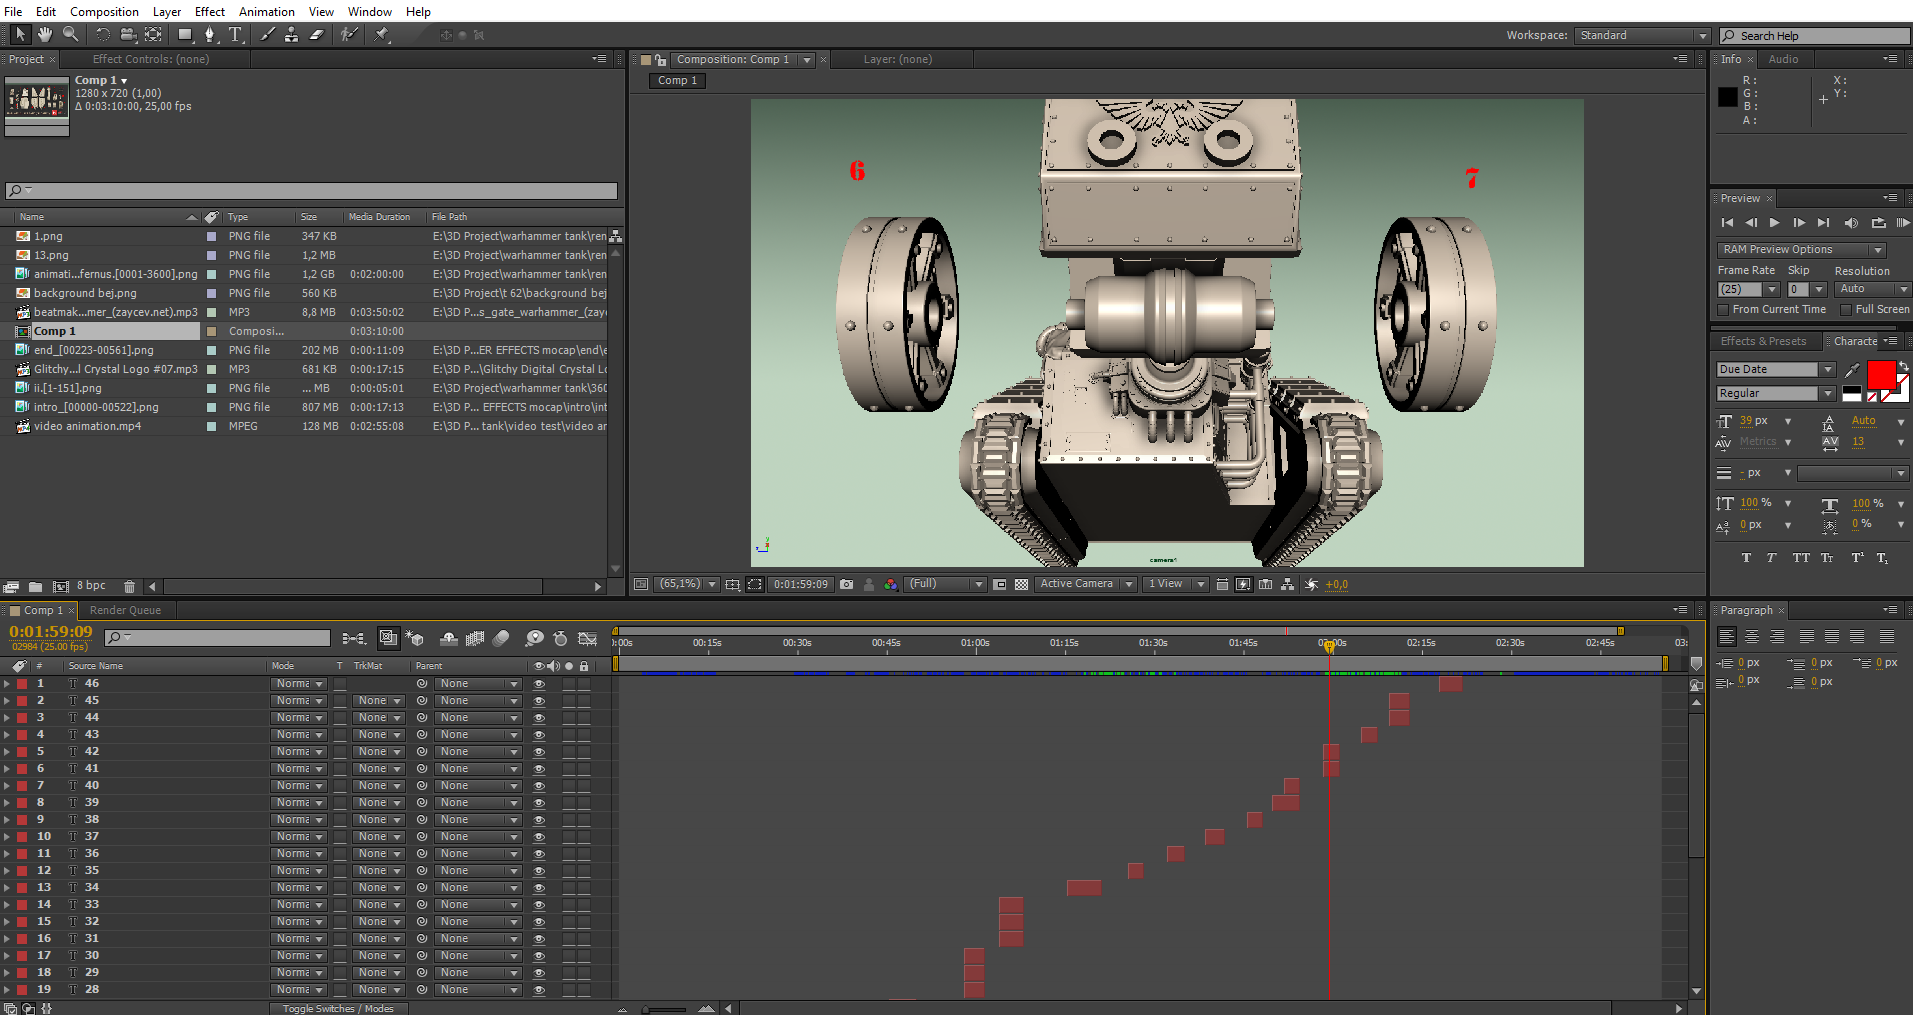
Next, you need to create a video of your 3D model’s assembly process (in case the model is in assembly form if it’s a static figure you simply will want to show it from all angles in the video). For Malcador Infernus 3D model we create the animation in MAYA modeling software and export it using the Playblast feature.
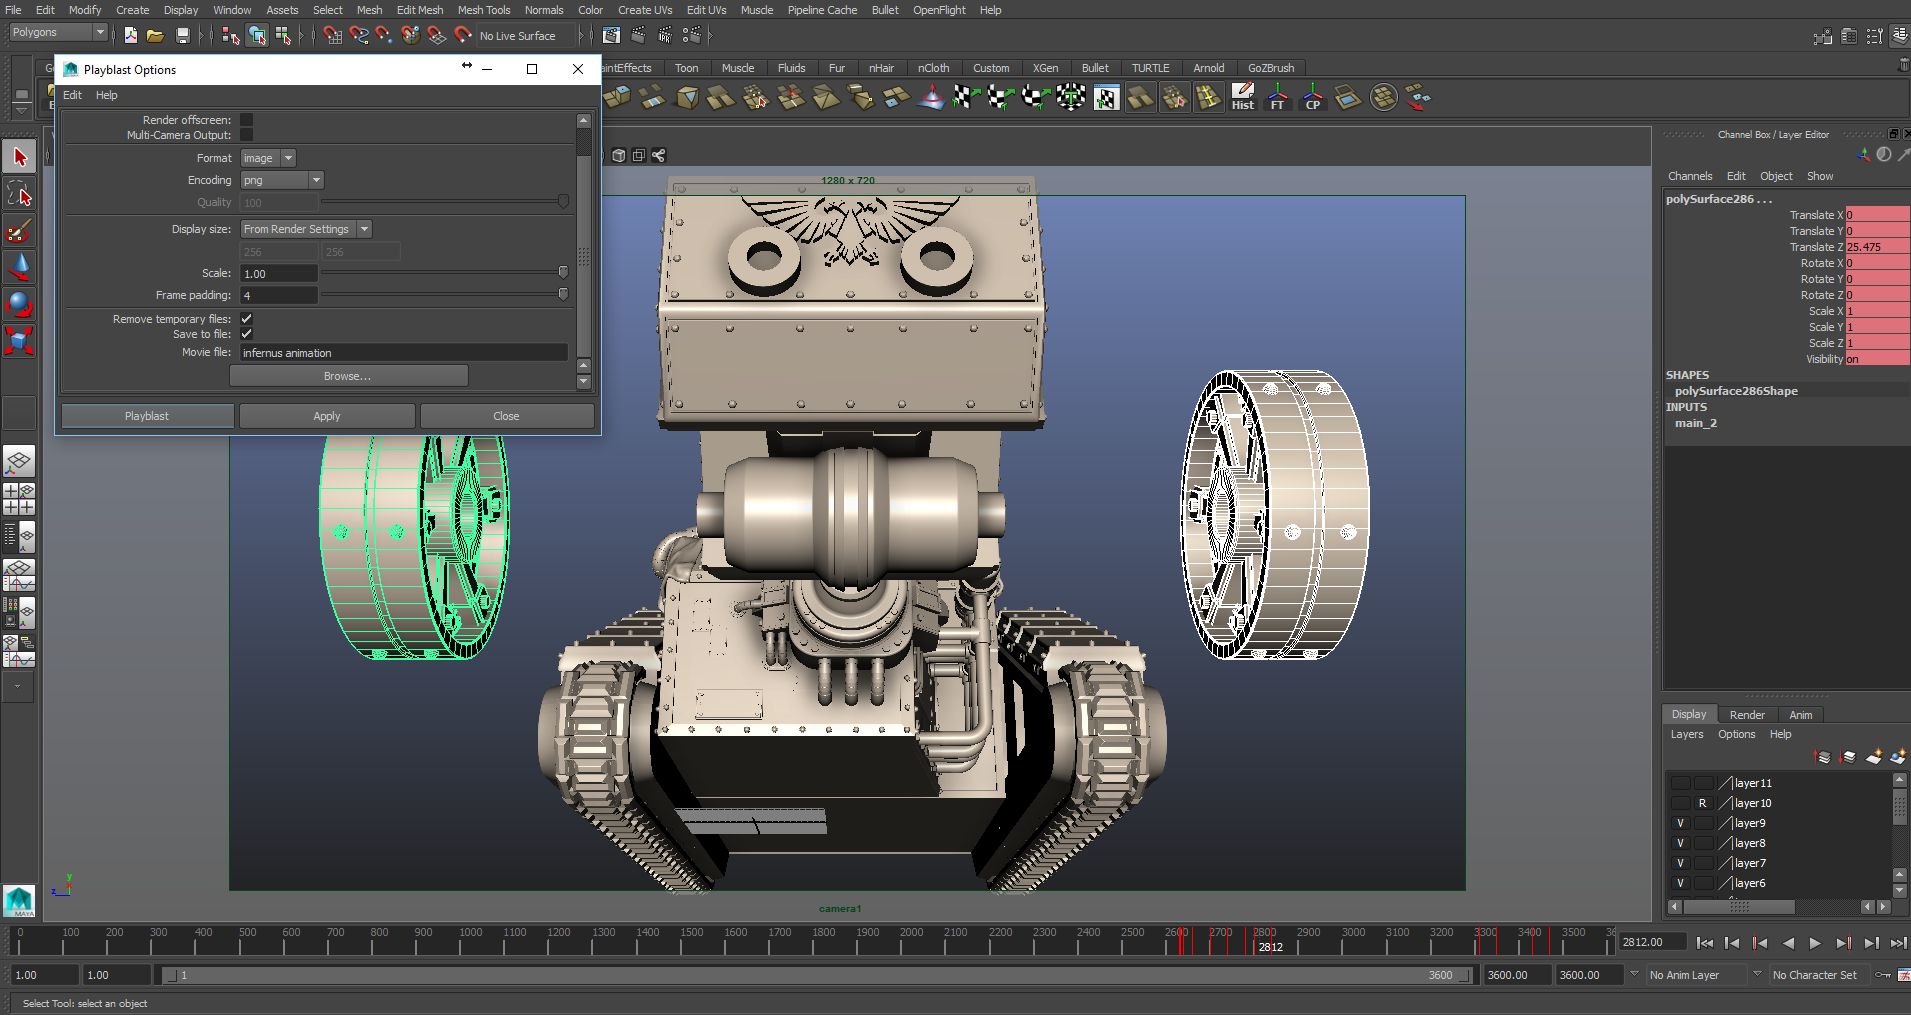
Then, we edit it in Adobe After Effects.
When the steps described above are complete, you can go ahead and upload your 3D model on www.gambody.com.
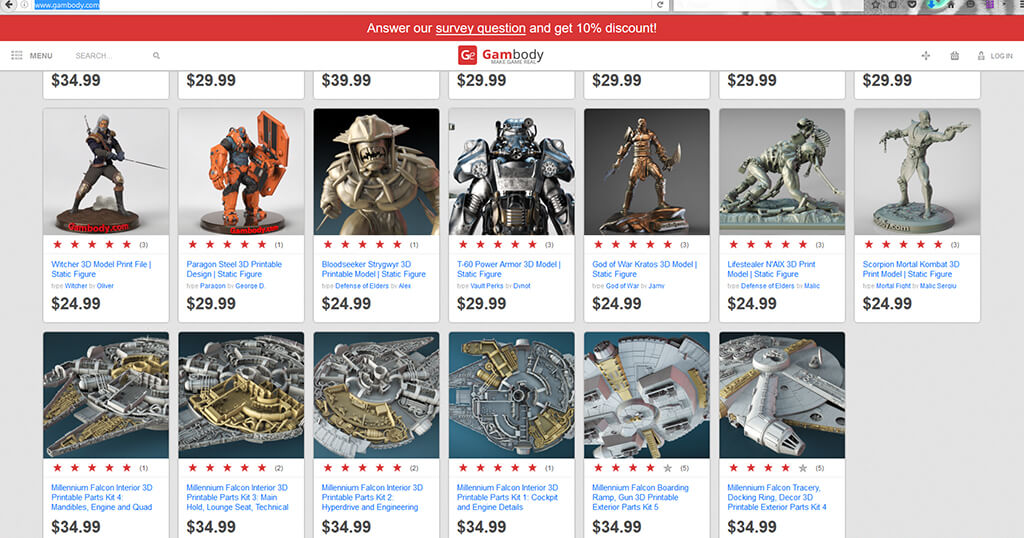
This is how the marketplace’s home page looks like.
Sign up or log in with gambody.com
If you don’t have an account yet, you can sign up using your personal email or, you can simply log in using your Facebook or Twitter accounts.
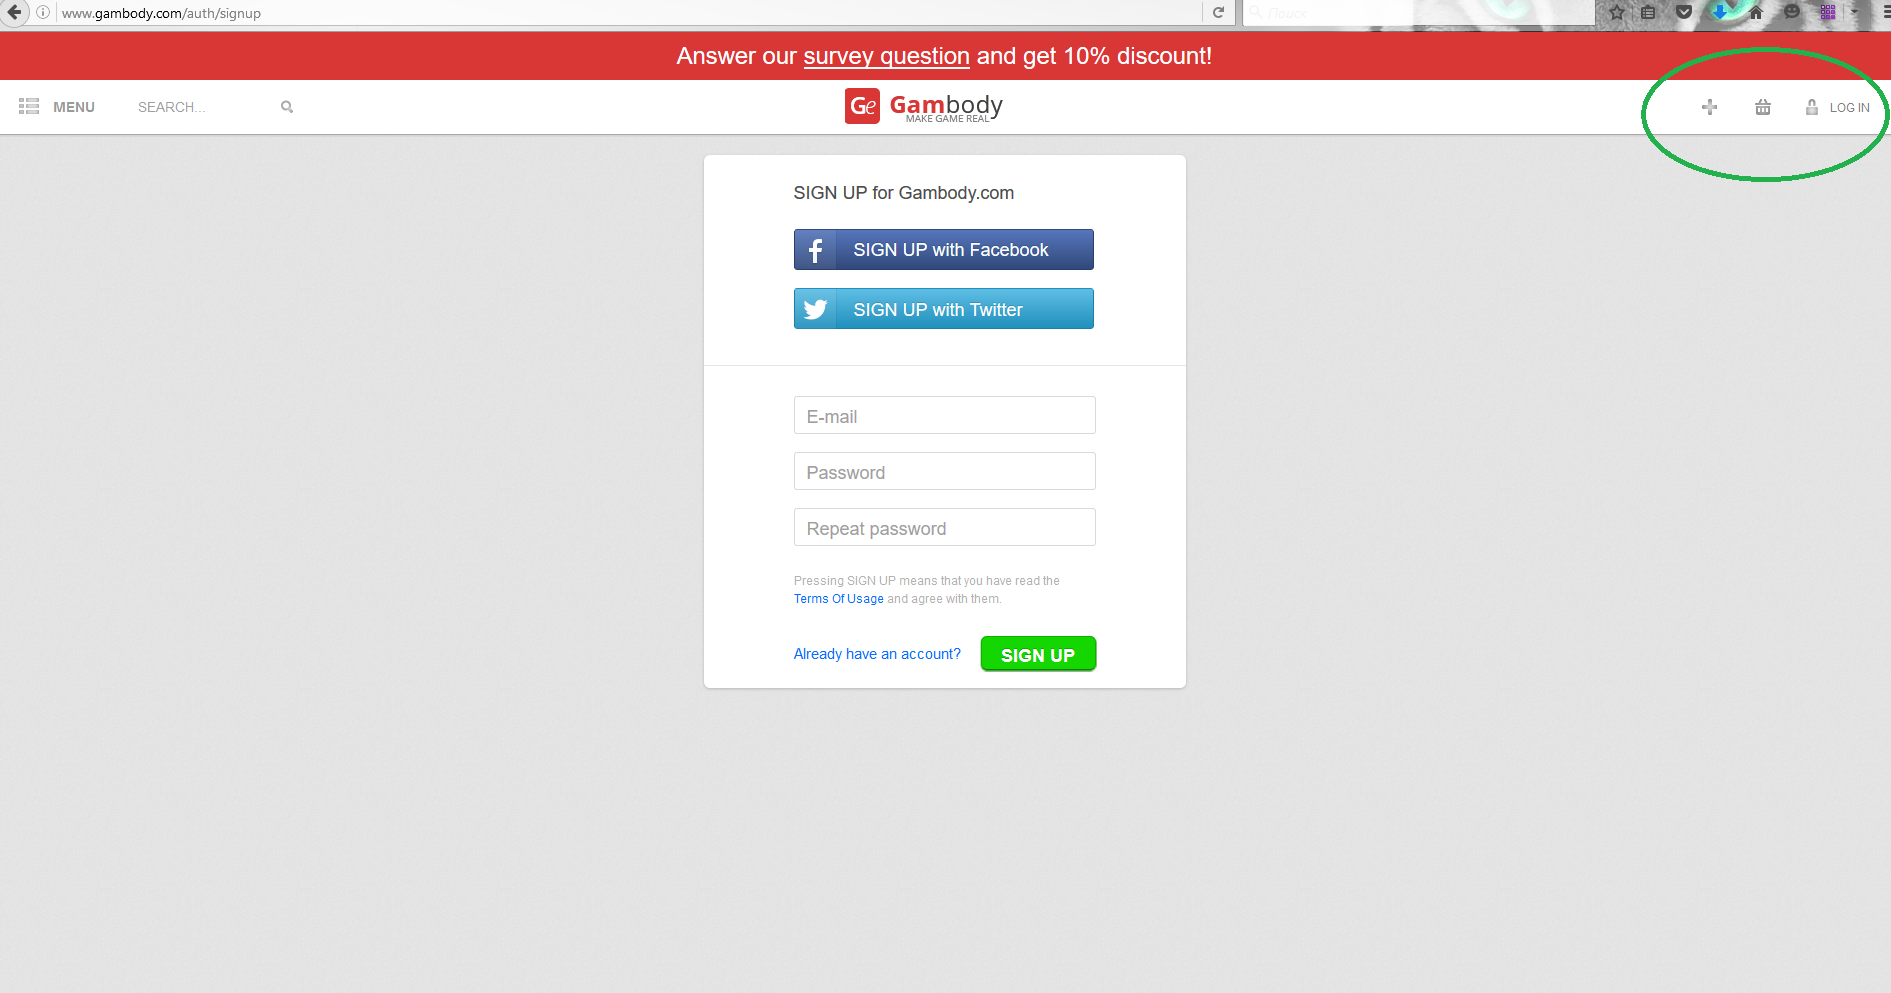
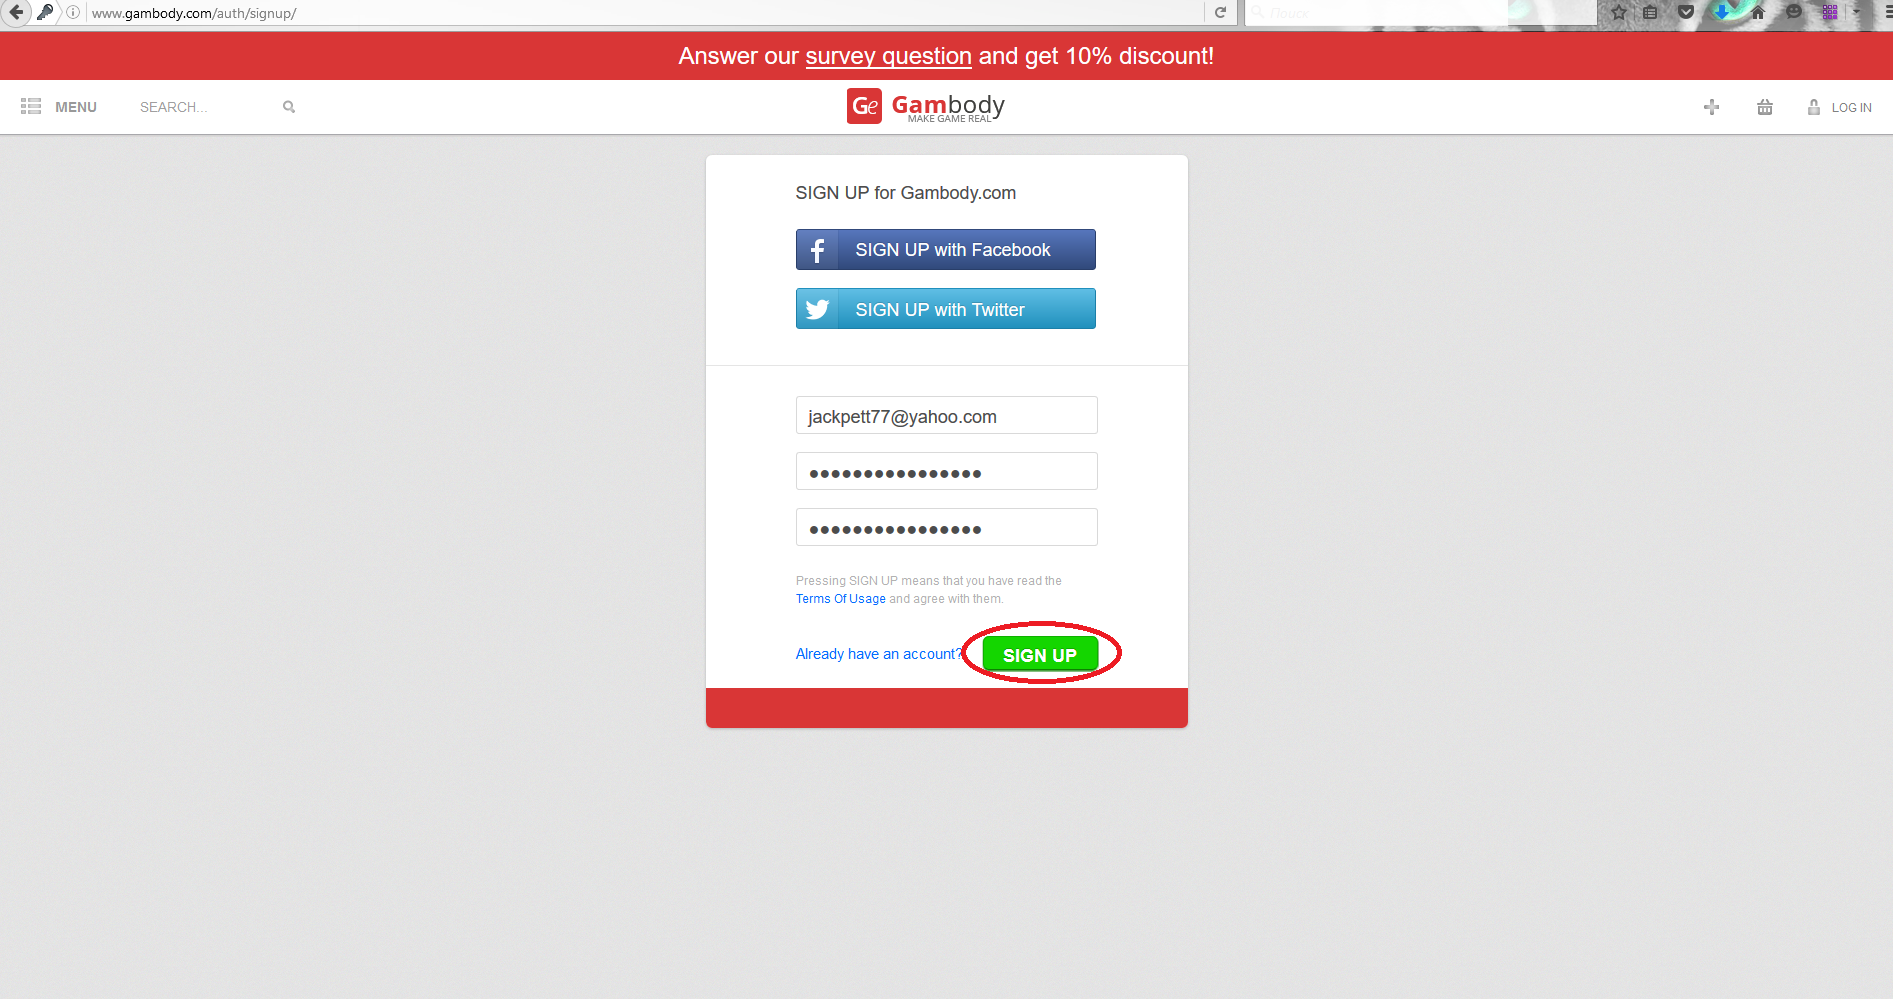
Signing up is easy. You enter a valid email address, create a password and hit SIGN UP button. A confirmation email will be sent to your inbox.
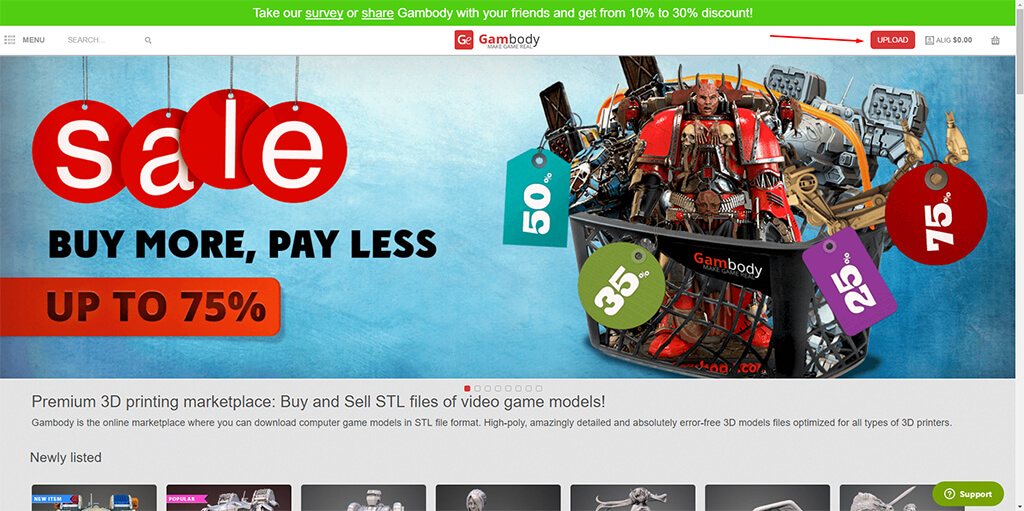
Once you’ve signed up, you can log in and explore the page designed for 3D model authors. On this page, you can upload and create your own online shop of 3D printable models. Here’s what you should do to optimize the model’s profile that will be displayed on Gambody’s homepage, once it is approved by the moderator.
Add a 3D model for sale
Step 1. Click the Upload button at the top right corner of the page (follow the red arrow in the screenshot to find the button easily).
This is how the Upload page looks like.
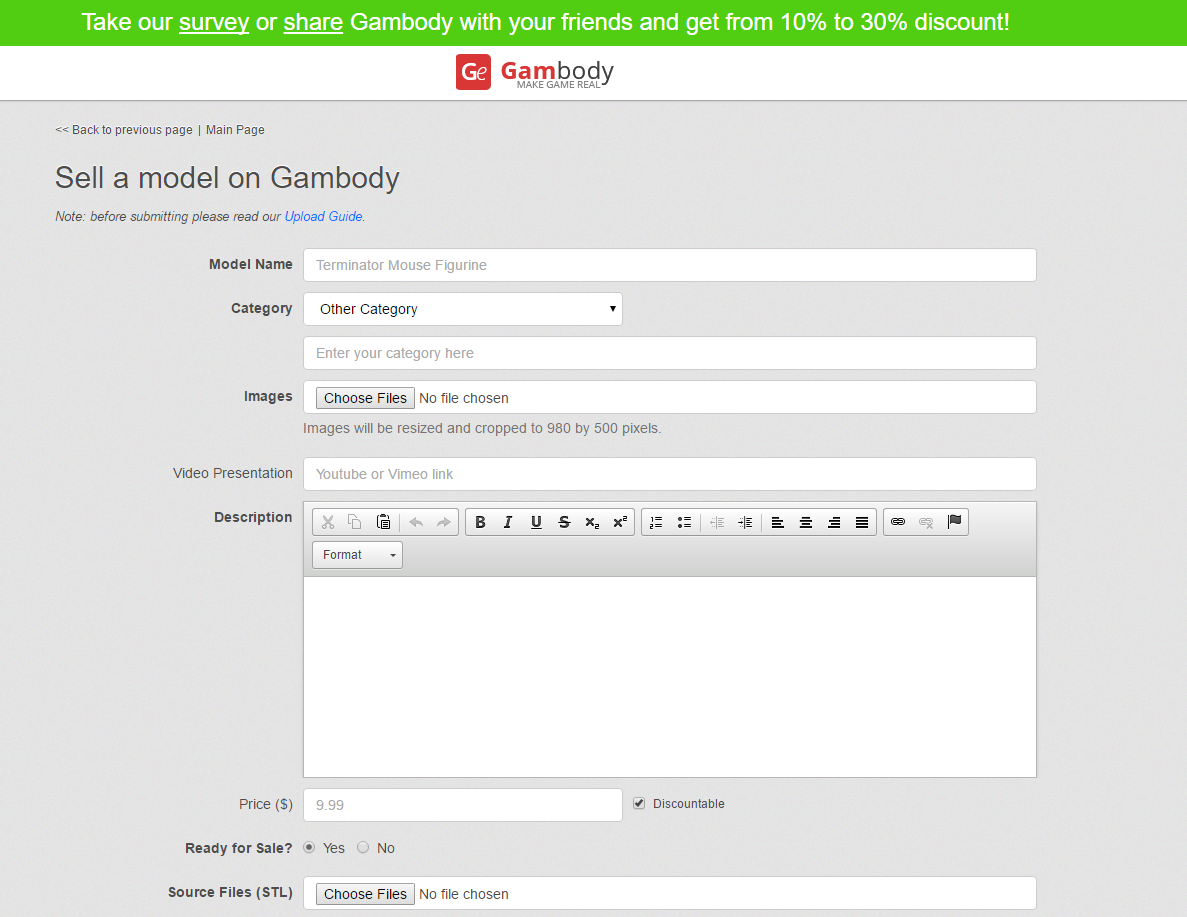
Step 2. Write a title for your 3D model
Every item that is displayed on Gambody’s homepage must have a title. Your title is the very first thing a potential buyer sees, so it’s important to be informative, concise and professional. Include the most relevant information only, and avoid fluff. A title full of vague advertising buzzwords is less effective than one that is clear and descriptive.
Here are several hints about writing a title for your model.
The Limitations
- Must be no more than 70 characters including spaces
- English characters only
Examples of Good Titles
- “[Model name] 3D Print Model [File Name (STL, OBJ)]” – Capitalize the first letter in each word. Small words like “of” and “an” may be lowercase.
- “Print Model of Engine in STL” – Capitalize acronyms and abbreviations like STL.
Examples of Bad Titles
- “THIS IS NOT ACCEPTABLE” – Do not use all caps.
- “this is also not acceptable” – Do not use all lowercase.
- “Beautiful 3d print” or “The Unique 3d print” – Do not use subjective words like brilliant, amazing, or best. These words describe your opinion rather than what the file actually is, and aren’t helpful for potential buyers.
- “User9909 – File Name” – Do not append your username or any other less-relevant information to the file name.
- “Apple-like Design” – Do not describe what your item is similar to in its title, describe what it actually is.

For Malcador Infernus 3D Model we used the vehicle’s name as it is known by gamers, thus increasing the chance to be found by buyers. The title is 54 characters long, including spaces. It consists of English characters only and it provides valuable information about the model, such as that this particular model is in assembly form.
Step 3. Choose the category your 3D model falls into.
The category section is a drop-down menu box with multiple options to choose from. The category titles are descriptive of the models that can be added to them.
Gambody’s marketplace has many category names available. Take your time to study each and every one of them to make the best decision as to where your model fits in.
Our model, Malcador Infernus fits into the category of Hammer of War items, because the model is inspired by Warhammer video game prototype.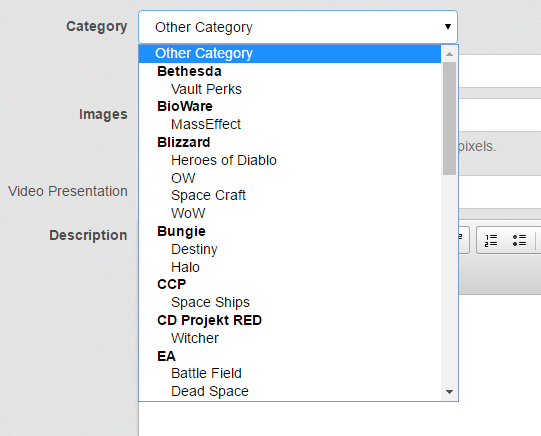
*If you don’t find a category from those available on the site that best describes your 3D model, enter your own. If the 3D print is from a video game, enter the full title of the video game.
Step 4. Click Choose Files button.

This upload box enables you to upload 3D model’s model pictures. When clicking the button, select all the picture files you want to upload for the model. Attempting to upload the files one by one will replace the previous one with the one you subsequently select to upload.
Model pictures tips
The preview images must be a graphic representation of your 3D model. The more thumbnails you upload, the bigger the chance for your model to be purchased.
- Upload high quality, clear unpainted images of the 3D model
- Upload at least 8-9 pictures of your model from different angles
- Upload screenshots of the model from Repetier, Cura, or the 3D printing software you use and is compatible with 3D printers.
For Malcador Infernus 3D model we upload the pictures we prepared in KeyShot and Adobe Photoshop programs and have written about in the first part of the article.
Step 5. Add video URL for your item.

This is the box you need to provide the link to your model’s video.
Note: Upload the video you created to www.youtube.com and insert on www.gambody.com only the link to the said video.
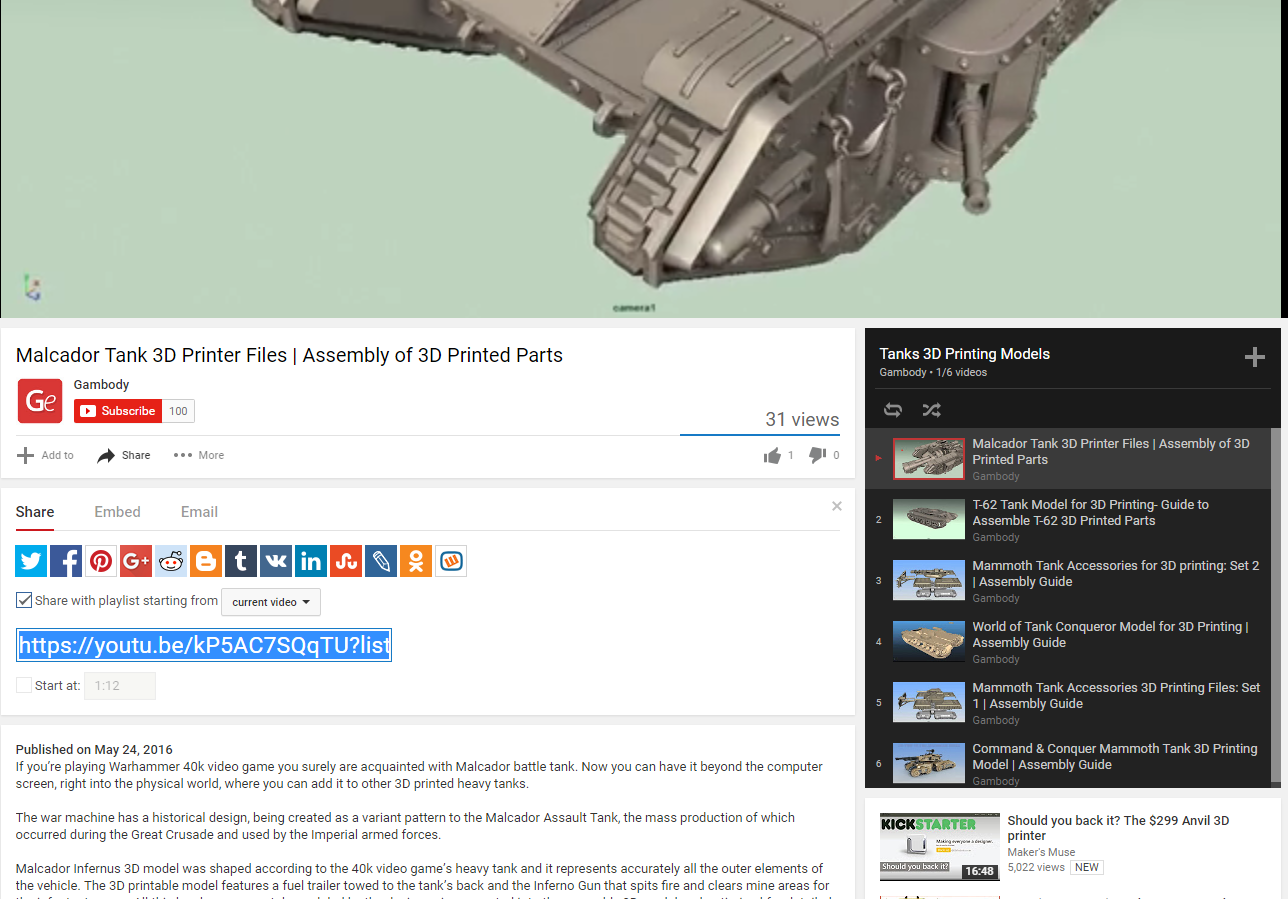
Don’t forget, Google loves unique copy. Therefore, if you want Internet users to come across your model’s video in search engines, provide a description. Refer to where you got the inspiration to create the model. Highlight the model’s best features: size, assembly/static, how many parts it consists of. See below YouTube screenshot picture of Malcador Infernus video profile and see the description under the featured video.
Watch the video of the entire assembly process for the 3D model. We’ve described the process of putting together a presentation video of Malcador model’s assembly above.
Step 6. Describe your 3D print.
Write a detailed, unique description of your model, no less than 300 characters long and printing details that apply to your model.
Write a description of your model
Describe where did you get your inspiration from to create the model, how it can be used or, specify how unique it is, and make sure that you reach your buyers with clear information about the model.
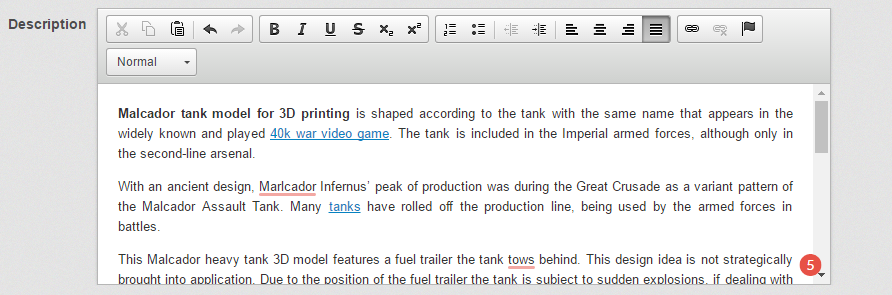
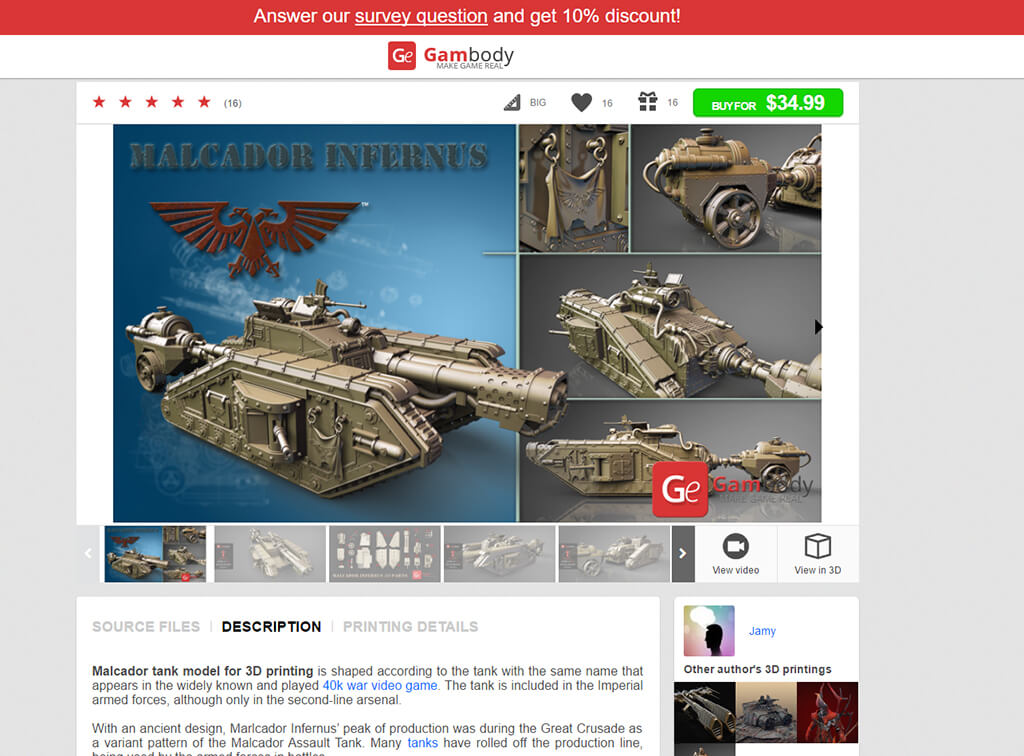
This is how the description box looks like from your model’s upload panel. In this example, you can see the description box with the copy for Malcador Infernus 3D printable model.
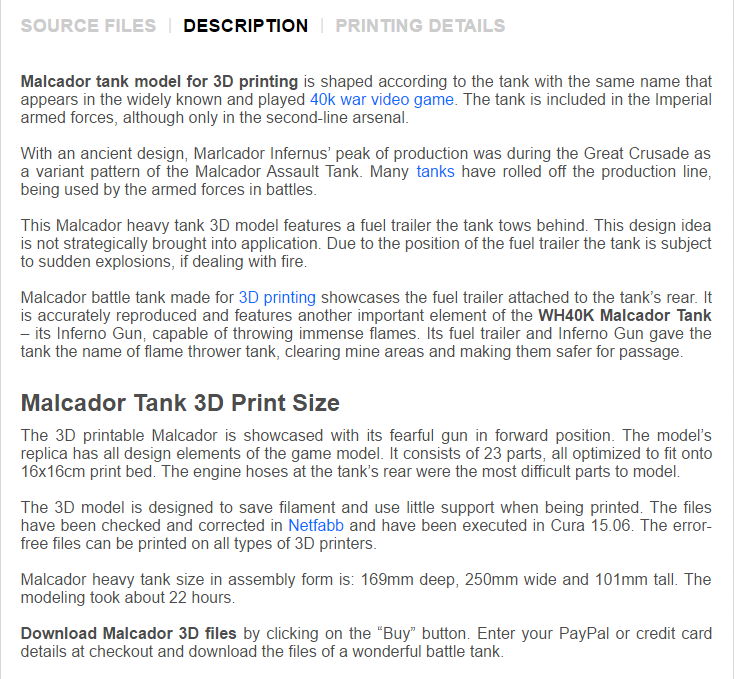
We’ve written a detailed description for Malcador Infernus 3D model, counting 334 words. This is how the copy is displayed in Description tab of the model, after getting published on the site.
External links that a user can add in the description and are accepted:
- No more than 2 links pointing to model’s Wiki page, 3D printing tools or software used for designing the model.
Step 7. Set a price in USD.

We are adepts of fair trade rules, where everyone has the right to evaluate his work and to charge for it as much as he wants. This creates real market competition among modelers and their shops which are competing to improve quality and to provide advantageous prices to increase sales. This is why all modelers are allowed to charge the price themselves as well as set the amount of discount.
We’ve integrated the option of enabling or disabling discount for a 3D model you upload on our website (put or remove the checkmark in the box next to Discountable option). You can later either disable this option, by following these simple steps.
- Go to My Shop section.
- You will see a list of the 3D models you uploaded on the site.
- Next to each 3D model, there’s the Allow discounts option.
- Remove the check mark in the box to disable the discount for the 3D model.

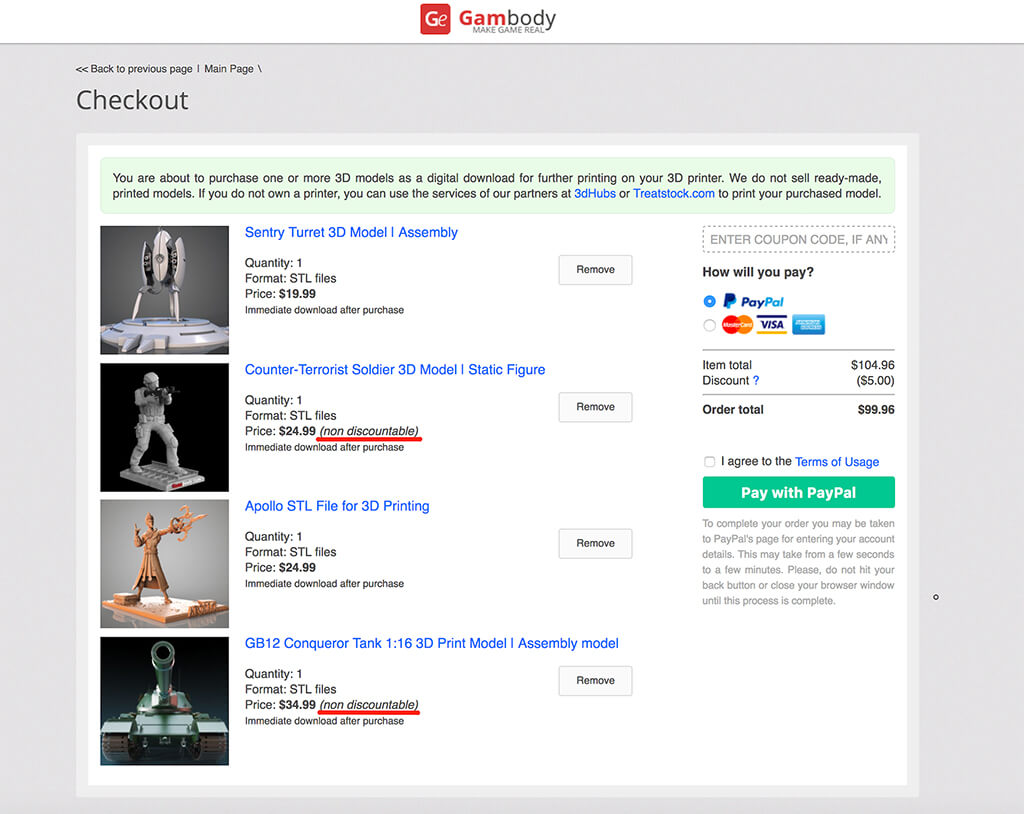
You can see below how a shopping cart, with the non-discountable items, looks like and how the The More You Buy, The Less You Pay promotion scheme applies to the items in the shopping cart.
Tip: Before setting a price for your work, have a look at our platform and check the prices for similar items so as not to charge a too high price, which might cause low sales.
We set $34.99 price for Malcador Infernus tank because it is an assembly model, it requires more time and effort to model. Similar price is set for other assembly models that are for sale on our marketplace.
Step 8. Choose Ready for sale.
![]()
![]()
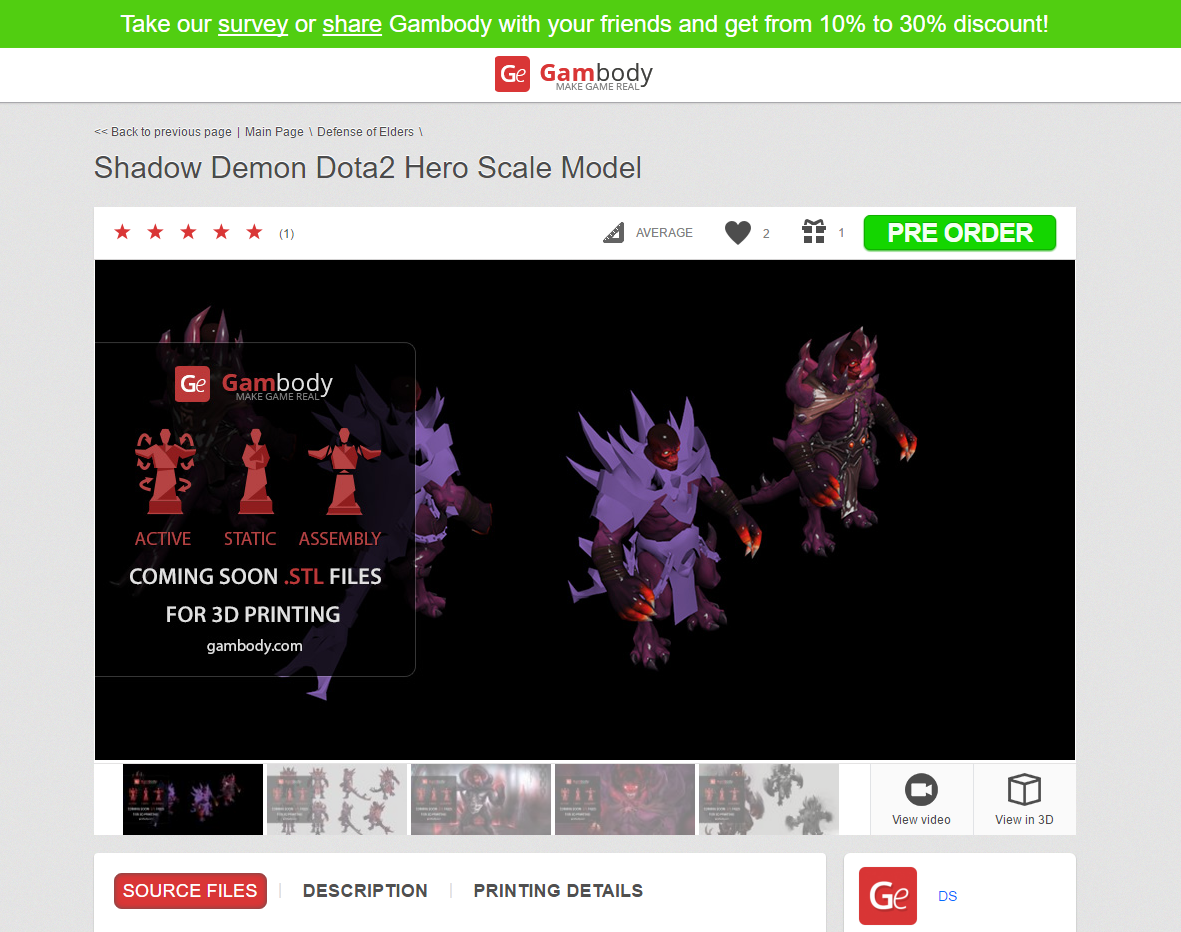
If you choose Yes, it means that you are ready to sell your 3D model (you provide the STL files for the model). If you choose No, your 3D model will appear in pre-order. This means that you will have the chance to receive feedback as to how many people are willing to buy the 3D model that is in pre-order.
Here’s how the page for a pre-order 3D model looks like.
Step 9. Source files
Our marketplace supports 3D printing files in .STL format. Your filename and size will be seen in “Source Files” tab.
![]()
![]()
Note: Gambody prides itself on offering error-free STL files of game-related models to its clients. Therefore, prior to uploading your own files, make sure that they are error-free and that the customers will be satisfied with the printed result.
Just like for images, if you have more than one STL file to upload, select all of them and make a single upload.
For Malcador 3D model we upload those 23 STL files we’ve prepared and repaired in Netfabb.
Step 10. Write printing details
It is advised to write printing details for your model. Include printing settings that ensure that the model is printed with high fidelity. Look through the printing details for other models added on Gambody to have an idea on how to do it properly.
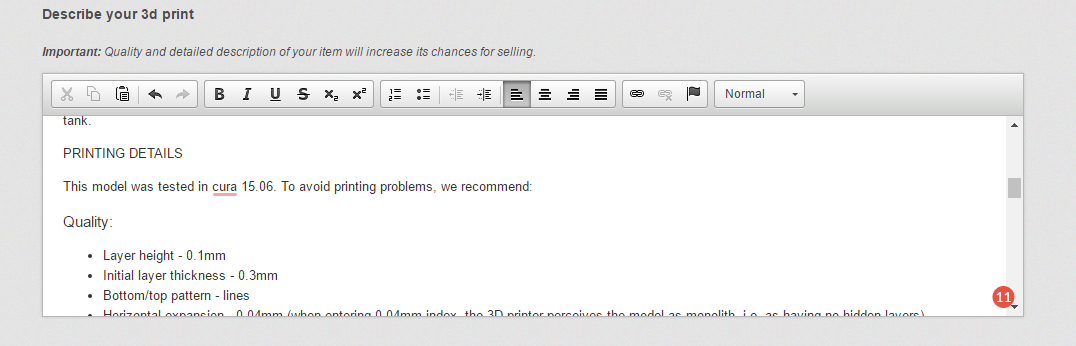
Add printing details below the model’s description text.
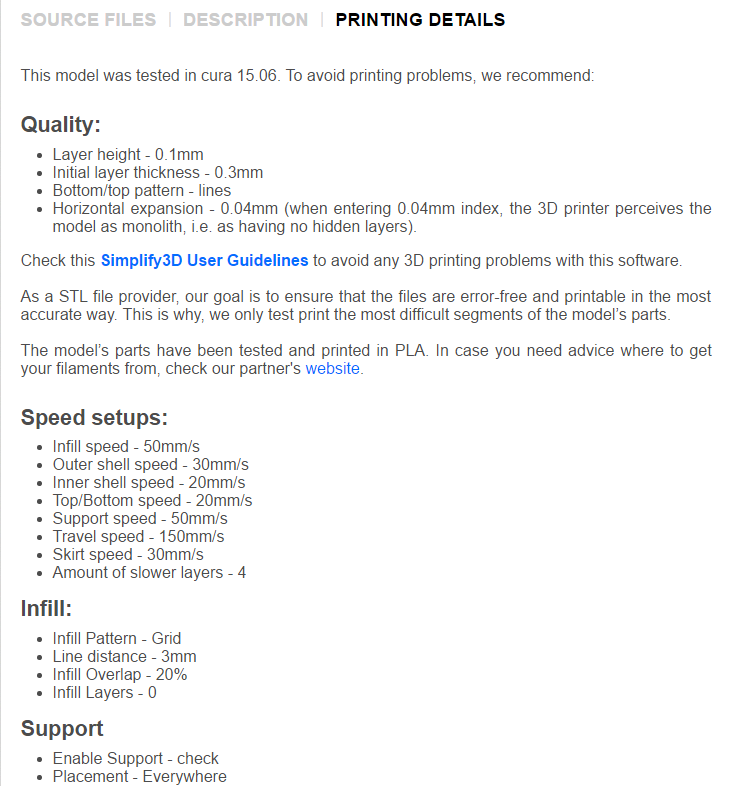
This is how printing information is displayed in Printing Details tab on the model’s page, in our case – Malcador Infernus model.
Step 11. Model type
There is another drop-down, three-option menu. Below, a definition is provided for every model type that you can choose from.
Static figure refers to a statuette representing a creature.
Action figure stands for a poseable character model based on a video game, film, comic book or television program. It has articulated limbs which are put into motion with an interior mechanism.
Constructor figure stands for models made of more parts that must be assembled.

Our Malcador 3D model is a constructor type model, that’s why we choose this option in the model type box.
Step 12. Insert number of parts the model is made of.

Malcador Infernus model consists of 23 parts. Therefore, we enter this number in the box, as shown below.
Step 13. Print size (mm).
Include the size of the model. This information can be provided in millimeters. Tip: you can get this information from your modeling software.

This is the size in millimeters for Malcador Infernus 3D model.
Step 14. Enter keywords
Keywords are reference points for finding information related to the word entered into the search engines to generate data results. They are words or phrases describing your product.

For our model, we used the following keywords: 3D malcador infernus, 3D model of malcador infernus, malcador infernus from warhammer 40k, 3D printable malcador warhammer 40k, buy 3D malcador tank, order 3D malcador infernus, 3D malcador infernus for sale.
Adding 3D model, 3D printable, 3D print words to the model title increases the chance for your model to be found by those who are interested in buying a 3D model for printing.
Use keyword generators to help you identify the keywords that get the most search results. Keywordtool.io is a great resource for this purpose.
Step 15. Click Submit for Review button
It might take a while for the information to be sent and recorded in our database. Please be patient and don’t refresh the page if you see the message below.

All the information will be sent to the site’s moderators to be checked. If the moderators decide that the provided information is correct and accurate, your model is displayed on Gambody’s home page, with the NEW ITEM tag.
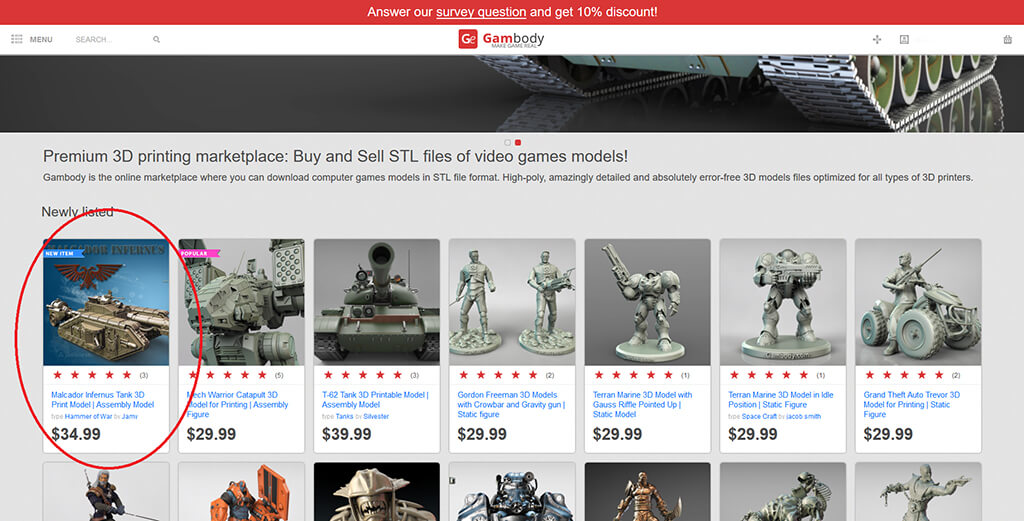
When you click on the picture, the model’s page opens where every user can see the photo slider, the video, the model’s description, printing details and the model’s source files tabs.
So, now, your 3D model is live on our online marketplace and you can start checking on your sales.
Buy Warhammer Malcador Infernus 3D model
The procedure is not difficult. You will need no more than 30 minutes to upload a model on the website. However, you have all the tools to create your own online shop and advertise it among your friends and friends of your friends and thus reaching a wider audience.

Best Tips on How to 3D Print Without Supports
Read Article
Trending 3D Printed Toys STL: Dragons, WOW Characters, Villains
Read Article