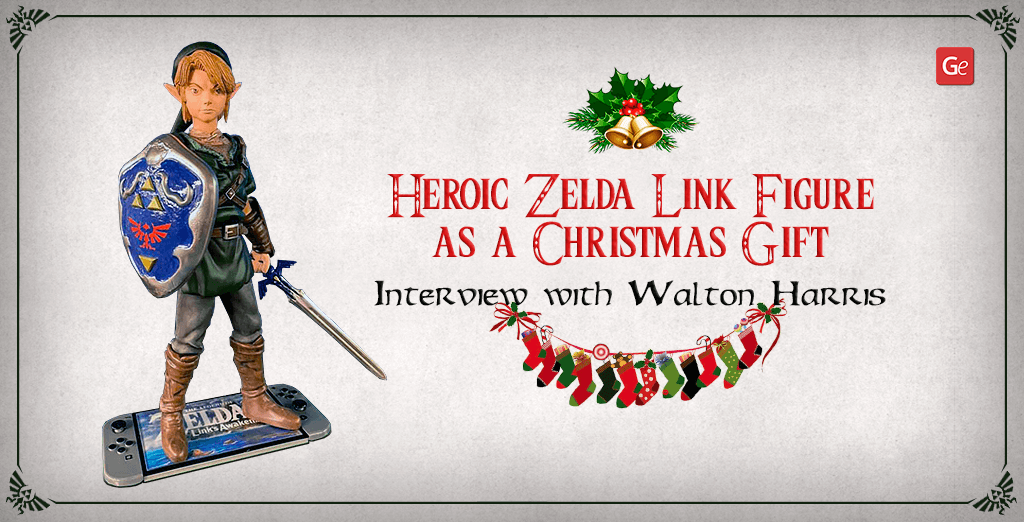
Gambody community loves stunning 3D prints shared by its members. One of the most recent shares was Zelda Link figure. Walton Harris crafted it for his daughter, as a Christmas gift. And this present looks unique, filled with love and many fantastic details.
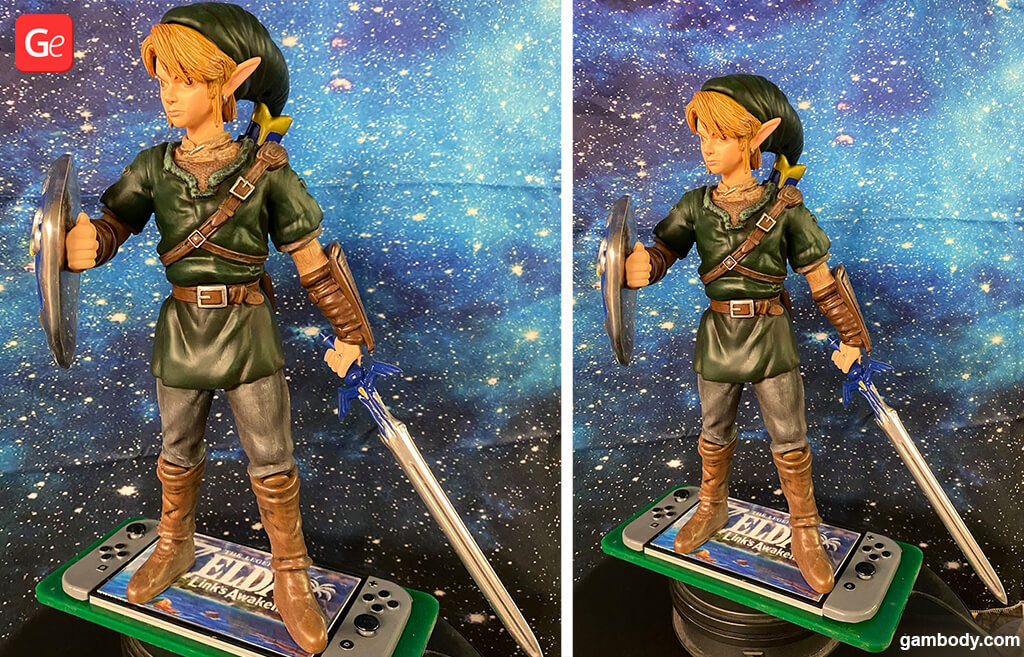
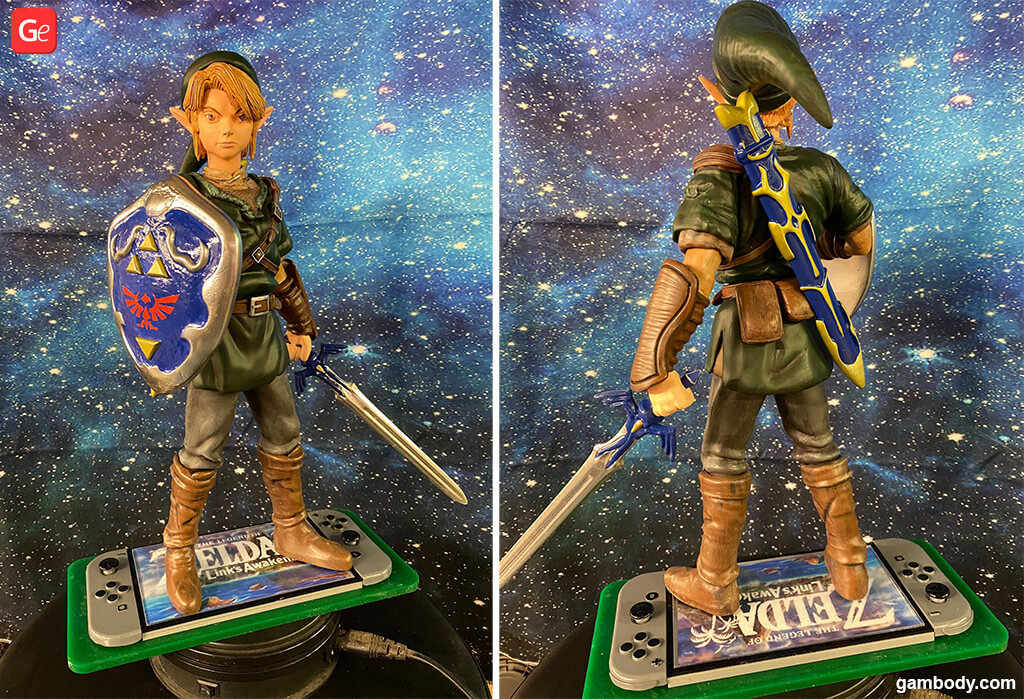
Walton’s Link is built and coloured as an adult character. The elf from the video game wears a green elf hat, green outfit and brown boots. The look is completed with a sword and a shield.
About Zelda Link Character
The most famous character from The Legend of Zelda video game loves adventures. Link is known as a brave, courageous boy who carries the Spirit of the Hero. He does not always appear as an adult in the franchise. He is often portraited as a little boy.
For Christmas, Walton chose to download STL files with Zelda link figure to 3D print. The files are available on Gambody – Premium 3D printing marketplace. This is an adult version of the famous hero. Its designer is J.Bardo.
It is possible to craft the Zelda Link figure as a one-piece model or assemble it from 7 or 18 parts (depending on the type of your 3D printer).

Zelda Link Figure: Interview with Walton Harris
It was a real pleasure to discuss the creation of Zelda link figure with Walton Harris. Gambody team is happy when hobbyists choose to 3D print famous characters and statues as a Christmas gift to relatives and friends.
1. Hello, firstly, Gambody community finds your Zelda Link figure stunning. It looks like you are professionally fond of 3D printing for several years. Is it so? Do you remember when you 3D printed your first model?
I think I started 3D printing around 2012 with a PowerSpec from Micro Center.
2. You mentioned that Link, the Hero of Winds, is a Christmas gift for your daughter. Does she play The Legend of Zelda, or are you a fan of this video game?
She is a gamer and loves the Zelda games.
3. The Link 3D printing model was made on your ELEGOO Mars resin 3D printer. Which settings did you use? Did every part print well from the first attempt?
See pic for the Mars printing settings:

All parts printed great. However, I reprinted the shield because I forgot to hollow it out.
4. Which filament brand did you work with?
I used ELEGOO Grey resin.
5. Did you experience any challenges when crafting this fantastic Christmas gift?
The biggest challenge was the silver paint used on the shield and sword of the Zelda Link figure. I used Molotow Liquid Chrome. It looks great and goes on smooth, from the pen or an airbrush, but does not like clear coats over it. It also does not like being touched. The only clear I have found so far that doesn’t dull it is Alclad II Gloss Klear Kote.
6. You wrote that the base for the Hero of Winds from The Legend of Zelda game was the custom cut acrylic base. Did you make it yourself?
I did.
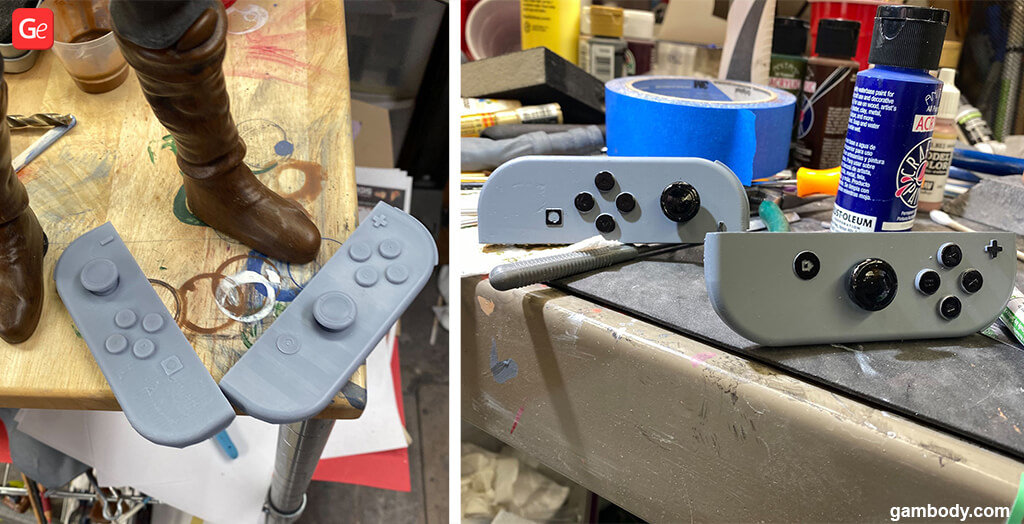
I wanted it to look like a Nintendo switch, so I found some joycon models on Thingiverse and cut the rest out of acrylic on my Glowforge 3D laser printer.
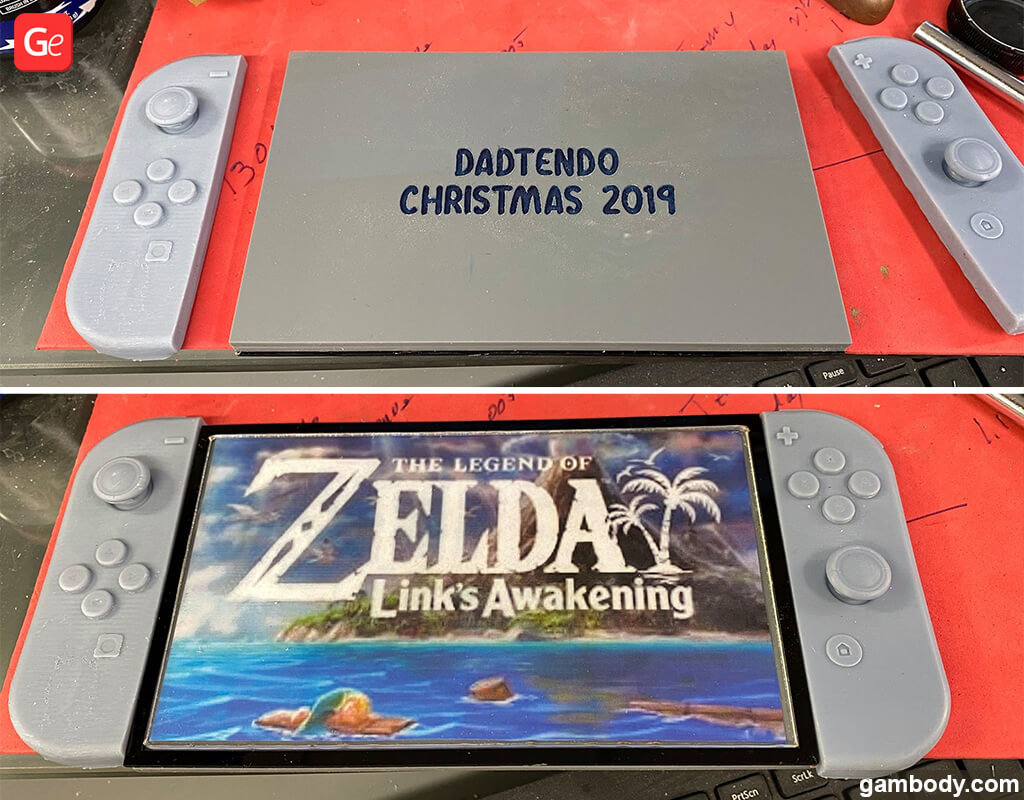
7. Whose idea was it to add a removing glass to the Link base to change screen pictures underneath? Was it a complicated project to turn into life?
As I was completing the base, I realized it would be cool to not glue the clear screen cover in so she could change the picture.
8. Your figurine is 14.5 inches tall (37 cm). Did you scale the original STL files?
I scaled it 175%.
9. The painting job is outstanding. Can you describe this process in more details? Which painting method, paints did you use? How did you pick colours?
Like all my models, I sand then prime with Badger Stynlrex grey. Because the Zelda Link figure was cut on natural lines, I painted the parts before assembly. This isn’t always possible, but it is a considerable advantage when possible.
For most pieces, I paint with this process. I paint the primary colour, for instance, the green shirt and hat. When that is dry, I seal it with matte acrylic spray. This is an essential step because 1) your next coat won’t soften and ruin the previous layer and 2) if you have to wipe the next step off due to error, the prior layer stays in tack.
So, after the primary colour, I do a dark wash.
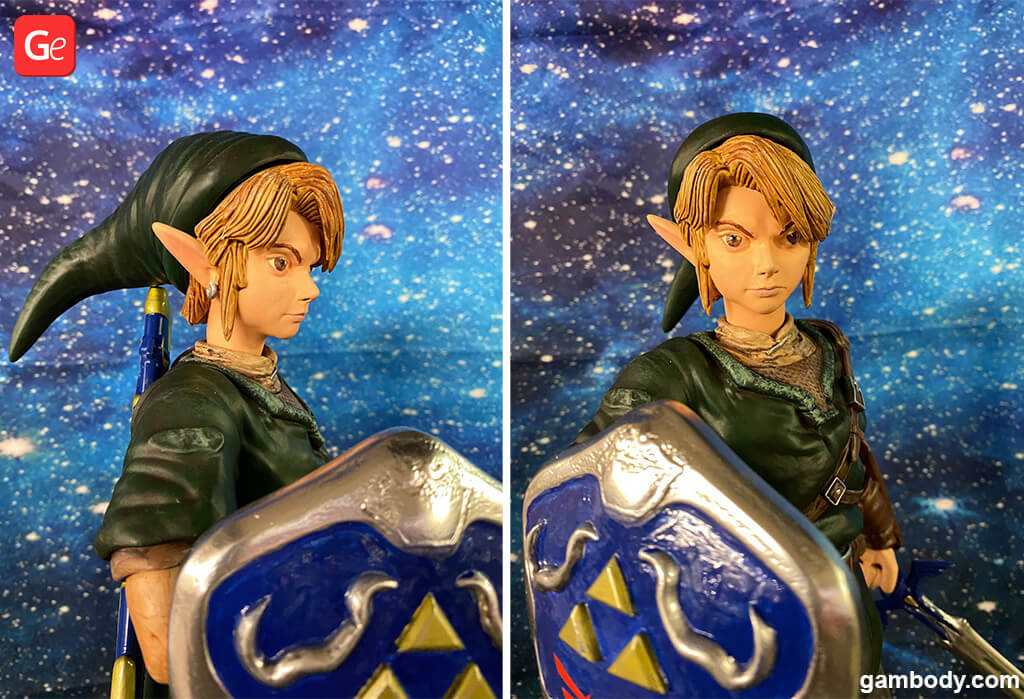
In the case of the green top and hat, you could do a darker green or black. I used a colour called soft black, thinned just a bit. I brush it on, then use paper towels and sometimes wipe it off. This brings depth to the piece by accenting the shadows.
Then I apply a clear coat, once everything has dried.
To finish up, we will take a lighter shade of the primary colour (green in our case) and dry brush it to accent the highlights. It’s vital to get the brush pretty dry to ensure you’re only adding subtle highlights.
Pay attention to seams and stitching on clothing as well as sharp edges and ‘higher’ (bumps/bulges). Then add a clear seal coat once the colours have dried. In some cases, you could make 2 dry brush applications with varied colours for even more depth.
10. Was there any reference for the Zelda Link figure for more original painting?
When painting, I always get on Google images and search for reference pictures, then print out 3 or 4. Sideshow collectables is also a good website for painting reference.
11. How did you paint the human skin to make it look so real, along with straw-coloured hair and shining eyes of your stunning Zelda Link figure?
The skin is flat flesh by Vallejo, some rose on the lips and edges of the eyelids.
Sometimes I apply dry brush of a little lighter colour for the highlights of a face, like chin and cheekbones, as well as a slighter darker flesh in the crevices for depth.
The hair is all done with several steps like described above. I light tan primary colour, apply the darker brown wash and several dry-brush coats each one getting a little lighter in the shade.
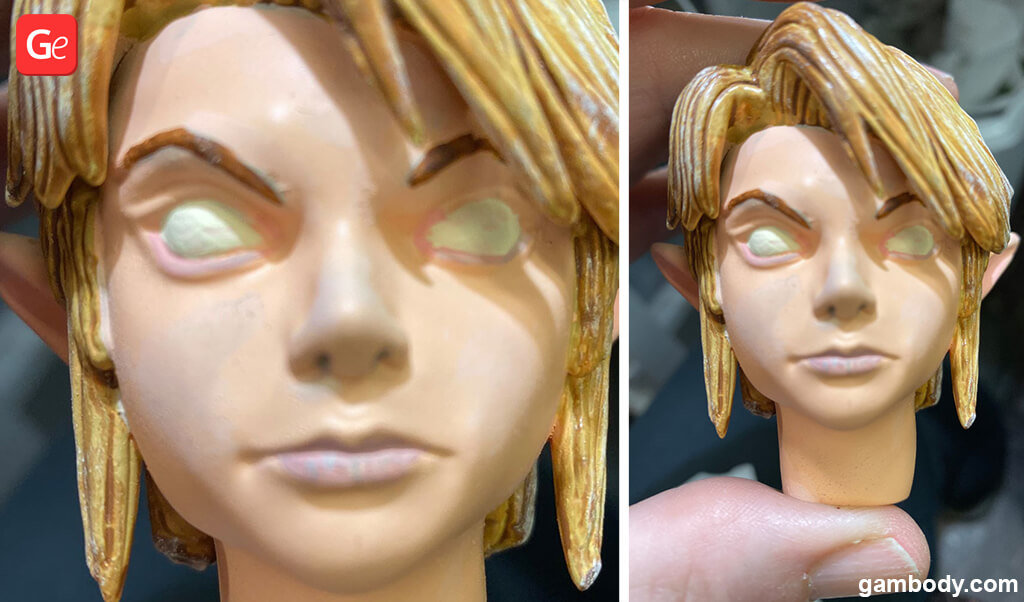
The eyes are decals I printed on my inkjet printer on decal paper, then applied. Once the decal is completely dry, I use a gloss clear coat to make them shiny. Future floor polish also works great.
12. How many hours did it take you to make this stunning Christmas gift?
I honestly don’t know for sure but would estimate 30 – 40 hours.
13. Are you 3D printing Christmas gifts for other members of your family or friends?
Yes, I am also doing a Darth Vader, Katniss Everdeen and White Power Ranger. As well as printing and priming a Godzilla and Demogorgon. Those 2 will be given with all the supplies needed to complete.
14. Does your daughter know that she will find Link from The Legend of Zelda under the Christmas tree?
She does not.
As a final word, thanks to all who have expressed interest in my work, I always appreciate it. And offer this advice to all makers. You have got to enjoy your hobby to excel. If you find yourself frustrated, take a break and give it another go later.
Gambody team has no doubts that the fantastic Zelda Link figure will be a stunning and unforgettable Christmas gift. We wish everyone a very Merry Christmas and hope to see more incredible 3D prints shared in Gambody group on Facebook. Ho! Ho! Ho!

Trending 3D Printed Toys STL: Dragons, WOW Characters, Villains
Read Article
Most Popular Types of 3D Printers & How They Work
Read Article