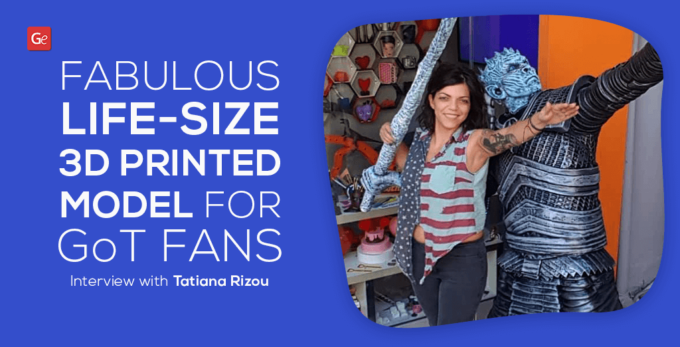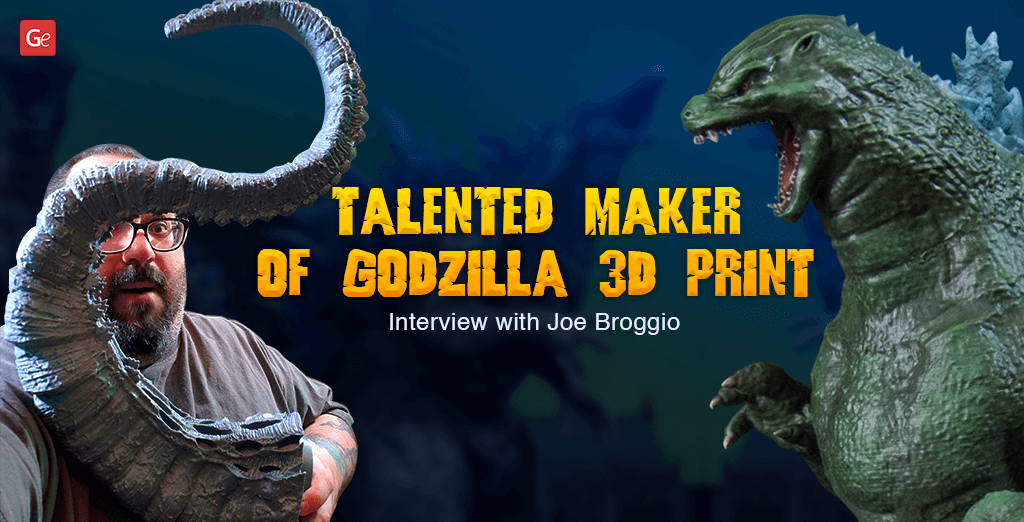
3D printing crafters are very talented, hardworking, and patient people who are in love with their hobby. They spend many hours producing impressive 3D prints, and peering into their projects and lifestyle can inspire you. Joe Broggio is one of the crafters who enjoy 3D printing. We are happy to share our interview with this talented American enthusiast and show you some fantastic photographs of his 3D printed Godzilla figure and other works.
Joe posted stunning images of his figurines and statues to the Gambody Facebook Group. Each of his 3D prints attracted much attention within the community, especially Godzilla Hybrid and Heisei Godzilla figure.

Right now, Joe is working on his latest Shin Godzilla model. He gladly talks about his past and current projects, recalls his 3D printing experience, discusses different types of 3D printers for beginners (FDM and DLP), and shares useful tips and tricks on how to paint 3D prints with other hobbyists.
1. Can you introduce yourself and tell us when you have fallen in love with 3D printing? What has inspired you to make your first 3D printed model?
My name is Joe Broggio, and I’m from Iowa, USA. I work in IT, and am a big fan of all the Godzilla movies – the first one I saw was Godzilla vs. King Kong when I was a little kid, and it made a big impression on me.

I haven’t been 3D printing for very long. I bought my first 3D printer in May 2018. I’ve followed it for years, though.
I had wanted to try 3D printing ever since people started printing out Battlemechs from Mechwarrior Online, but I wanted to wait until DLP printing became less expensive – I wanted excellent detail. That happened to me when the cheap DLP resin printers hit the market at the $500 price point. Now, a year later, they are about $350 and dropping… it’s amazing how fast this moves.
I am even newer to FDM printing – I love being able to print enormous things even with a little loss of resolution.

2. Is 3D printing your hobby or more than just a hobby?
It’s very much just a hobby for me. I have occasionally printed some functional parts – I keep fish and designed and printed out a very handy fish strainer for doing water changes – but the overwhelming majority of things I 3D print are little statues, minis, things like that.
3. How many Godzilla figures have you 3D printed? Two or more? Which Godzilla 3D model is your favorite, and why? Do you have a figurine you are most proud of making?
I have two completely finished Godzilla figurines – the Heisei and the Hybrid. I have a printed but as yet unpainted Shin Godzilla figure that I am working on now.

It’s very hard for me to pick a favorite! There are different things that I like about each Godzilla figure and different challenges with each as well.
The Hybrid Godzilla figurine has a very cool look to it and was the first one I bought. I love how fierce it looks, and the posing is excellent. It’s also close to the current Legendary Godzilla model, which I think is an amazing-looking Godzilla. He also has, I think, the best detailed dorsal plates – they have a very organic, realistic feel.

Download STLs for 3D printing your Hybrid Godzilla 3D model.
The Heisei Godzilla figure is very near to my heart because this is the one I grew up watching – when I was a kid, this WAS Godzilla. It doesn’t have any of the sense of menace you get from the more modern ones – more akin to a destructive force of nature (and occasional defender of mankind).

Download STL files with the Heisei Godzilla 3D model for printing.
The Shin Godzilla model is a very technically impressive sculpt – it has terrifying visuals. In that respect, it is the exact opposite of the Heisei Godzilla figure. The jagged teeth, the skin like a hot charcoal briquet, the purple laser breath – what’s not to love? He’s also so enormous – far and away the biggest thing I have ever printed.

Shin Godzilla 3D model STLs for downloading are available on Gambody – Premium 3D Printing Marketplace.
4. We have noticed that you are using at least two different 3D printers to build your Godzilla model. Which is your favorite one? Why?
I use an Anycubic Photon (DLP-resin) and an Anycubic I3 Mega (FDM-filament) printer. Much like the different Godzillas, each has its own benefits and challenges.
The Photon is terrific for getting really amazing detail – it’s an entry-level printer, but I’ve seen side-by-side comparisons with the Form 2, and it’s pretty close. From a technical perspective, leveling the plate is simple and once it’s done, you’re good to go for a long, long time – I leveled the plate once 6 months ago, and it’s just print, remove the plate, peel the print off the plate, and stick the plate back in, ready to go again.

The downsides of the Photon, and any DLP resin printer really, are that it’s messy, it’s substantially more expensive, and the printed parts can be delicate. Learning how to position parts on the bed and support them is a bit of an art as well – there is a definite learning curve to getting perfect prints.
The I3 Mega is perfect for when I want to do larger 3D prints, which is a lot of the time! It’s also so much cheaper to run than the resin – you can get an incredible volume of prints out of a $15 spool of PLA. Additionally, once it’s set up, you’re good to go for a great many prints essentially on autopilot – print a part, wait for the bed to cool, peel it, move on.
The downsides to the I3 Mega and all filament printing are you really aren’t going to get the quality of resin – you’re always going to have stepping lines unless you do some chemical or mechanical smoothing. That’s not always a negative – for the Groot 3D print, I think it actually makes the model look better. But generally speaking, you don’t want stepping lines, and the workarounds to avoid them are limited and problematic.

Download STL files for Teenage Groot 3D model to 3D print.
5. When you look at the model you are about to 3D print, do you already know whether it should be scaled or how to load the plate for the best results? How much do you like to ‘play’ with printer settings?
I usually pick the largest components and make sure I can fit them into my build area in the slicer, and use that as a guide for how to scale the model. Do the hips fit in the I3 Mega’s build plate? Does the head fit on the Photons? The Heisei Godzilla figurine and Shin Godzilla figure both fit at 100%, but I had to scale the Hybrid Godzilla 3D model to 98% to get it to fit in a way that made sense to me.

I’d like to get as close as possible to the designer’s intended scale and detail level when I can.
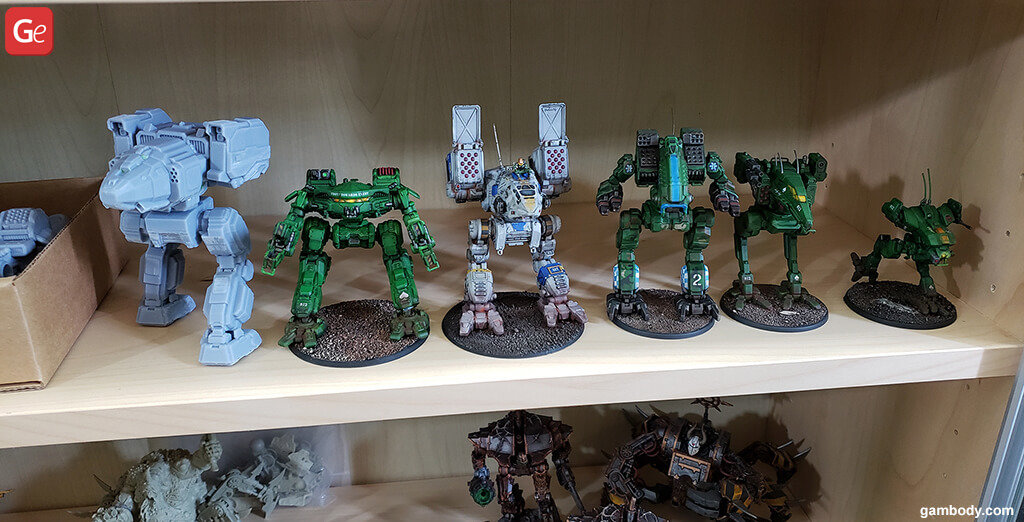
For my Battletech/Mechwarrior 3D prints, it’s a little different. The very first Battlemech I printed was a Raven, and now I use that one as a baseline. I found a mech scaling image on the web, and use that as a reference point.

I don’t always get it right – my King Crab was a lovely 3D print, but I realized after painting and displaying it I had clearly messed up the scaling somewhere, it is much too small. Oh well – I have already reprinted a correctly scaled version.
6. Big projects can be 3D printed for several days in a row and require much patience. How long did it take you to make your Godzilla figure from the start (3D printing) to finish (painting)?
Oh boy. I measure the Godzilla figure 3D printing time in weeks, not days. I think the longest single part was 112 hours long – that’s how I discovered the i3 Mega’s print time display flips at 100 hours, so it showed “12 hours” to print.
The Shin Godzilla 3D model, my most recent one, took about 4 weeks to 3D print. This is with the printer running pretty much nonstop; it was never idle for more than a few hours.
I should point out that this is using the very best settings I can possibly squeeze out of my 3D printer, and at the largest size my bed can handle. You could drastically reduce this time by either lowering the quality or the size of Godzilla model, as needed.
The build time is hard to quantify since I don’t wait for the print to finish to assemble – I print the feet, then the legs, then the hips, and so on, and assemble the Godzilla figure as I go. The assembly for all of these models is very simple, generally, and hard to mess up. For the Godzilla figurines, I didn’t bother with the clips – I just used lots of Loctite control gel on the edges, and they hold together just fine.
7. What was the most challenging part about making Godzilla figure? Can you share any recommendations on scaling, printer settings, filament, etc. that can help interested Gambody 3D printing enthusiasts to create an ideally looking king monster?
For printer settings, I honestly just used the exact settings provided by Gambody with the Godzilla 3D model – I created a profile called “Godzilla Superfine,” which matches the details Gambody gives you in the printing details section. I slice with Cura.

I use the same 0.1 profile for all FDM models, and I use the draft quality preset for functional parts. For some specific oddball parts, I have tried tree supports, but that’s a little hit and miss – awesome and fast when it works, but sometimes it just doesn’t.
So far as challenging… I found that blending in the seams to be the most tedious part of the process. Even with really well-fitting parts of 3D printed Godzilla figure, you’re still going to have a gap between them of at least a few millimeters. I would never paint a model with visible seams – I think it looks bad, it’s the first thing you see when you look at the Godzilla model, and it makes it look like a toy.

For the first two Godzilla models, I blended the seams with Kneadatite (“Greenstuff”) two-part putty. This is a putty that is used extensively in the miniature wargaming community – master minis are sculpted out of it. You just mix up both parts until evenly blended and shape as needed. It’s sticky, so you need to keep your tools wet.

The plus of Greenstuff is you can fill even a wide gap if needed in a single pass. The downside is that it is very time-consuming – I must have spent at least 6 or 7 hours each on the first two Godzilla figures applying and shaping putty with shapers.
For the Shin Godzilla figurine, the seams were extremely tight, so I tried something new: I use a pointed piece of styrene rod and some printing resin, and just run a bead of resin into the crack, and then blast it with a UV flashlight for 10 seconds. This works quite well and is very fast – I bet it was 2 hours tops to fill the vast majority of blends. There was a pretty substantial gap between the head and neck, so that still needed a blend with Greenstuff.
The problems with the head to neck interface… I haven’t 100% perfected using 2 different print types in concert with each other yet. Most resin shrinks a little bit, and I don’t have a perfect feel for how to scale those parts. I’m usually doing 101% proportionate to the FDM printer scale, but there is always a tiny bit of manual finessing involved.
8. Which part of making a 3D printing model do you love the most? Is it printing, assembling, or painting? Why?
It is absolutely the assembly, no question. There is something I love about peeling off the supports, shaving down the brim, and fitting them together to make a finished product, the actual act of producing something from components that is deeply fulfilling for me. I get that feeling whether it’s a 3D print, a plastic model kit, or a desk from IKEA.

The printing can be interesting as well, especially for resin prints. There are often tactical decisions to make when orienting a part and placing supports.
So far as painting – to be honest, I am not a fan. I think I am relatively good at painting, but I have never actually enjoyed the actions and mechanics of painting 3D prints. I feel a good deal of satisfaction when it is done – but it is for me at best a necessary evil.
9. Which filament is your favorite type for various 3D prints? Do you like to experiment?
I have tried a couple of different filaments before settling on Hatchbox Silver PLA. It seemed to give me the best results in terms of quality. I settled on PLA as my go-to because I don’t need the strength and challenges that come with ABS – although I do use ABS for functional parts when I make them.
I haven’t personally seen an enormous difference between the few brands of filament I tried, though. Part of the reason I picked the Hatchbox Silver was actually that it photographs very well, and it’s very easy to see flaws and issues on a 3D print before it’s primed.

I don’t experiment very much with filament – I’m the type of person that once I find a meal I like at a restaurant, I am going to order it every time forever. As soon as I decided that I liked the Hatchbox Silver, I ordered a case of 10 boxes. I’m down to my last unopened box though, and I’m not seeing a good sale so… it might be time to try something new!
I do try all sorts of different resins, though. There are so many different factors for resin – the print quality, how strong it is, how brittle it is, and so on. One of my favorites, when I need pure strength, is e-SUN bio-resin, which is a PLA-based biodegradable resin that prints well and is super strong without being brittle. It’s a hideous shade of really shiny yellow, though.
My go-to everyday resin is actually a blend of two different resins – Anycubic Grey and Siraya Tenacious. I mix them 70% Anycubic Grey and 30% Tenacious, and you get a strong, excellent printing, beautiful matte light grey 3D print – it photographs well, and since it’s not shiny, you can tell immediately where you need to remove supports and do touchups.
10. You seem to enjoy mixing colors to create your ‘secret sauce’ for the projects that turn out very impressive and realistic. Have you studied Fine Arts or mastered a magical painting technique? Is there special education required for being creative, or is it your sixth sense and years of experience?
I have no art background at all, really. I liked drawing when I was a kid but never ran with it.

I was very into a video game called Total Annihilation in the 90s, and that game had mods for it. I installed a 3D application called Rhino3D to make my own units for the game, and although I never got great at Rhino, it did give me a useful working knowledge of 3D design.
Much later, in 2009, I got very into a tabletop wargame, Warhammer 40K. It has a ton of different units – little infantry guys, tanks, aircraft, the works. When learning how to play the game (and paint the little guys), I went to a wargames forum, Dakka Dakka, that taught me how the game worked, and also pretty much all I know about how to paint 3D prints (miniatures).
From the basic brushwork required to do my first mini and up to how to airbrush, I learned it all from posting and asking questions there, standing on the shoulders of the giants who came before me.

I still have so much to learn on how to paint 3D prints! There are so many techniques I have yet to really get down. By the standards of wargaming, I think I’m an average at best painter. One of the best things about a background in printing 1-inch tall army men, though – when you print a 2-foot-tall Godzilla figure, the margin for error opens up considerably.

When 3D printing became a common thing, these 2 interests – 3D modeling and miniature painting – came to a useful intersection for me.
In addition to printing out the models I get from Gambody or Thingiverse, I also design and print 3D models of my own design – little bits for 40K, conversion parts, and stuff like that. I’m not very good at all yet – I don’t know how to use blender or Zbrush so am limited to building things I design out of primitives essentially – but it’s a lot of fun for me, and there is nothing really like having an idea in your head and then transforming it into a real thing in the real world.
11. Why do you build 3D models by yourself? What advantages do you derive from using 3D technology compared to getting industry-made and mass-market figurines and miniatures?
The thing I love about 3D printing is the unparalleled level of customization. When you get a plastic model kit, you’re probably going to have a few options. If you decide to kitbash – incorporate parts from other models – you’re going to expand your options further still.

But once you start 3D printing, you can do whatever you want. Not only can you create unique 3D printed models that are exactly to your specifications, but you can also have parts that are not possible to produce in a plastic injection mold, and you can scale them to whatever size you want with just a few clicks. It’s a crazy time for hobbies.
12. How do you choose a 3D model for a new project? Are you a fan of one-piece miniatures or big models as a Godzilla figure that is cut into several parts for a smoother 3D printing experience?
When I pick new 3D models for printing, I usually go with 100% aesthetics – I consider how much I like a model first. Usually, this is driven by the things I enjoy – Battletech/Mechwarrior, movies or TV shows I like – Godzilla, Alien movie, or just plain cool-looking stuff.
The next thing I look at is how successfully I can actually pull off the finished model in terms of painting it. For example, there is a beautiful Wonder Woman 3D model for printing on Gambody I can’t bring myself to buy because I know perfectly well that I won’t be able to pull off the paint job it deserves – I am not that great at painting faces or skin of 3D prints.
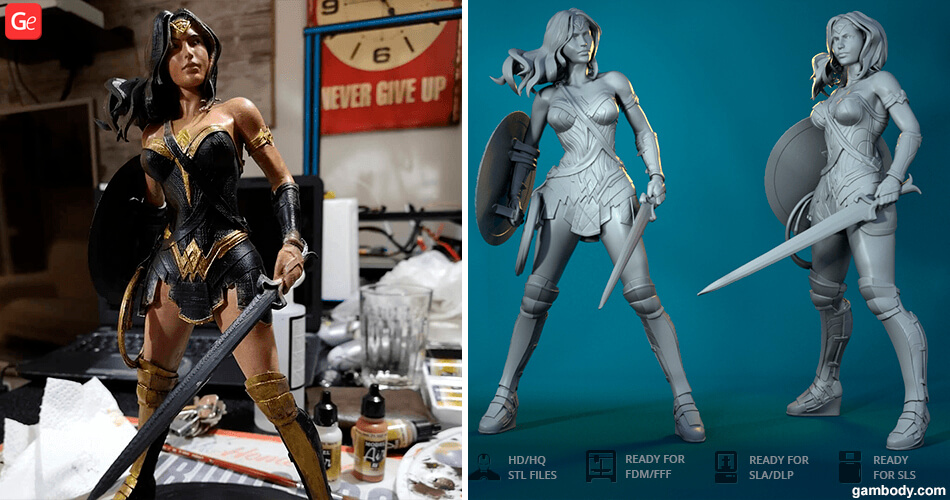
Download STLs with the Wonder Woman 3D printing model.
Conversely, there is a Doctor Doom 3D model that has a wonderful cloth texture that I would be able to paint beautifully. I probably will pick that one up at some point.
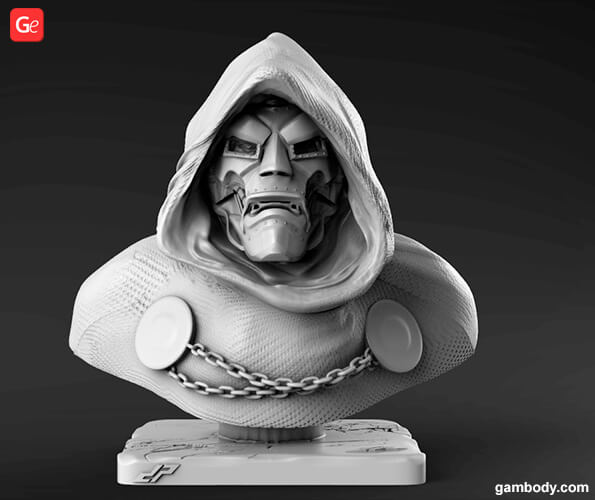
Download STL files with the Doctor Doom 3D printing model.
I rarely look at the actual parts of a model before I buy it – if I like it enough, I’m going to make it work. However, ideally – to me – models are always chopped up into components. The reason that I use two different printers for my Godzilla figure collection is that there is just some detail an FDM printer will not do well. The big focal point for a Godzilla figurine or big lizard or monster is the face. And I don’t think almost any FDM printer will do the teeth justice – it’s just too fine a detail.
Additionally, I found there is always a good side and a bad side to a 3D print – the side with the 3D printing supports is always going to be a little imperfect no matter how well you orient it. In a perfect model, it’s multi-part, and the parts where supports go are mated to another surface and invisible when the project is done. The Godzilla 3D model does this perfectly, most of the supports are on the flat insides of the tail sections.
13. How big is your collection of 3D prints? Do you display each newly built model for yourself or make figures as unique gifts for people you love?
It’s growing every day, and there is a pretty substantial backlog. It seems there are never enough hours in the day to get all of the things I’d like to get done.
I have built a display case recently with some open spots earmarked for future projects, like my Battletech/Mechwarrior stuff.

I do also print some things to give away as gifts. For example, I have a friend who is into chess, so I 3D printed a chess set for him.
14. Which model do you plan to build and paint next? Is it something offered by Gambody premium 3D printing marketplace?
I am working on two figures right now – both of which are Gambody models.
The 3D printed Shin Godzilla figure is just awaiting paint. I have not yet been able to work out the best way to get the exact paint scheme I want to achieve. I have a test print – just the head – that I am trying to nail down before I apply it. With a Godzilla model that large, I want to try to get it right the first time.

I am also working on the Aliens Dropship when I feel like I need a break. That’s a great 3D model for printing too, with some challenges to solve from a modeling perspective. I had always wanted a Dropship model when I was a kid, but couldn’t afford it – now I have one 3 times larger that also transforms. Can’t beat that.
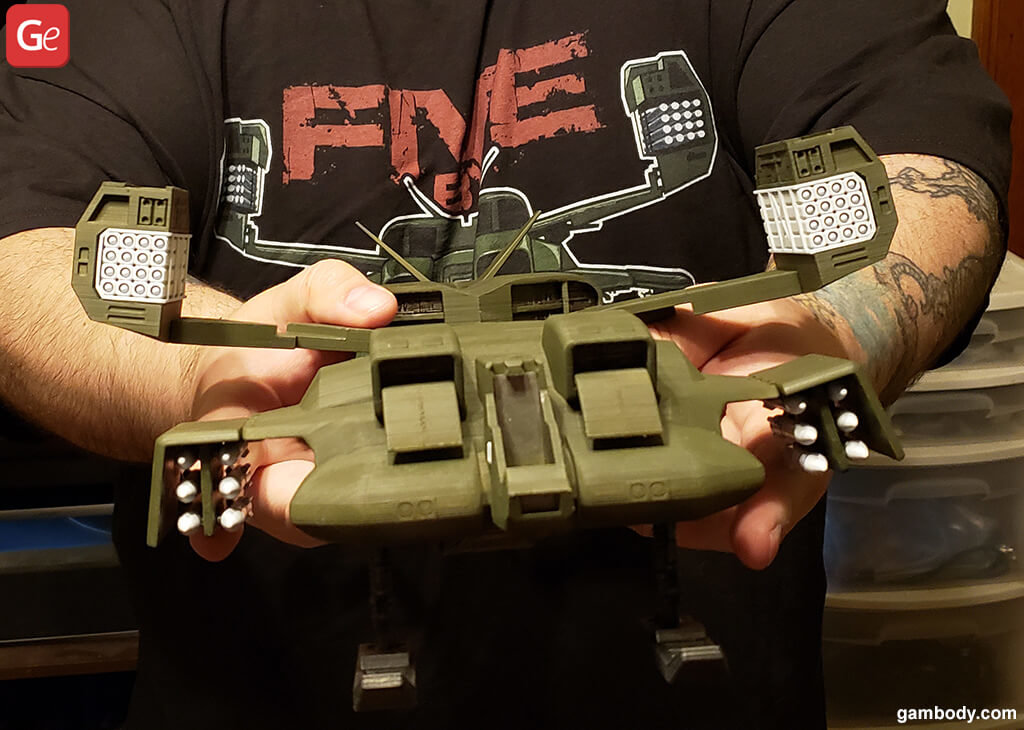
Download STL files with the Alien Dropship 3D model to print it.
Once those are all done, I will probably take a closer look at the Doctor Doom bust.
15. Gambody readers would also love to know what do you do with your free time outside of 3D printing?
I’m very big on video games and sci-fi movies. That is where a lot of my inspiration comes from, along with tabletop gaming. I am very into all sorts of monster-type media – giant kaiju destroying cities, giant robots fighting kaiju, robots fighting aliens… you name it. I’m a sucker for monster movies.

Gambody team wants to thank Joe Broggio for his time and incredible conversation. It is unbelievable how skilled you can become within just a year of 3D printing. Joe’s Godzilla model (three versions), 3D printed chess set, Teenage Groot, battle mechs figurines, and other 3D prints look fantastic!
We hope you have learned something new and valuable from this interview about painting a Godzilla figure. We are happy to meet you in the Gambody Facebook Group where you can post your projects, share your 3D printing experience, and give your advice to other hobbyists and crafters from all over the world.

March Roundup: 3D Models of the Month
Read Article
MechWarrior 3D Prints Showdown: Top BattleMech 3D Print Models
Read Article