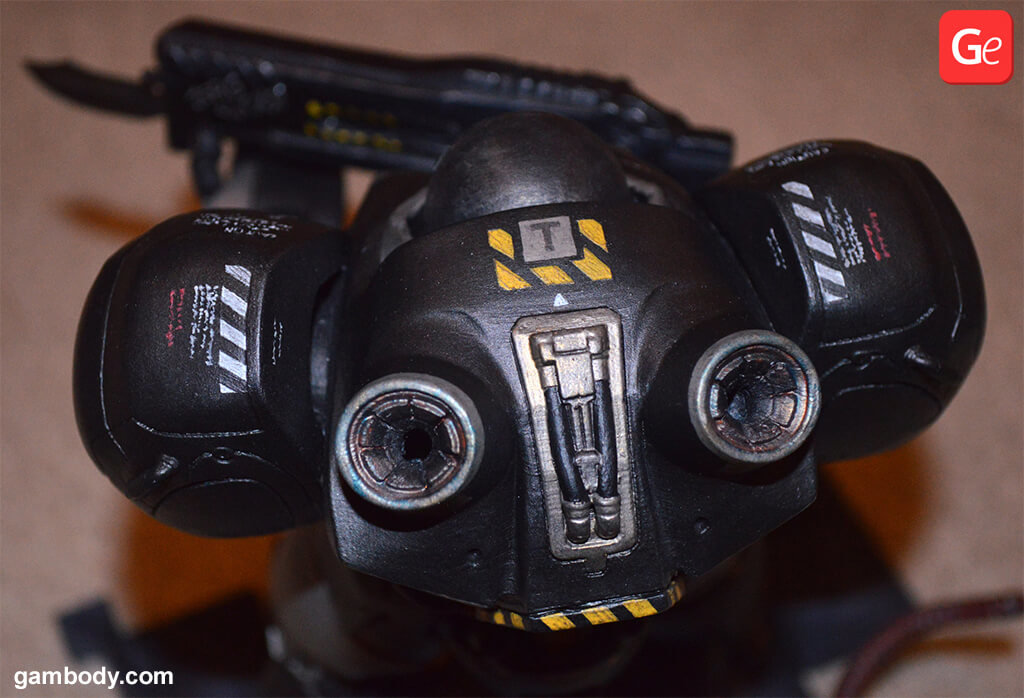
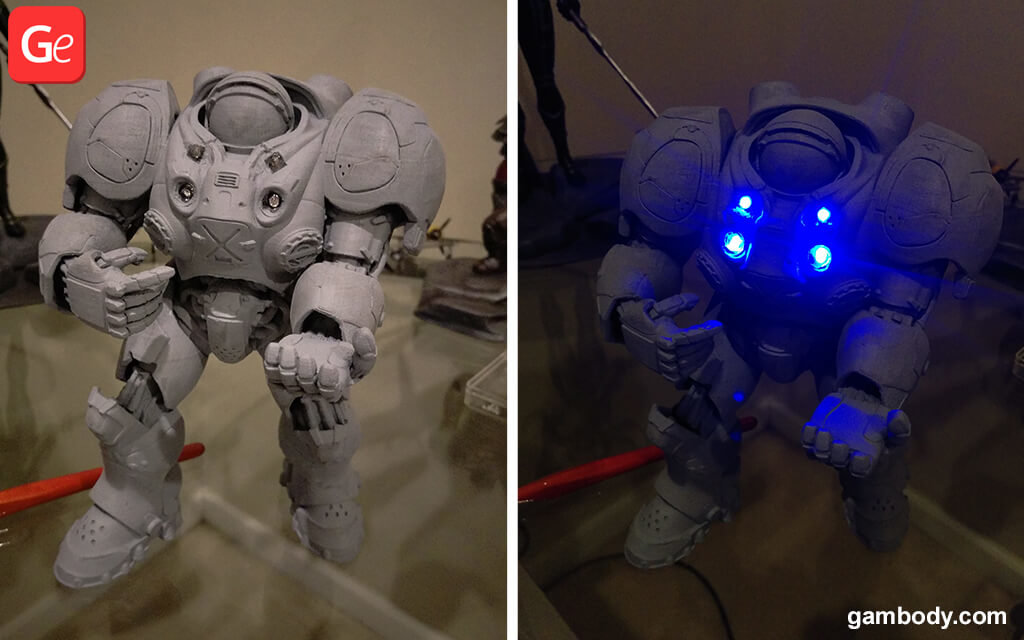
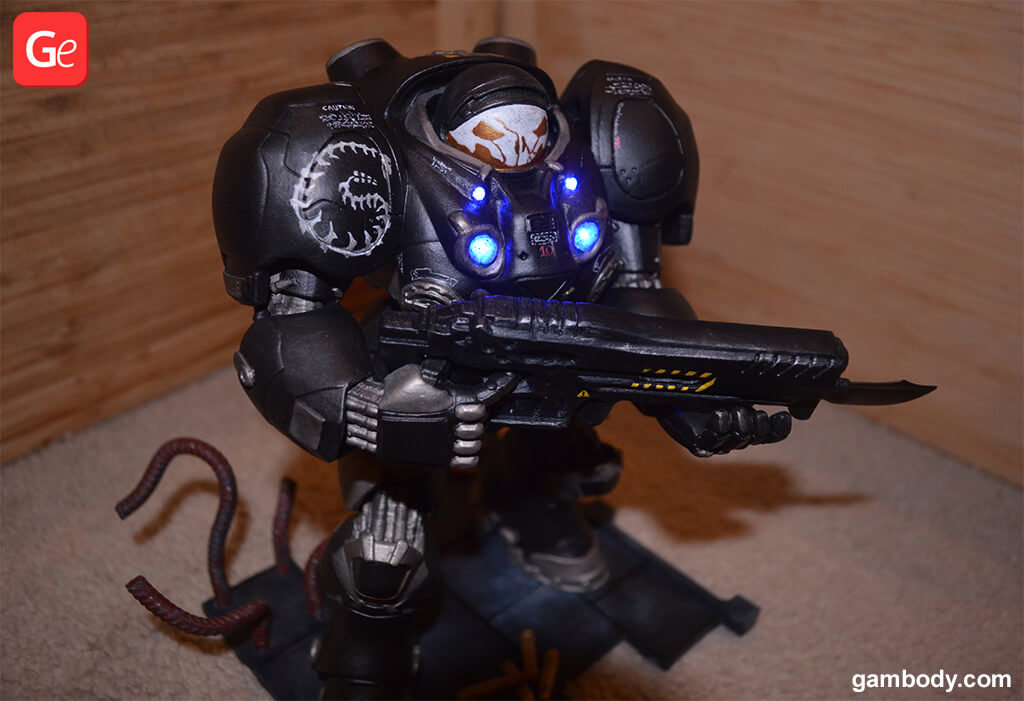
A true artist always finds a way to complete a project of which he would be proud. Gambody 3D printing enthusiasts are real artists. They are willing not only to post impressive photos of their finished 3D prints to Gambody Facebook Group but also to share their tips and tricks with anyone interested. At the end of September, David Emanuel posted images of his finished StarCraft 2 Terran Marine figure, which looks fantastic with real lights and the most exquisite details.
David spent more than 200 hours on crafting this beautiful Terran Marine 3D printing figure. He was challenged with multiple tasks while working on this project. And he was kind enough to answer our questions, explain how to insert LEDs to make the 3D print stand out, how to paint Terran Marine, how to plan ahead, etc.
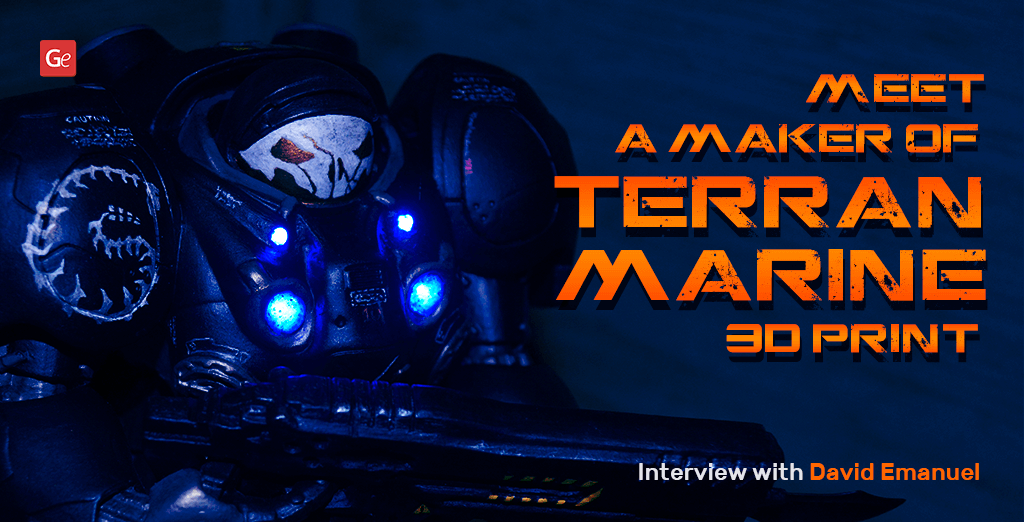
The interview with David Emanuel about making a StarCraft 2 Terran Marine action figure is a useful guide. It can be handy for those who are planning to 3D print this fantastic model, designed by Jacob Smith and available as STL files at Gambody – Premium 3D Printing Marketplace.
1. David, your Terran Marine 3D printed figure is stunning. Did it take you a year to complete this project from the moment of purchase to the final touches? Or how long did the overall work last?
Thank you! It took me a year to complete because I felt like taking a break from printing and painting for a while and focus on other things-health related. But then, of course, painting is something I have become to enjoy, which helps with mental well-being.
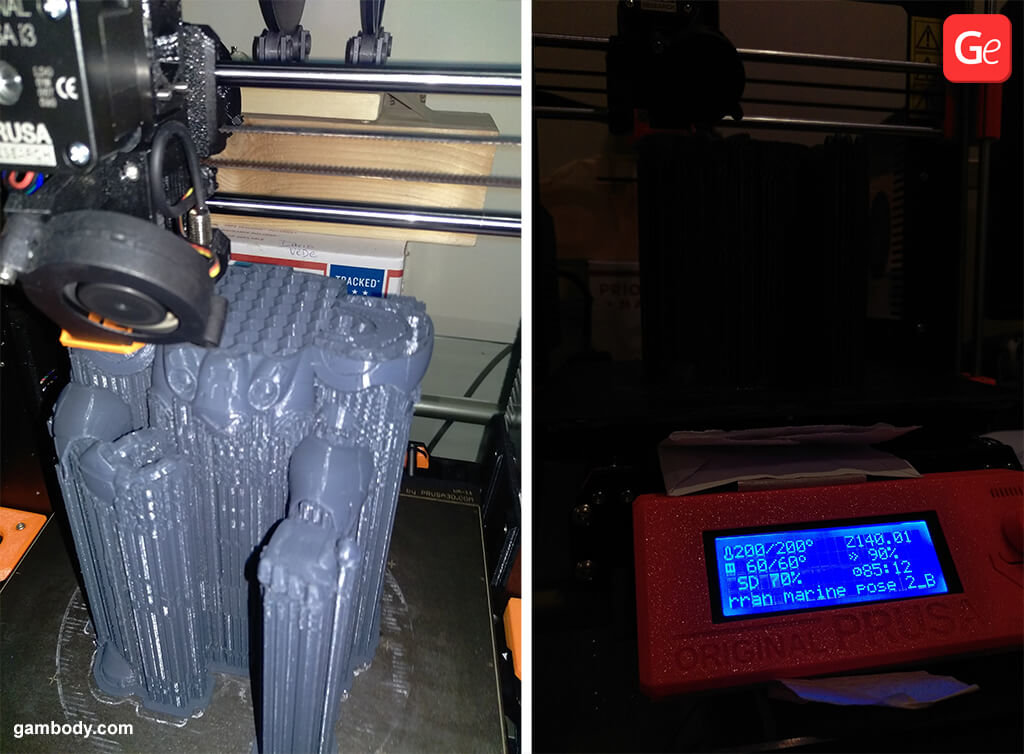
I estimate the number of hours actually spent on the figurine (the 121 printing hours not considered), was roughly 80 hours.
You have to consider cleaning the supports (combining the supports every layer was a mistake, don’t do it unless you want to despair while attempting to remove them), spraying primer onto the entire figurine, sanding, and repeating this process about 5 times, etc. And after I was almost happy with how it looked in grey, I started mixing the colors and painting the rough.
2. Why did you choose to build a figurine of Terran Marine? Are you a big fan of the StarCraft strategy game?
Funny you should ask: Even though I love strategy games, I have not played StarCraft once in my life. I grew up playing Warcraft, Dota, Red Alert 2, Heroes 3, C&C Generals, etc., but not StarCraft. My best friends from middle school (best friends even now, almost 20 years later) played and raged about it all the time, but honestly, I don’t know why I never got into it.
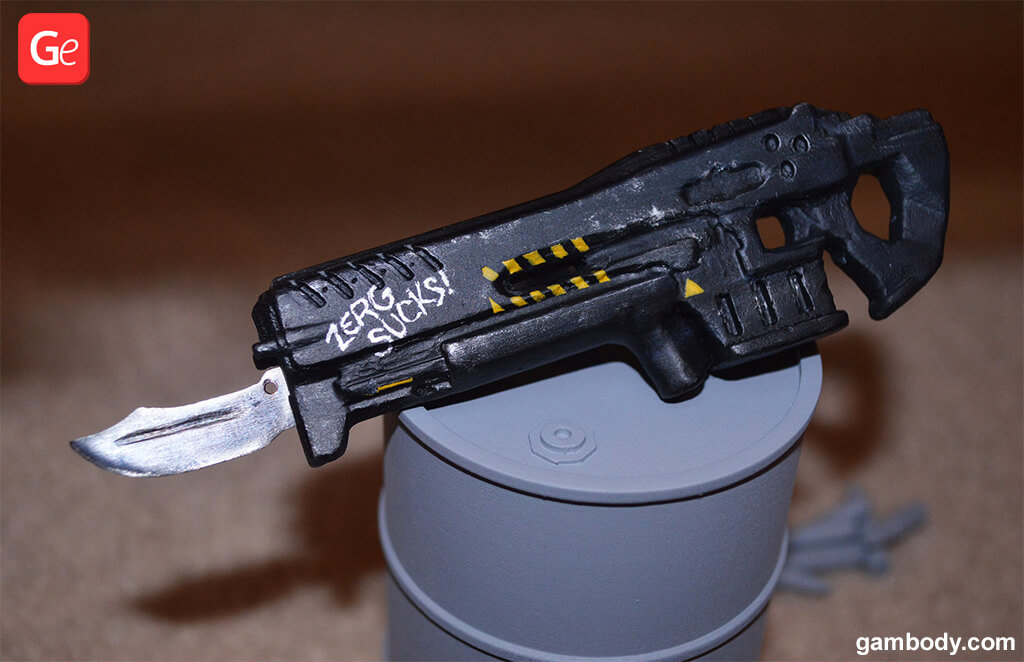
I suppose I decided to print it because the storyline of StarCraft 1 and 2 is pure badass and the characters were carefully created with enough detail to make almost anyone love the creators’ genius, whether it is about the Terran Spacesuit looking badass, the Protoss looking out-of-this-world or the zerg; zerg sucks. I guess, “Hell, it’s about time.”
3. How did the idea to add lights into a 3D printed Terran Marine figure come to your mind? Are you good at electronics, or did you find a great DIY guide online for connecting wires, lights, and batteries? Can you tell us more about this part of your project?
Initially, I wanted to paint it as a blue Terran Marine, but while looking for ideas, I stumbled across the Sideshow Jim Raynor figurine, and I just loved the way they approached the whole concept, and I was sold. So, if you look at their figurine, the details are amazing, and yes, they used LEDs in their design, so I thought I would give it a go.
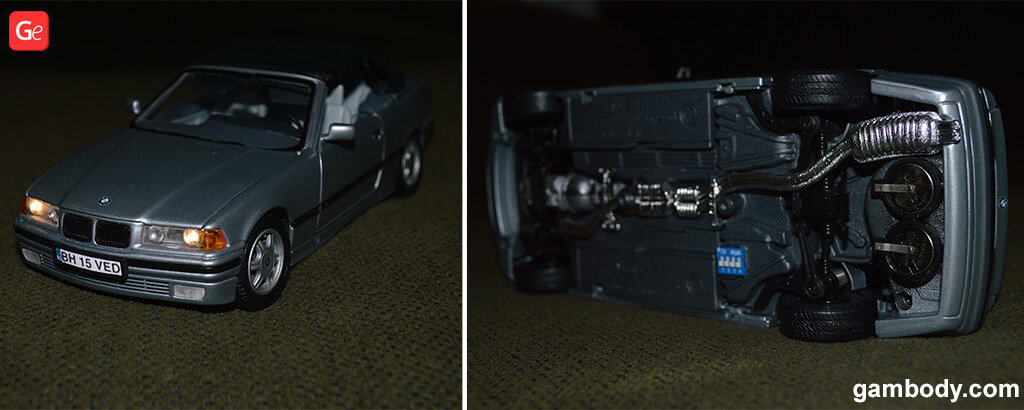
Using lights is nothing too hard. In the image above, you can see how I modified a 1:24 Maisto BMW E36, a friend of mine gifted me, to make it a replica of my personal car.
I am a bit of a DIY-guy, and if I don’t know something, I usually try to find out how to do something and do it myself. YouTube is super-good for this, as most people already know. I am sure everyone here has basic knowledge in a lot of things, including electronics, but with the risk of annoying some, I will mention some of the hardware I buy for any projects I add lighting to.
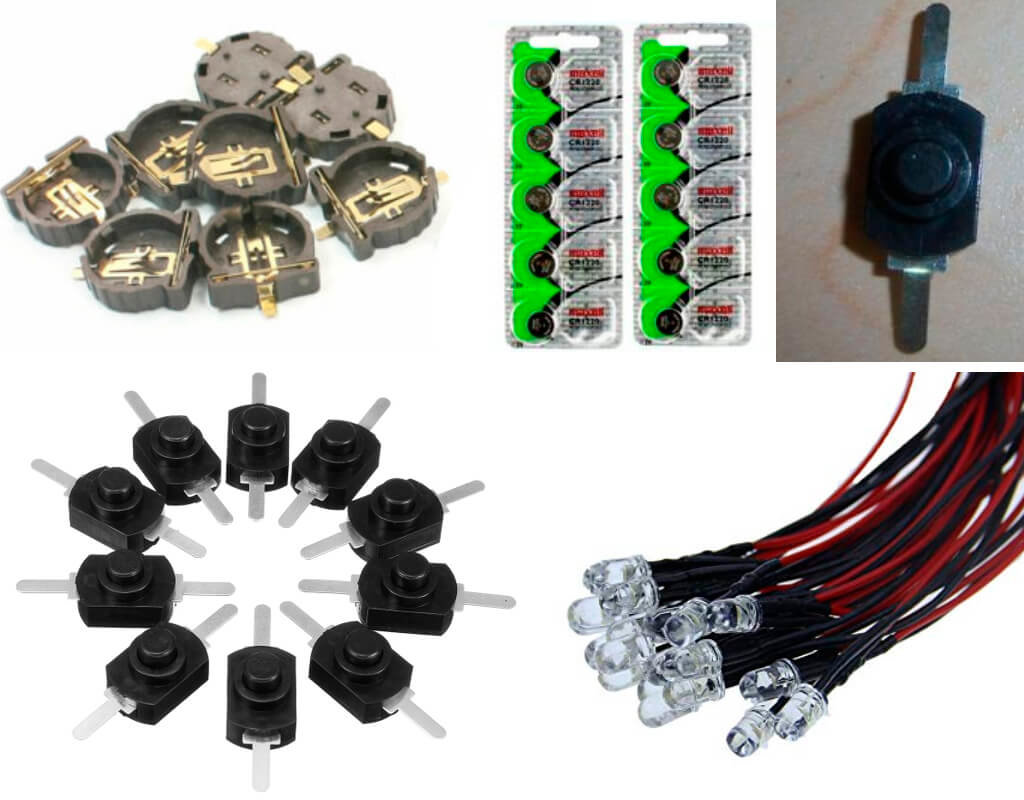
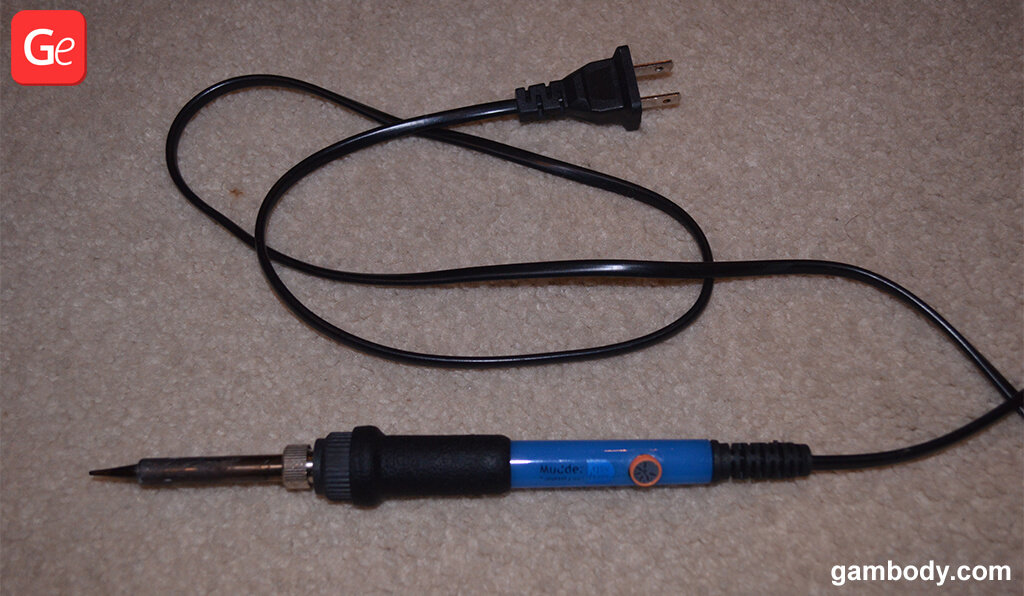
You mainly need 4 elements: lights, switch, battery, battery holder. You might want to look into a cheap soldering iron and electronic soldering wire (it is very fine, unlike plumbing soldering wire, which is much bigger) as it would help a lot with connecting everything together:
- Battery Holder: its size depends on the size of your battery-geometric size, not Voltage.
- LED Lights: I prefer to use 3mm LEDs instead of 5MM as they are easier to add in smaller places.
- 3V Battery: any battery brand would do, but try to use higher quality ones such as Maxell, Duracell, or Energizer.
- Latch Button Switch: you need to make sure you use a Latch button/switch unless you have a memory board to control what a temporary switch does. This way, it is very straight forward.
Some people might use other elements to make a circuit, but I don’t really find it necessary. Below there is a circuit example with a 9V battery. The idea is similar for a 3V scenario:
Step 1. Place the battery in the battery holder. Make a note of the positive and negative side (top of the battery is positive – the one with the writing) and solder 1 wire at each end of the battery holder. They are like little wings sticking out usually.
Step 2. Then connect the black (negative) wire from the battery holder straight to the LED light or LED lights. You can use multiple lights connected straight to the battery, which is parallel wiring.
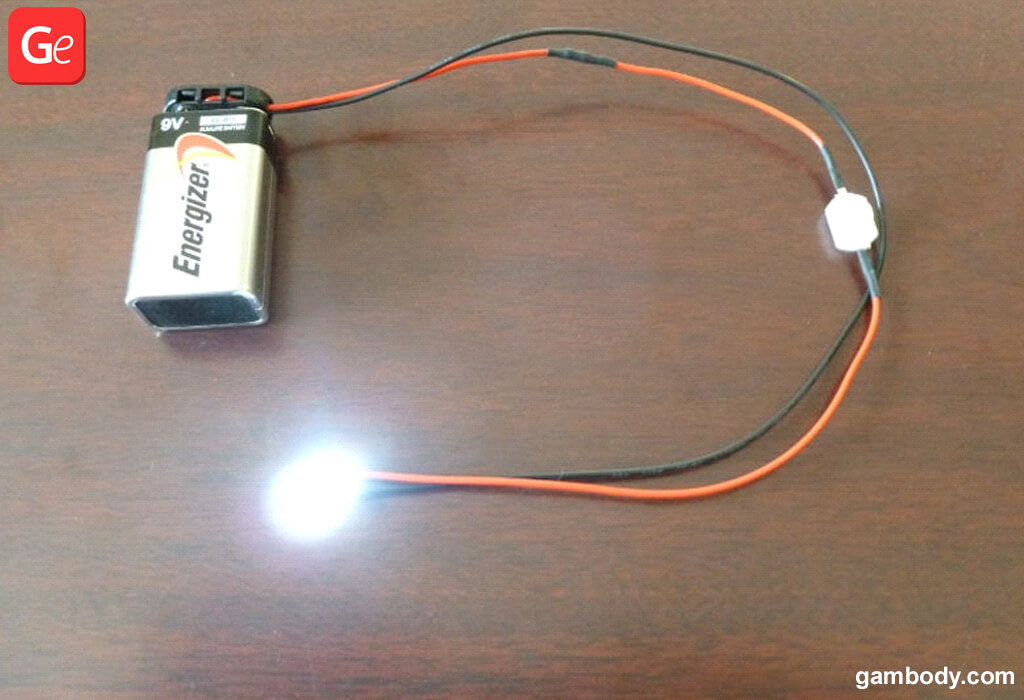
Step 3. Connect the Latch Switch as shown in the figure above: one end to the red (positive) wire coming from the battery and the other end to the red wire coming from the LED. It doesn’t matter which end as it is interchangeable.
Or there is a scenario you may use for multiple lights (connecting them in series), which allows for a slight decrease in brightness between the bulbs. But for this purpose, it is virtually not noticeable. The wiring is similar to the one shown below. You don’t need to worry about the resistor, as each LED from the link I provided above, comes with a Resistor already installed. Just don’t forget to place the switch instead of the Current Limiting Resistor shown in the picture.

Just keep in mind, if you add a lot of lights, the battery will drain out really fast. So if you plan to create a disco, use a 9V battery and the 9V version of the LEDs as well, as it provides far more amperage than a 3V battery (lasts longer). For easy connect, you can search for 9V Battery Connector and use that for easy swaps.
If you use a 3V battery and have the room for it, use a CR 2032 with the respective holder as it would last longer than a CR1220.
4. You mentioned that you learned many useful lessons while building your Terran Marine. Was melting the holes in the figurine where the lights would go the most challenging part or not? Why is a heated Stanley blade better to use than a soldering iron?
As I mentioned, I used the soldering iron to melt the holes where the LED lights went in. After the print finished and I got the figure ready for spraying the gap-filling primer on it by covering the LED lights with masking tape.
When I finished the repetitive primer & sanding process, I laid the figurine on its back. I mixed 2-part epoxy (clear) glue and poured it into the holes where the LEDs went to secure them in place and create that “glass” cover look.
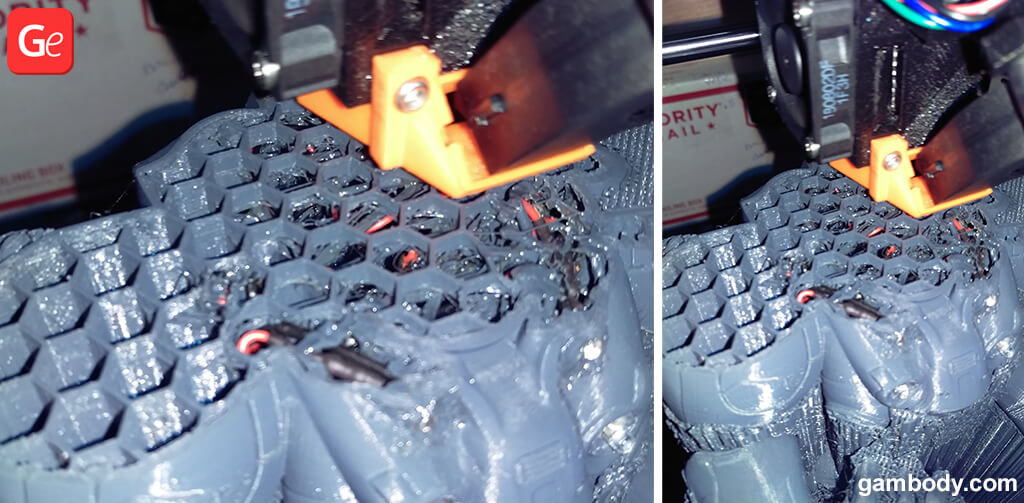
I made sure to stick some bits of masking tape behind the LEDs with a needle, without damaging the wires, so the glue wouldn’t flow all the way inside the figurine and stick to everything. The bottom holes were easy to melt through. But the top ones were far smaller, and the soldering iron radiated too much heat, thus damaging the surrounding plastic, which I didn’t want to happen. So, as a lesson, I would use a small drill and work my way up to the desired hole diameter. It is essential to not drill a lot and very fast, as the fast-turning of the drill bit will create heat and melt the figurine.
I thought long and hard, where I could place the battery for the figurine. If I had considered the lighting before the printing was already at 40 percent, I would have run a wire from the bottom of the boots through the middle of the figurine all the way up; so the batteries would sit on the bottom of his shoes for easy replacement (honeycomb infill would make that very easy).
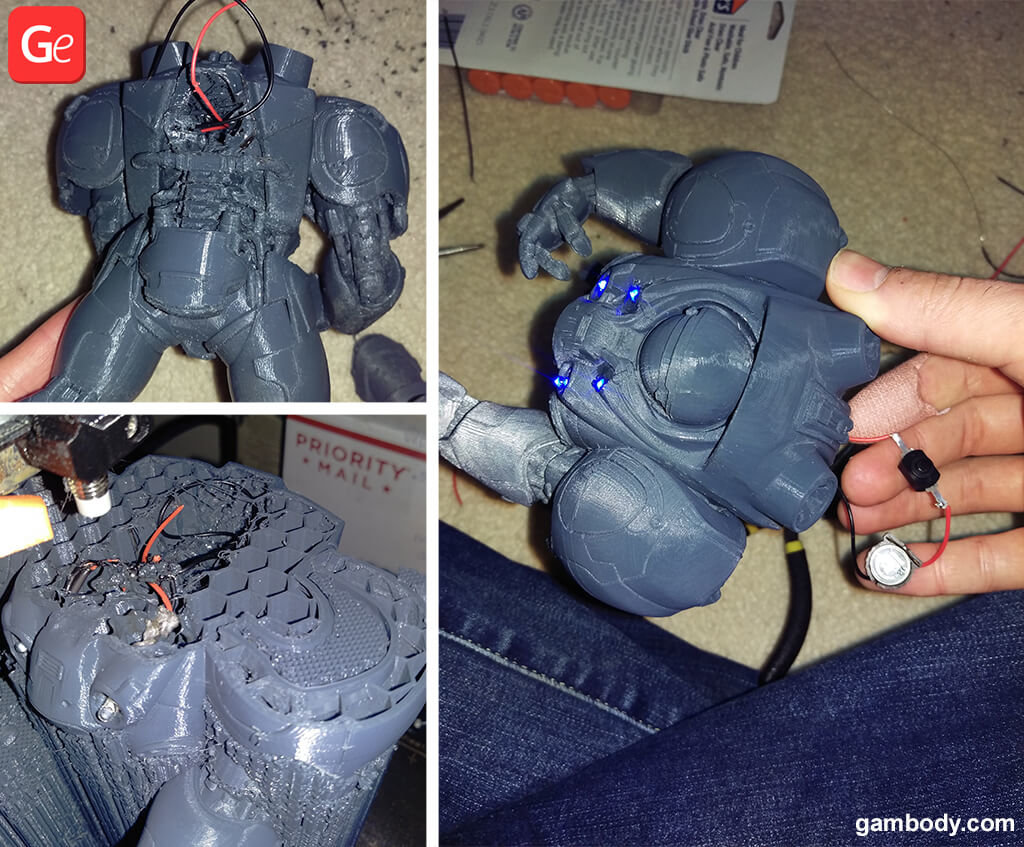
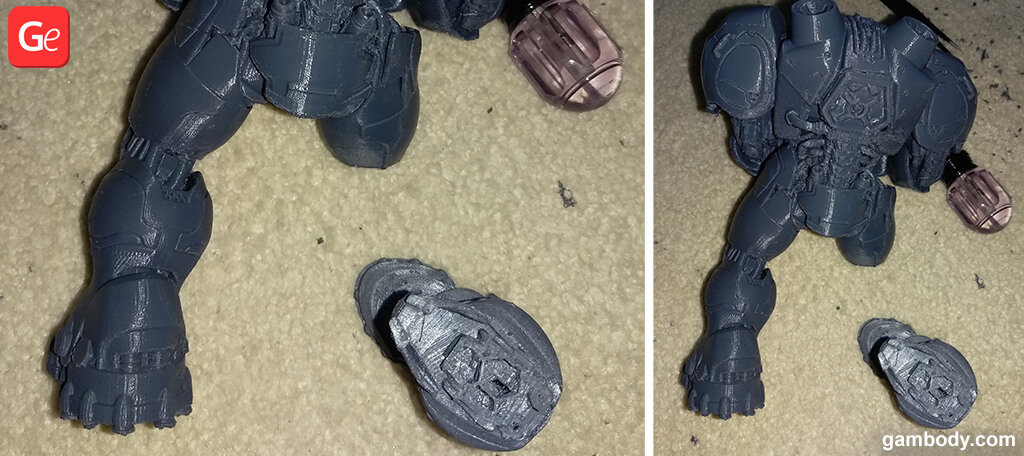
But I thought of it all a bit too late and decided to add the battery inside the StarCraft 2 Terran Marine figure, as you can see from the pictures. The heated Stanley blade (any cutter blade you don’t plan on using again) came in handy when I cut off the rear compartment door located in the back.
The figurine has a small channel between that “door” and the rest of the body which I sliced with the blade. Important! You need to angle the blade inwards. Otherwise, you will destroy that part of the figurine – might want to practice on something else first. If you cut straight across, you will only cut out the outer edge (the rest of that door is recessed inwards as it can be seen from the picture).
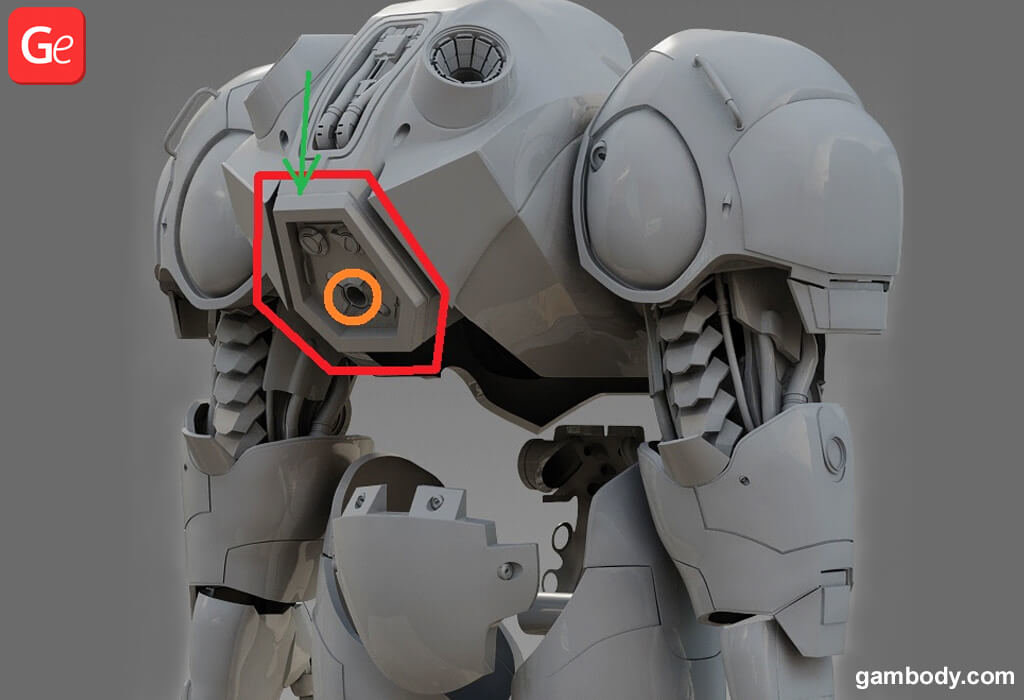
And after I completely removed that door from the body, I drilled a hole shown with the orange circle and placed the Button Latch Switch there for easy control. I use two-part epoxy and not superglue when it comes to electronics because of the hazing effect the superglue produces, which destroys electronic circuits. Make sure the glue doesn’t creep inside the switch, because you wouldn’t be able to push/release the button anymore.
5. What is the best method of repairing the melted parts after the lights are added into a project? If you choose to cut filament and bridge the gap, how do you connect these parts together?
PLA melts really easily, which makes it more comfortable, but requires more caution when molding. I cut the filament into small pieces and melted them with the soldering iron into the honeycomb infill. And then used my finger to make sure none of them stick above the infill, as it would make the extruder hit them and possibly destroy the print.
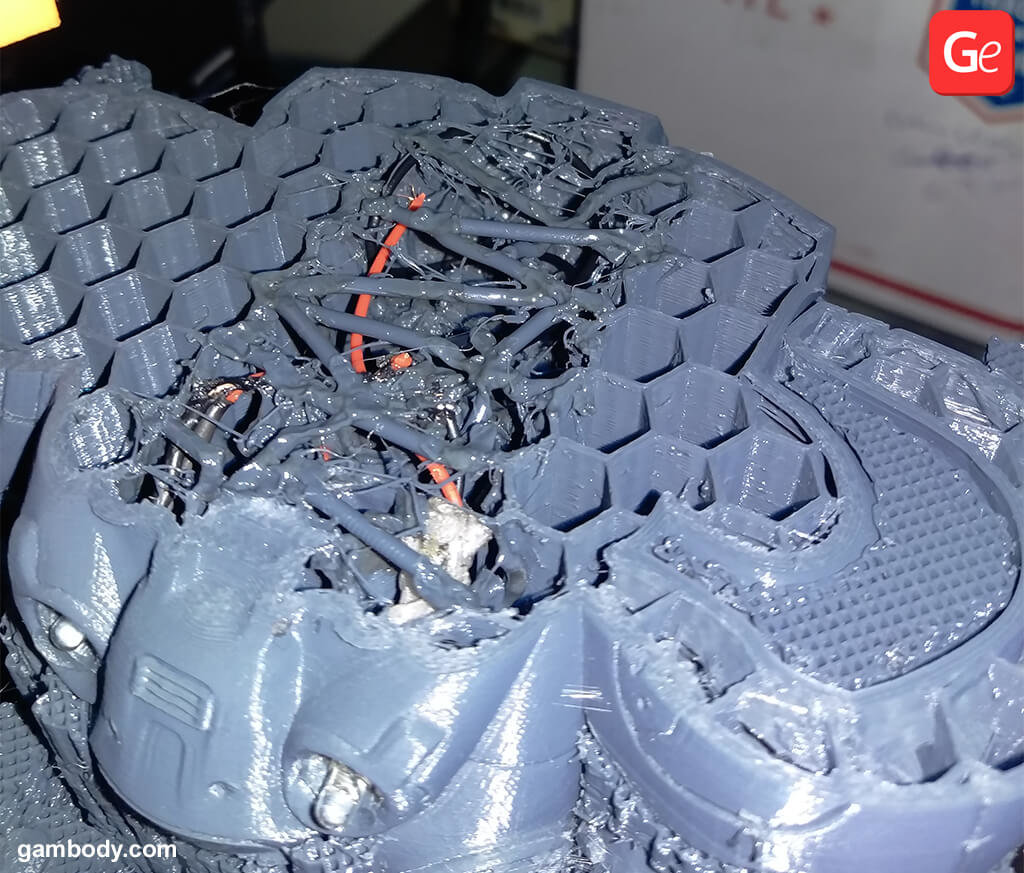
One way to remove this problem completely would be to split the model a few layers above the top lights. Print it in 2 parts and glue it at the end. But that means you will have to glue them together perfectly and do a little bit of sanding to hide the seam. This is possibly easier to achieve than hovering over your print to pause it at the right time and make sure you don’t hit the plate to create layer shifts.
If you print it in one piece, you don’t need to worry too much about a perfect inside fix, as each infill layer will start healing the model, and by the time the head prints, the infill is perfectly level. Just try to get it close enough, not to have a huge hole, as you can see from my pictures. That would mess up the infill too much.
*If you melt the outside of a model, you can fix it by melting it back into shape with the soldering iron (temp. 300-350), which is what I had to do for the top lights. Practice on some models/parts you don’t need.
6. Also, do you insert lights, batteries, and wires after the whole project is built? Or do you pause 3D printing, melt holes, add all the additional materials, fix the gaps, and resume the 3D printing process?
I paused, melted, and repaired mine, but it can be done before and after. The idea is to think before you start printing. If you want lights, analyze the figurine on your screen and plan ahead. Think of where it would work best and how it would affect the model the least.
Obviously, there is always a learning curve, but you would rather have it at the beginning of a print, rather than at the end of it. I think I scaled my print at 110% of its size, which made it pretty easy to work inside it while having the print paused (that is why it took 121 hours).
I guess that is the reason I used the soldering iron instead of the drill. I may have been afraid the vibrations would cause the plate to shift. I think a Dremel tool (or knock-off, such as WEN) with the hose attachment would be the solution to that, as it is much finer, lighter, and less likely to cause the model to shift.
7. Removing supports after the 3D print is complete can be a real challenge. What happened to the Terran Marine you were making? How did you fix the problem with the snapped leg? Which glue is the best to keep in a workshop for solving similar issues?
I learned that the hard way. Test normal support structures, versus combining the layers of support structures. I would advise anyone to nail down the support structures. Out of all pieces of software I used- S3D, Slic3r, Cura, etc., I believe Cura has the best supports. And make sure you use fine tools and a lot of patience to remove your supports. I usually use medical-grade tweezers with a flat head and a Round Scratch Awl (I just learned the name of that). The tweezers to pull the supports, especially from cavities, which this model had a lot and the Awl to break apart and push the supports out.
For my PLA models, I used 2-part epoxy glue (clear), as mentioned before. I seem to like the Gorilla brand, but there are a lot of reliable ones out there. It requires patience as you need to keep the pieces you want to use secured together for a good 5 minutes and not move them after that for at least an hour. If you print ABS, you can use acetone to melt the two parts together.
I would say the best glue out there is the epoxy as it is very versatile. But beware, it can get messy!
8. Also, can you tell us more about drilling PLA and using boiling water to bend PLA?
As I mentioned above, if you drill PLA, start with smaller drill bits and work your way up. Drill slowly as it will melt the PLA.
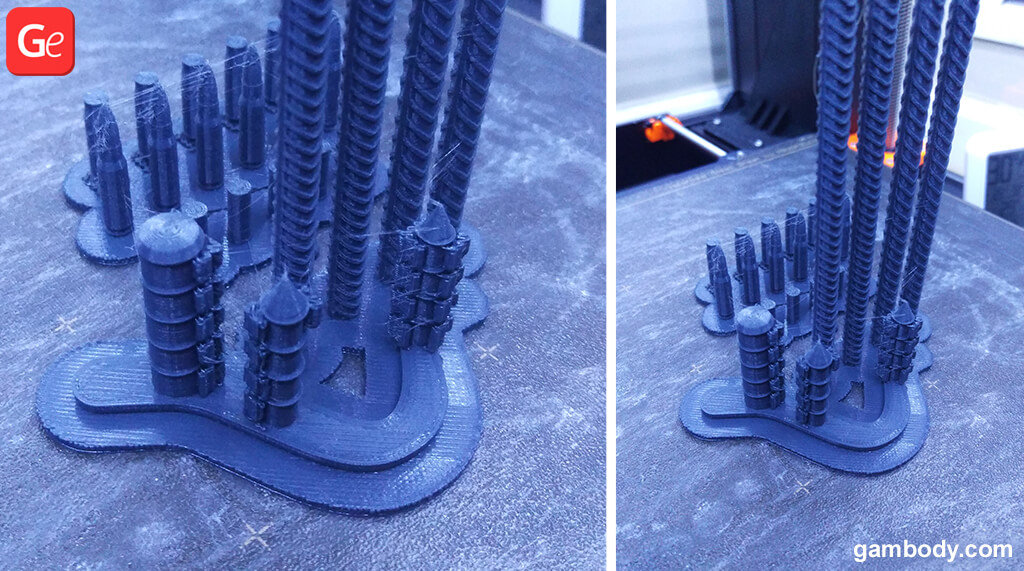
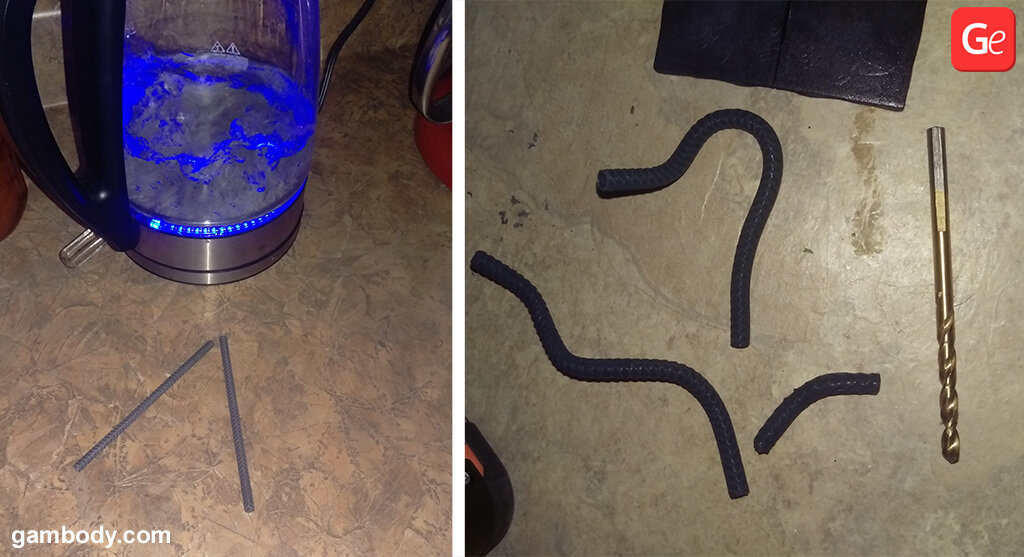
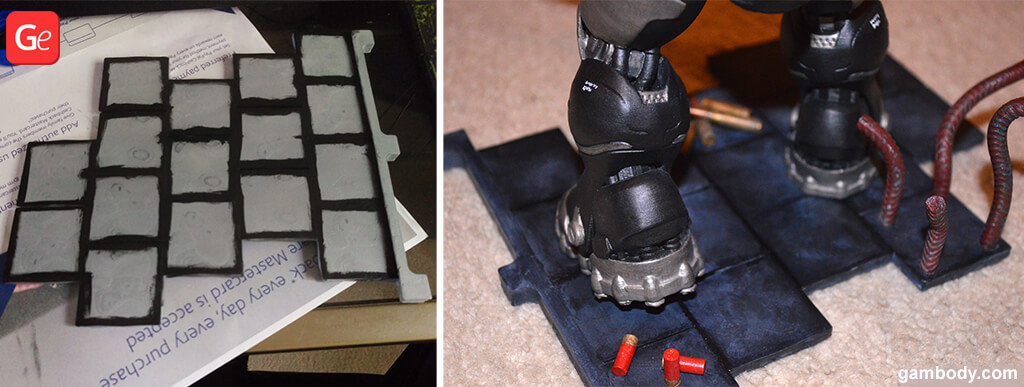
Boiling water is awesome! I just learned this trick from a Chinese designer who created the Iron Man MK1 suit and said among needed tools: Hot Water. So, I wanted to see what he meant. I tried to print the rebar parts which went in the base for this figurine already bent into shape. But my supports and overall print failed miserably, so I remembered what this dude mentioned.
No more supports.
I printed the rebars straight up and then boiled some water in the kettle. I placed it in a bowl and then dropped 1 rebar in (~4mm dia.) I left it there for 3-4 seconds and then pulled it out with the tweezers and voila! I was able to bend it at will.
Advice:
- Don’t keep it too long in there as it will deform badly.
- If you are already happy with how the element bent, do not reinsert that part back in the water. Only insert the remaining part you want bending further.
9. Can you please describe your painting steps? How many paints did you work with while painting the Terran Marine 3D printed model? How did you mix colors? Did you have a reference image of Terran Marine, or did you paint based on your imagination?
Firstly, I use paintbrushes instead of an airbrush because I think you can achieve similar results with both methods. And, in my opinion, brushes are easier to maintain. Also, not electricity dependent.
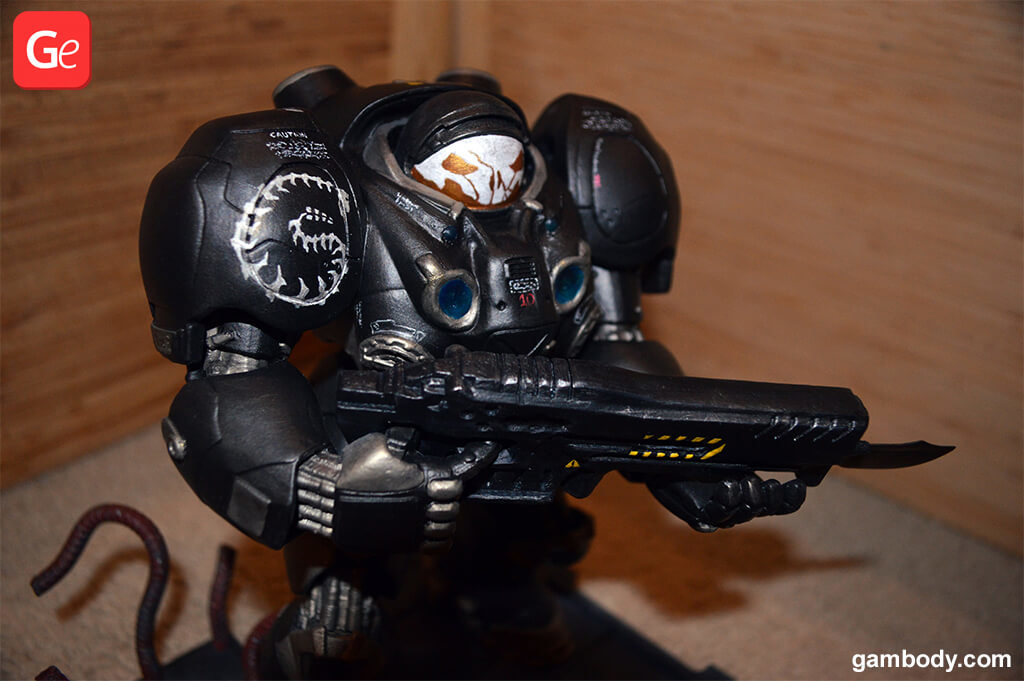
I acquired a lot of paints along the years, but for this figurine, I used the ones shown in my photo.
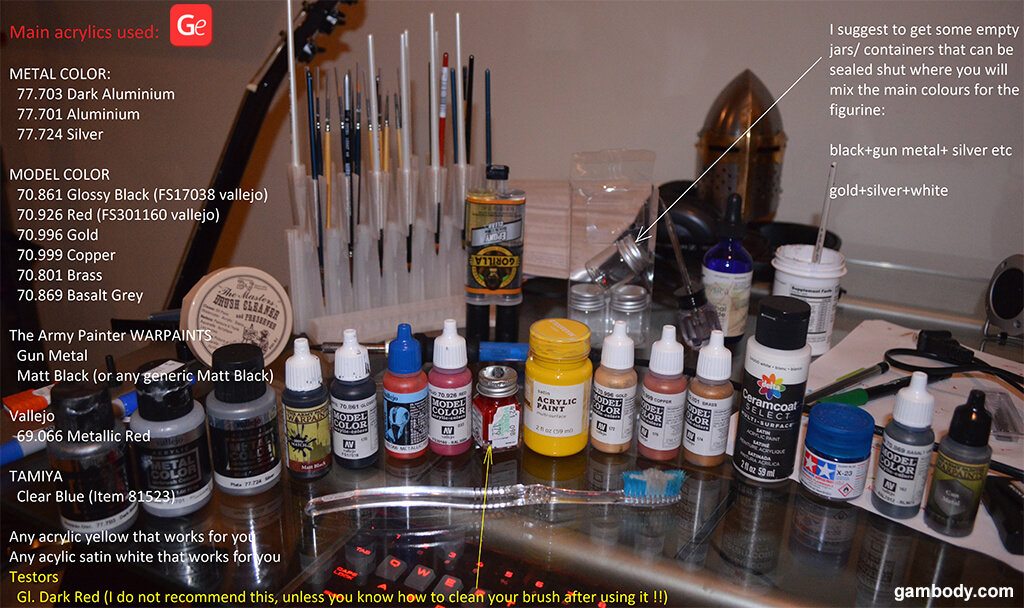
I prefer the MODEL COLOR brand and METAL COLOR for the metallic ones as they seem the most reliable acrylics, in my opinion. I never dilute the colors, and always make sure to only use as much as I need. I try as much as I can to not waste any if possible.
This may be odd, but I save the metal caps from coke, cider, glass bottles as they are small, shallow and ideal for mixing small amounts of color and then disposing of them when I am done. If I need to take a break from painting I can always apply some painter’s (masking) tape over it, so the paint doesn’t dry out.
For larger quantities, such as the main 2 colors I used for the figurine (the Black Steel and Gold Silver – as I call them. I know, lame) I bought small jars from Hobby Lobby and I mixed the colors until I was happy with how they looked when they dried out on my testing surface.
The nice thing about the MODEL COLOR brand is that the color looks very similar dry to as it looks wet, so it makes it easier to know what I want to mix. And no, I am not being paid for or sponsored by any of the brands/products I specified. I am solely recommending them because that is what I am using, and I found it to work very well.
For the 2 main color mixes, I made sure I mixed enough to last me the entire paint job, so there would be no issues with running out of paint and worrying about a new mix.
For reference, I used the Sideshow Jim Raynor figurine, and I mixed my colors to resemble those:
- As the main (Black Steel) color, I mixed Glossy Black (works with matt also), Gun Metal and Silver, until I thought it looked like the reference.
- As the secondary color (Gold Silver) I used Gold, Silver (can use Aluminium) and Matt White.
- I also mixed the third jar with a color lighter than the black steel. To achieve this color, I mixed in Black, Dark Aluminium (can use Silver/Aluminium) and Gun Metal, with far less Black than the first mix. I used this color as the shading/light weathering of both the Black Steel and Gold Silver.
If you leave only one color or one mix as the final layer and don’t apply any weathering at all, the figurine will look a bit dull. So, my suggestion is to dip your brush in paint just a little bit and wipe it lightly on a piece of paper, so it has only a small amount of paint left on it. And then proceed to add weathering (a process called dry brushing, videos can be found on YouTube).
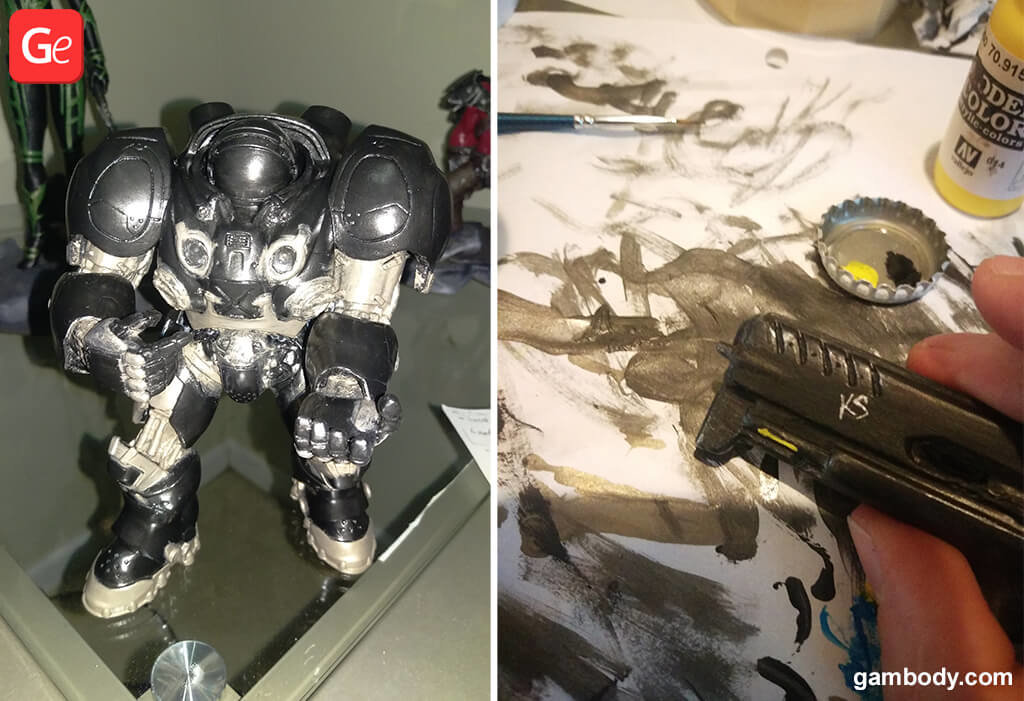
With regard to the painting process, I started by painting light coats for the entire figurine. I never focus on one area unless they are separate models. It provides continuity. Believe it or not, the mood you are in will rule how heavy is the shading you do in one sitting or how light. Hence, I like to carry a task to completion rather than keep taking long breaks.
Believe it or not, it does help to take a break for a few minutes every so often, not just for health concerns, but it provides you with a “fresh eye” when you return, making it easier to see if you want any changes made to something you’ve painted.
The first layer of paint will rarely cover the primer on the figurine entirely, so don’t stress about it. Don’t go over it 100 times while wet, as you will achieve nothing. Use thinner layers (not too thin) and make sure you eliminate the brush strokes (not leaving a lot of paint on the surface un-evened out).
For brushes, I use Winsor & Newton Series 7 and Artmaster Pearl. They are not cheap, but you don’t need very many of them. A 0, 1, 2, 4, and 6 will do. You need to make sure you clean them very well with hot water and hand soap and not leave them frayed or out to dry as this will cost you. I also use a brush cleaner container which you can find on Amazon or at a hobby store. Once I washed my brushes, I rub them in this brush cleaner and mold them into their original shape.
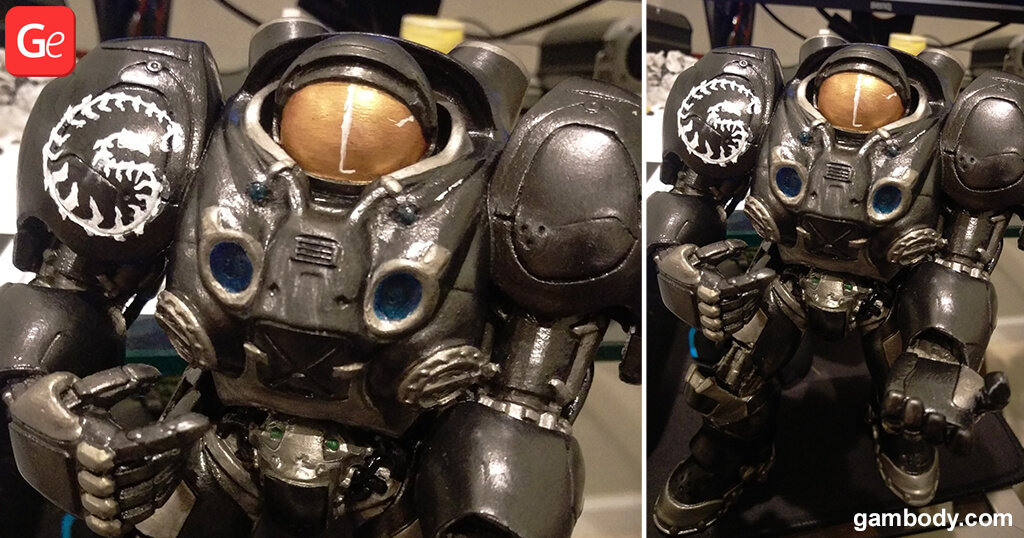
As you move on with the paint job, if you have 2 different colors on 2 different surface elevations, I realized it is much easier to not worry about being perfect with your paint job on the higher surface (paint freely even if you spill to the lower surface) and then just paint the other color onto the lower surface perfectly. The higher surface will act as a fence, so your brush wouldn’t go over and spill unwanted paint. You can see how I let the Gold Silver “spill” over the Black Steel, as the surfaces are higher than the ones of the darker color. I suggest getting the darker color close to where you want it to be beforehand, so you only need to worry about correcting the “spills.” I hope this makes sense; easier to explain while painting.
10. Is it more challenging to paint a project that has lights on it compared to a 3D print without them, or not?
With regards to paint, the only difference it makes is when it comes to masking the lights during the Primer stage (unless you use airbrush).
When painting with brushes, it can be treated as a normal surface you don’t want to get paint on. But if you do, you can use the Dremel tool with the (pointy, rounded) white cotton attachment to brush the paint off.
11. At which stage of your project did you protect a painted body of Terran Marine 3D printed figurine with Krylon acrylic crystal clear? How did you apply this additional layer? Was it necessary to wait until the primary paint wholly dried?
The primer I used takes 10-20 minutes to be completely dry and ready for sanding.
The Model Color paints I used take 5-10 minutes to be completely dry and ready for the next stage/layer.
You can use clear coats that can be applied with paintbrushes to protect the paint or achieve the desired flatness or glossiness, but I would strongly recommend using the ones in a spray can. If possible, go for non-yellowing ones.
You can use any amount of glossiness you want: flat, matte, glossy, etc. Whatever many are out there. Just make sure you test on a different surface to achieve the desired effect. My figurine was way too glossy from the paint mixes I created before applying the Krylon Flat. With that, I achieved exactly what I wanted.
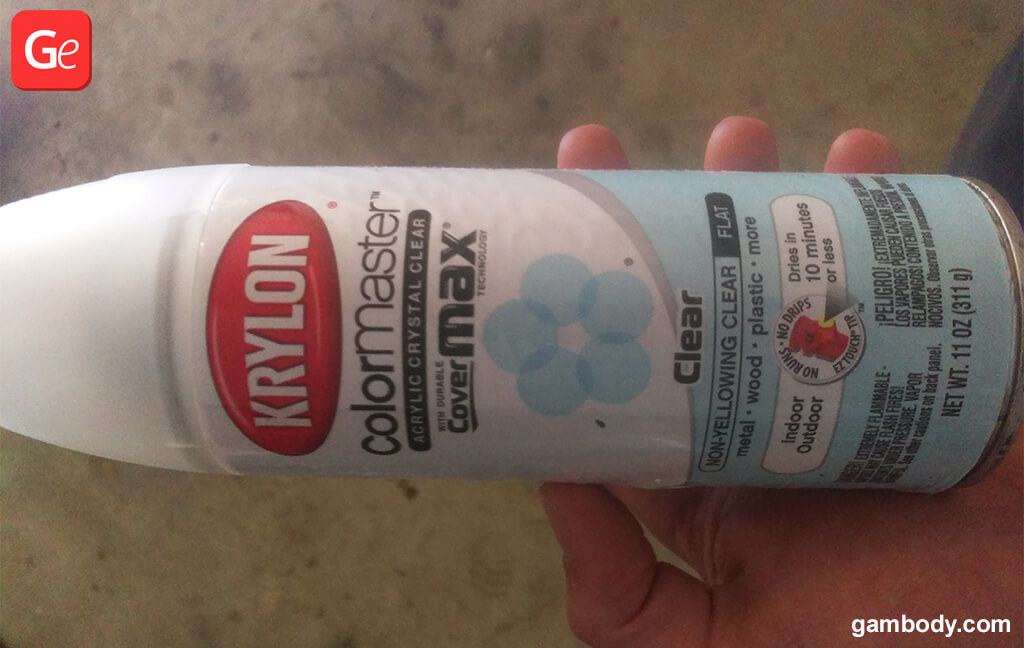
The Krylon acrylic was the last thing I did to the figurine.
Tips:
- Make sure you clean the figurine from all dust and check it thoroughly for defects before this stage. I suggest applying the clear spray inside a room where air doesn’t circulate around, as dust particles will stick to it very fast. I did it in the garage but immediately covered the figurine entirely with a clean bucket. Allow to dry for 20 minutes at least (or longer, depending on instructions).
- Apply VERY thin layers. Do not go over it with a lot of layers in one go. It will make the paint melt or run off and destroy all your hard work. I applied 5 layers of spray on my figurine. Between each application, I rechecked it for dust particles or unwanted stuff that may have become stuck to it. Tweezers help. You can also use the dry brushing method for spot fixes if needed. Then apply the next layer of Clear Acrylic.
Important! Make sure you wear a mask when you spray the clear coat onto the figurine. All sprays are very toxic to your lungs.
For the base, I used Gloss clear coat spray, and once that was completely dry, I sprayed a few small areas with the Flat clear spray to create a more diffused effect.
12. What paints would you NOT recommend to use? You talked about Gl. Dark Red paint ruining your brush. Can you describe this situation and your methods of solving it?
I am sure there are ways to clean a brush after using the TESTORS products, but to me, it is not worth it. I would rather stick to my Model Color ones, which can be very easily cleaned with warm water and hand soap.

Make sure you avoid dipping the brush in the paint all the way, as the paint will get stuck at the base of your brush and make the hairs split like no other. I highly doubt you will be able to clean that brush back to normal.
I don’t think I managed to salvage that Number 2 brush after using that specific paint.
Also, do not use MODEL AIR for brushes. It is intended for AirBrushing, in my opinion, and the colors seem too diluted for my taste.
It is easier to create quality models by using quality colors. This will cost a bit more, but it is worth it.
You can always check the Warhammer stores for paints. They sell pretty nice stuff there also.
If you buy a new paint brand you have never tried before, use it with a cheap brush first to make sure it won’t ruin it, like it did with me.
Do not waste the paint. Use a drop at a time if needed, and the investment will have been worth it.
13. Which part of your project did you like the most? Was it 3D printing, assembling, coloring, etc.?
Painting. As much fun as printing/assembling is, painting is always the cherry on top of the cake.
14. Do you have any advice on how to make Terran Marine 3D print for other crafters?
Apart from all the stuff I rambled on about above, I would suggest you get to know your printer first. I honestly can’t remember all the settings I used, but one thing I know for sure is, the printing profiles that come with the figurine won’t work for everyone.
The few things I would mention are:
- Print slower where you have high detail.
- You don’t need supports for 5mm bridging.
- You don’t need supports for angles below 45.
- Infill 20-30% – I prefer Honeycomb.
- Use enclosure for ABS. Don’t use it for PLA.
15. What is the next project you wish to 3D print?
I have been playing with the design software a little, as I initially bought my printer to print myself a Prism Tank from Red Alert 2, and I am happy to say I have successfully designed and printed that as well as the Soviet War Factory, which made me really happy. I need to finish painting those up.
But in terms of the fantastic designs at Gambody, there are quite a few, but on some, I think I will wait for a little until I can get my hands on an SLA printer to capture all the details at a similar size (20 cm).
Just off the top of my head, the topmost, which I am most likely going to print and paint one day: Female Shepard, Sylvanas, and last but not least, the Queen of Blades and Artanis, the main players in StarCraft. It just wouldn’t be fair to leave Jim all alone.
Gambody team thanks David Emanuel once again for taking his time to answer our questions and share excellent tips & tricks about 3D printing a StarCraft 2 Terran Marine figure. It is fantastic how creative some people are, and we are proud of the Gambody Facebook community and their projects. You can also join Gambody – 3D Printing Gaming Community to get advice from other hobbyists and share images of your 3D printed models along with printing/painting guides.
Read also: Meet a Talented Maker of Godzilla 3D Print: Interview with Joe Broggio

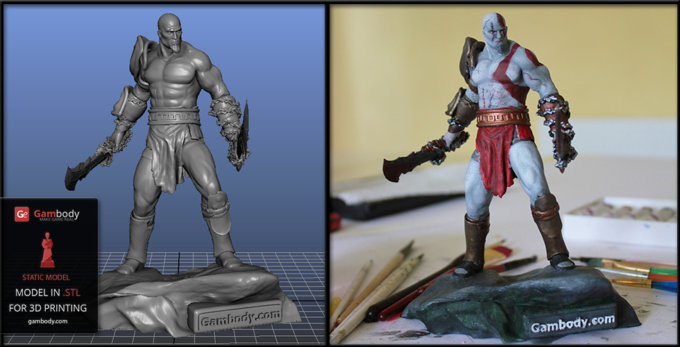
God of War Kratos 3D Model: Digitally Crafted and Manually Painted
Read Article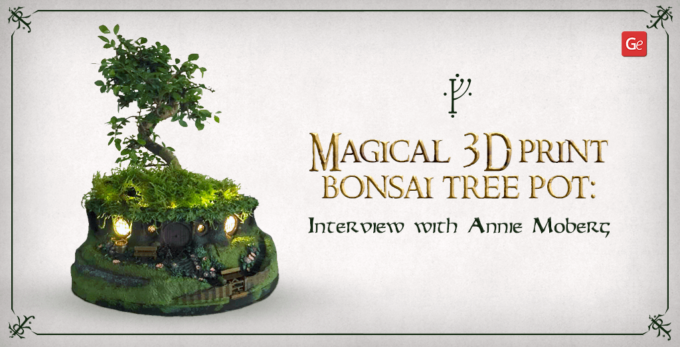
Magical 3D Printed Bonsai Tree Pot with Lights Resembling Hobbit House from LOTR: Interview with Annie Moberg
Read Article