Users with a 3D printer at home know that painting 3D prints is not a complicated but enjoyable procedure. We will get you through the steps of the priming and painting process in a way that will make you grab the paintbrush or spray paint in no time.
Having a home 3D printer enlarges our horizon and allows us to create personalized things according to our liking. Hobbyists love to 3D print and paint cell phone cases with unique patterns, household objects, office supplies, such as paper clips of unusual shapes, and video game action figures. 3D printing has entered our lives and showed us that 3D printers allow us to go as far as our imagination and creativity.

Read also: 100+ Fun 3D Printer Projects to Make
How to Paint 3D Prints
The future when every household will have an affordable 3D printer is possible. It will be a helpful device for creative people. Today, many 3D printing enthusiasts are intrigued to discover all its functional capabilities and employ them for their pleasure. Their interest in 3D technology’s potential has constantly increased for the last several years.
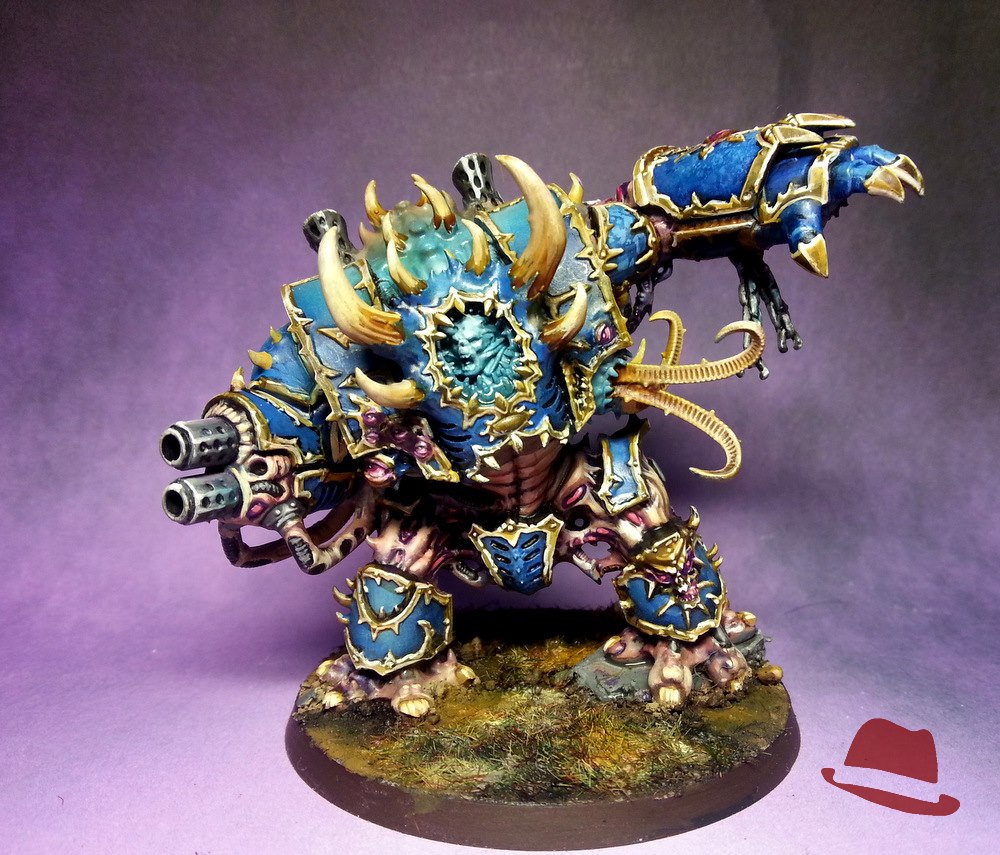
Although cool stuff, 3D printed models are usually monochromatic. Learn how to paint 3D prints to look more like their prototype. You can use any quality acrylic paint and a paintbrush or an airbrush tool, but you should first prepare the model (sand and prime it). The entire process of smoothing 3D prints can be time-consuming, but it’s worth the effort.
In our guide on painting 3D printed models with the best paint for 3D prints, you will learn how you can airbrush your projects and paint them with acrylics to create stunning glossy and smooth surfaces to adorn your figurines.

But before you begin painting 3D prints, it is essential to prepare your 3D printed model, make it smooth and fill in every tiny hole with a primer and putty. Below, see more details on each step.
List of Materials Needed to Prepare 3D Prints for Painting
Since sanding and priming come in partnership when you are preparing your 3D prints for painting, you should ensure you have these materials in hand:
- Sandpaper for 3D prints of different grades, including 220/320, 400/600 grit (the bigger the number, the more precious and smoother the result will be);
- Rotary tools or a hand file, pliers, knife (Dremel, Proxxon and Craftsman tools help to sand the model before you apply gentle sandpaper);
- Brush-on and spray-on primers for smoothing 3D prints (to quickly repair cracks and uneven layers) – popular brands are Montana, Tamiya and Krylon;
- Spray booth, gloves and respirator (a perfect place to airbrush your 3D printed model and protect your face and hands from airborne particulates and solvents);
- Masking tape (to protect painted areas and clean surfaces from new coats of paint);
- An old toothbrush or a delicate scrub brush (you can use it to get rid of the dust that will appear after sanding);
- Best paint for 3D prints (acrylics, spray paint, etc.);
- Regular or distilled water (it helps to clean up any mass that appears and remove dust);
- Soft cloth (use it to remove the dust from a 3D printed object gently);
- Dowels of different sizes and a drill (you can mount a 3D printed model to rotate it and apply even layers of paint without leaving any fingerprints on its surface).
Step 1. How to Smooth 3D Prints
Smoothing 3D prints is an important step if you wish to achieve a polished surface. And since many complex SLA and FDM 3D printing objects use supports to avoid the collapse of overhang parts, it is necessary to remove the support material in the first place. You can use a knife, pliers, rotary tools or razor blade to do this step carefully.
After this, the surface of the model will be rough. So, it is advised to sand it to make it polished. It is how to smooth 3D prints at home.
Usually, before painting PLA 3D prints or ABS projects, you will notice visible lines and patterns from printing, depending on the layer height. These lines can also be sanded out with medium, fine, extra-fine sandpaper for 3D prints. You can start with 220-320 grit sandpaper to carefully smooth the surface and then switch to 400-600 grit.

This type of work is time-consuming and requires patience on your side. However, the final result is worth all your efforts!
Once done with the sanding process, you can proceed to the next step of choosing pain for 3D prints and preparing 3D printed models for painting. But make sure to wash the dust away before proceeding.

Step 2. Applying Primer
Primer paint is used to prepare the 3D printed parts for further painting. It is used to ensure better adhesion of paint to the model surface and covers all other minor defects of an object, filling in holes and fine lines to create a smooth 3D print.

If your model comes with imperfections, holes, cracks and other issues, you can use the neutral grey primer to highlight all the problems and prepare your 3D prints for sanding afterwards. Besides, for ABS, TPU, PLA smoothing, you can fill all the problematic parts and lines with modelling putty.

If you wish to paint 3D prints with acrylics, you can apply black primer (for example, Krylon) beforehand.

Depending on the colour of your 3D prints, you can apply from one to five coats of primer. Let your project dry between coats. Also, apply a primer in horizontal or vertical lines and keep to the primer application pattern along with the entire model.
Several hours after applying the last primer coat, you will have to sand the model again with fine sandpaper for 3D prints after the primer dries out completely. This way, you can smooth the 3D print surface before painting and eliminate any roughness that appears during the primer coating procedure. Simple final polish can be handy and help you achieve a more professional result.

Step 3. Spray Paint 3D Print
Airbrush is a technique of applying paint or dye on a surface, in our case on a 3D printed model. An airbrush is an air-operated tool that sprays paint on a 3D print (or another object) in multiple, tiny droplets. The person that manoeuvres the tool controls the amount of paint that gets applied to the surface of the object.
This technique allows blending two or more colours, with one colour gradually becoming another colour. Airbrush is vastly used for paper paints, murals and other types of painting. When you look at some graffiti and spray-painted posters, you can see that such projects lack details and beautiful effects. Still, spray painting 3D prints with the proper technique can create stunning gradients and smooth creations.
The airbrush technique has become very popular among hobbyists and 3D printing enthusiasts because of its capability to apply finer coats of paint on 3D printed models. This technique is preferred because it allows producing various effects, like opaque, stains, which are harder to be produced by hand-brushing. Painting 3D prints using an airbrush technique might sound challenging, but it is not impossible. It takes a little effort and some imagination to finish the object.

Apply Layers of Spray Paint
So, once you finish smoothing 3D prints and priming your project, you can spray paint your 3D print. This technology is the quickest way to create even colour shades across the surface.
Start building up thin layers of spray paint and apply multiple coats over areas that have been primed. To achieve thin coats of paint, you will need to hold your airbrush tool or paint bottle relatively close to the areas and move quickly from one part to another one. If you learn how to paint 3D prints and wish to create beautiful 3D models, use a rotation station to move the print around and keep your layers thin and even.

If you plan to add different paint colours, make sure to mask areas to avoid spraying paint over them. Also, when you add more than one paint coat ensure you have buffed and polished it after each coat. This way, you will create a smooth glossy area that will look superb once you apply the clear coat.
Since primer is of a neutral shade, you can easily block it by adding a colourful undercoat (it is also known as a base layer). This way, you will enjoy a beautiful richer colour.
When you choose the spray painting 3D prints technique, you will have to apply two or three thin coats of paint to cover the model’s surface thoroughly. Ensure to complete your airbrushing in one session. This way, the layer will be even and nice.
Between Layers
Before applying a layer of spray paint on your 3D printed items, you should add the undercoat to create lifelike dark tones (shades) to make the figurine or model look more beautiful. Usually, it is best to use black paint for the first undercoat.
To make a 3D print in PLA or resin even more real, you will have to add lighter colours (white is the best) as a topcoat.
And between the layers, it is best to mask the areas to paint the coats you only wish to add now. However, you should only leave the masking tape for one or two days.

Thin or Thick Coats?
The thinner the coats you apply to a 3D printed model, the more its undercoat will be seen through. So, when working with thin coats, you can create a beautiful effect with dark and light shades.
Only remember that between the coat applications, you should ensure that the colour has enough saturation (just as you imagined it).
Clear Coating
After applying your colourful coats of spray paint for 3D prints, you can add a clear coating. You can add one or even two thin layers of clear coat to create a beautifully polished surface.
Some 3D printing enthusiasts love to polish the clear coat using an appropriate grit polishing cloth. Others prefer adding an extra protective layer of wax.
No matter what method you choose for spray painting 3D prints, ensure enough time for your 3D printed model to completely dry. It is great if you can set it aside for a week or even longer to give the paint time to harden.
Step 4. How to Paint 3D Prints with Acrylics
Not everyone loves airbrushing technique. In this situation, you will need acrylic paint for 3D prints, paintbrushes in different sizes (from small to big), a palette for colour mixing, water and, of course, a 3D printed model.
For painting 3D prints, you don’t need any fine art paints or hardware store paints. Even though they can be suitable for rough surfaces, they will not be great for a 3D printed model.
Acrylic paints are perfect for painting ABS, PU, PLA 3D prints and colouring the Nylon filaments. Remember that a lot matters how you prepare the 3D printed objects for painting (ABS, PLA smoothing). And an essential step to finishing the model is priming it. There could be flaws if you only apply paint coat by coat without polishing the 3D printed model. Thus, it is essential to hide various support marks, 3D printed mesh triangles and layer lines (if any) before you start painting 3D prints with a brush.

With various acrylics brands, you can go with your favourite company, such as Vallejo, Golden, Blick Studio, Arteza, etc. Professional 3D printing enthusiasts work with wet palettes when painting big 3D prints for days in a row.
Painting 3D prints with acrylics is relatively easy. You apply the paint directly to your 3D printed model and dry each coat. Use a reference or fantasize your shades to create a unique and excellent work of art.
Be artistic and ensure to dilute the paint. Also, try to apply a layer and give it time to dry before you continue. Here is some advice:
- Start painting the more significant 3D printed parts;
- Protect your eyes and hands (goggles and gloves) while painting;
- Begin with bright areas and use bright paints at first;
- Paint from the centre of the model and move to the outward parts;
- Add shadows;
- Add light accents in the end;
- Clarify small details at last.
P.S. Instead of acrylics, you can use enamels, oils, lacquers and water-based brands to paint PLA, ABS, TPU and other filaments. For example, it usually takes up to 5 days for the high-quality oil paint to dry on 3D printed models.
And as a whole, it should be fun painting 3D prints with any type of paint. You can achieve a stunning result after sanding and priming the project.
Besides, it is possible to mix your painting techniques and paint brands. Some users, for example, like to paint their 3D prints with acrylics and afterwards add an oil wash to achieve a stunning weathering effect to reveal the underneath coats.
Step 5. Add Realistic Effects
When you master how to paint 3D prints (resin, PLA, ABS, PTU, etc.) with acrylics or airbrushes, you can think of adding some realistic effects. Using opaque, silver, golden, antique shades, you can achieve retro, antique, worn-out, sparkling outcomes.
Enthusiasts who like painting 3D prints with golden and silver paints can use spray cans (or airbrushes) to spray the top layer where needed.
Step 6. Finish with a Clear Coat
To finish your work, you can apply a thin coat of matte or gloss sealer. It is the best way to protect the paint and your creativity for years ahead.

When choosing your clearcoat brand, check what different manufacturers recommend and select the brand compatible with your paint coats.
For example, when you are painting a 3D printed tank, you might want to add worn out and rush effects. It can be achieved by applying the rusty paint to one of the bottom coats and then slightly scraping off the topcoat so that the wanted result can peer through.
Use your imagination, and don’t be afraid to experiment.
Why Painting 3D Prints by Yourself is a Great idea
- Cost – 3D printed objects are expensive. 3D printed and painted models are even more so. Of course, there are services that sell 3D printed painted models at an exorbitant price. But, why spend a fortune on 3D prints which you can spray paint or paint with acrylics according to your liking? Not all of us can afford this luxury. However, spending several tens of dollars on 3D printing files, printing the model on your own 3D printer and painting it in your home is much more profitable and entertaining.
- Customization and personalization – When you learn how to paint 3D prints by yourself, especially when it is a video/computer game inspired model, you will enjoy the freedom to customize its appearance, up to the smallest detail. You can decide on the dyes you will be using to give colour to your model. It is also your decision to make about the best type of paints that you will be using.
- Fun – The process of painting 3D printed models can really be fun. Enroll your friends and make them help you accomplish the task. Have fun with colours and techniques, experiment with ABS, PLA smoothing, painting and don’t stop until you reach the desired result. You also get the chance to observe the entire process, from creation to final result, without leaving the comfort of your home.
See how DIY 3D printing is becoming a very popular trend nowadays and how delightful the all process can be.
- Emotional value – We all know that we have a higher emotional connection to something we create with our own hands. This is also the case with the 3D printed objects. Once you know how much effort and ambition you’ve put into smoothing 3D prints, priming and painting the model to look the way it looks, you will be feeling proud of your achievements and will know that nothing is impossible unless you want it.
Read 8 Benefits of 3D Printing at Home and find out what other reasons can determine you to invest in a 3D printer and start printing at home. Total customization, the possibility to control the printing process, and no shipping costs are just a few of the advantages we talked about. It’s a 10-minute reading, don’t pass by.
Conclusion
You have learned how to paint 3D prints with acrylics and airbrushing technique. Now you can master your skills and amaze Gambody 3D Printing Community with your new creations. Remember that a lot depends on how you smooth your model and prime it beforehand. Without applying a primer, the paints might not adhere well and instead peel off and ruin your work. Also, do experiments, watch videos shared by other makers and improve your skills with every new 3D print!

Your Best 3D Printer for Cosplay: Create Impressive Armor, Helmets, and Costumes Like a Pro
Read Article
Top 10 The Last of Us 3D Print Ideas: Amazing Models with STL Files
Read Article