


This should take overall.

This 3D Miniature consists of files in StereoLithography (.Stl) format that have been optimized for 3D printing.
Before printing the files, we strongly recommend reading the PRINTING DETAILS section.
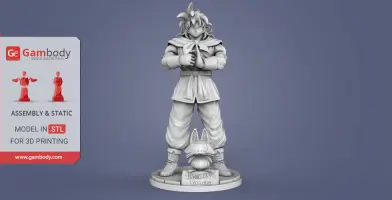
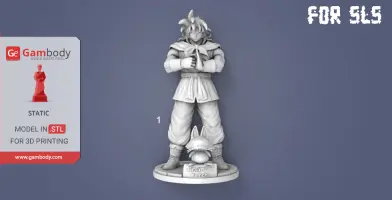
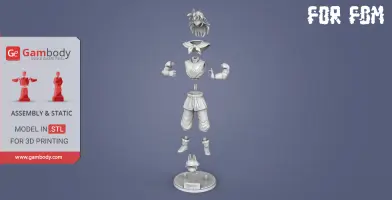
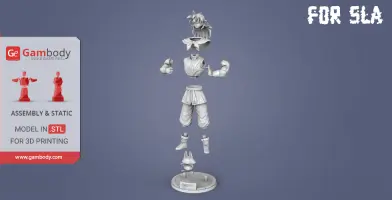
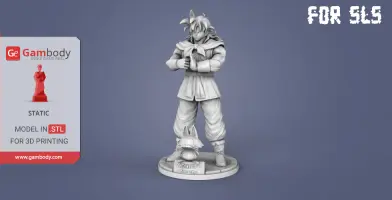
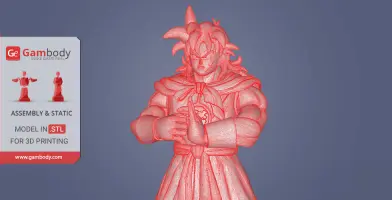
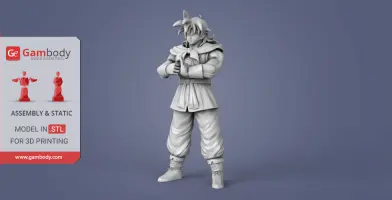
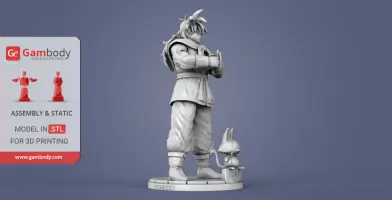
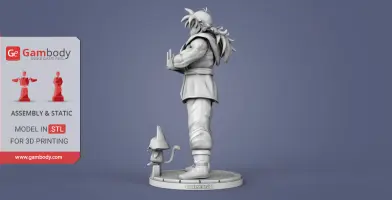
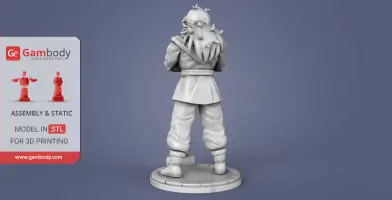
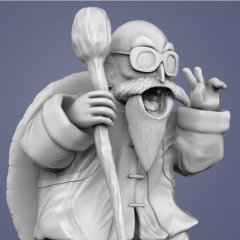
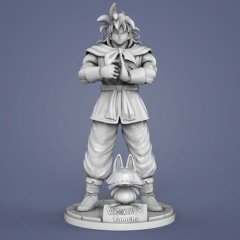
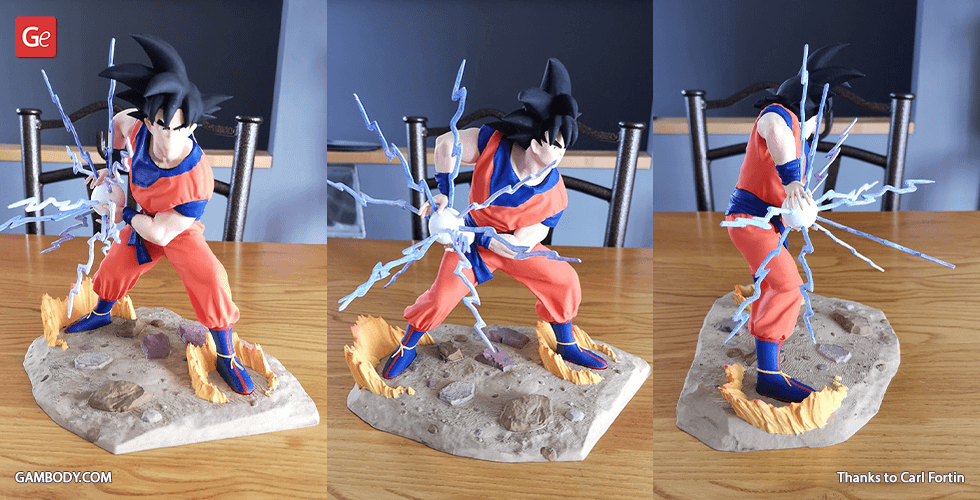
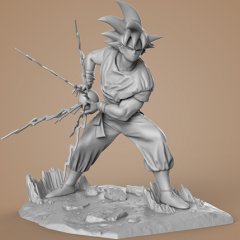
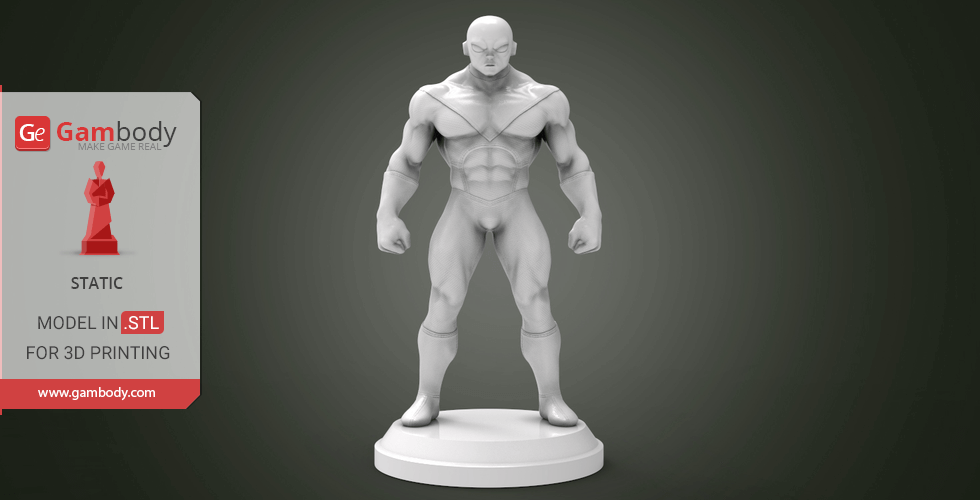
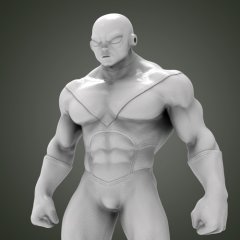
Version 1, Version 2 and Version 3 for Yamcha & Puar 3D Miniature optimized for 3D printing, the preview pictures of which you see above.
It is recommended:

|
|||||
|---|---|---|---|---|---|
| File Name | File Size | Time / Filament | Object Size (x/y/z mm) |
||
|
1_head.stl |
7.54 MiB | 10 h 26 min 7 m | 61 x 70 x 91 | Download | |
|
2_cloak.stl |
7.84 MiB | 3 h 48 min 2 m | 78 x 59 x 46 | Download | |
|
3_body.stl |
6.24 MiB | 7 h 30 min 4 m | 57 x 46 x 64 | Download | |
|
4_arm_R.stl |
2.90 MiB | 3 h 1 min 2 m | 42 x 30 x 69 | Download | |
|
5_arm_L.stl |
3.02 MiB | 3 h 32 min 2 m | 47 x 30 x 68 | Download | |
|
6_Ge_lock_7S (x2).stl |
0.02 MiB | 3 min <1 m | 7 x 18 x 2 | Download | |
|
7_legs.stl |
13.57 MiB | 14 h 50 min 9 m | 86 x 52 x 114 | Download | |
|
8_foot_R.stl |
3.41 MiB | 1 h 47 min 1 m | 30 x 41 x 42 | Download | |
|
9_foot_L.stl |
3.37 MiB | 1 h 48 min 1 m | 30 x 41 x 42 | Download | |
|
10_Puar.stl |
3.17 MiB | 3 h 10 min 2 m | 41 x 45 x 53 | Download | |
|
11_platform.stl |
24.09 MiB | 12 h 14 min 7 m | 129 x 128 x 29 | Download | |
| ... | |||||
This should take overall.
HISTORY OF YAMCHA
Yamcha is a main protagonist in the Dragon Ball manga. He is a former desert bandit, Yamcha was once an enemy of Goku, but quickly reformed and became a friend and ally. Brave, boastful and dependable, Yamcha is a very talented martial artist and one of the most powerful humans on Earth, possessing skills and traits that allow him to fight alongside his fellow Z Fighters when major threats loom. Although he retired by the latter half of Dragon Ball Z, due to being largely outclassed by both his allies and their enemies, he is always present whenever a new threat approaches, and will occasionally lend a helping hand, thus proving himself to be a powerful ally in his own right.
ABOUT THIS 3D MINIATURE
The model is saved in STL files, a format supported by most 3D printers.
FDM version features:
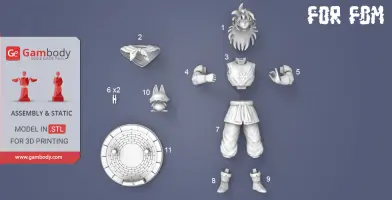
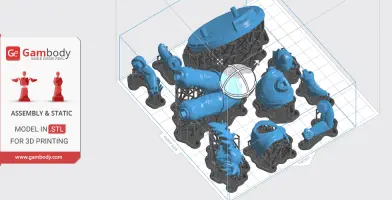
- Contain 11 parts;
- Made with Locks. One part of Lock (6_Ge_lock_7S (x2)) you need to print twice;
- Made with platform;
- Made with Puar, his loyal companion;
- All parts are divided in such way that you will print them with the smallest amount of supports.
DLP/SLA version features:
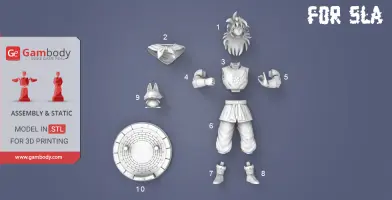
- Same as FDM but smaller, also made as 10 parts;
SLS version features:
- Same as SLA but made as 1 part for economy your material;
All STL files for 3D printing have been checked in Netfabb and no errors were shown.
Note: Before starting 3D printing the model, read the Printing Details for CURA 3.2.1.and Simplify3D Software.
There are 11 parts for FFF/FDM version, 10 parts for DLP/SLA version and 1 part for SLS.
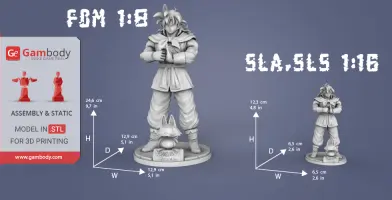
Scale: His tall is 1830 mm. Model made as 1/8 for FFF/FDM version and 1/16 for DLP/SLA/SLS version.
FFF/FDM version dimensions:
After being printed will stand - 246 mm tall, 129 mm wide, 129 mm deep;
DLP/SLA/SLS version dimensions:
After being printed will stand - 123 mm tall, 65 mm wide, 65 mm deep;
- Has a few details, to keep printing costs down.
WHAT WILL YOU GET AFTER PURCHASE?
- STL files of Yamcha & Puar 3D Miniature for 3D printing which consist of 22 parts;
- 3 versions of files for this model for FFF/FDM, SLS, and SLA;
- Made with platform and his companion Puar;
- High-poly detailed miniature of Yamcha & Puar;
- Detailed settings that we provide for Cura 3.2.1. and Simplify3D for the best print;
- Full technical support from the Gambody Support Team.
Watch the tutorial video on how to assemble Yamcha & Puar 3D Printing Miniature at Gambody YouTube channel.
You can get Model of Yamcha & Puar for 3D Printing right now! Just click the green Buy button in the top-right corner of the model’s page. You can pay with PayPal or your credit card.
Also, you may like other Anime 3D Printing Miniatures, as well as 3D Figurine of Dragon Ball.
_______
FAQ:
Where can I print a model if I have no printer?
How to get started with 3D printing?
How to set up my 3D printer?
How to choose right 3D model print bed positioning?
How to paint printed figurine?
This model was tested in Cura 3.2.1 and printed on an Ultimaker 2 in PLA material. Below you can find printing recommendations for Cura and Simplify3D softwares.
Recommendations: For all parts of Locks you need to change "Brim" type to "Skirt" in Build Plate Adhesion section.
To avoid printing problems, we recommend the following settings:
Quality
Layer Height: 0.1 mm
Initial Layer Height: 0.3 mm
Line Width: 0.4 mm
Wall Line Width: 0.4 mm
Outer Wall Line Width: 0.4 mm
Inner Wall(s) Line Width: 0.4 mm
Top/Bottom Line Width: 0.4 mm
Infill Line Width: 0.4 mm
Skirt/Brim Line Width: 0.4 mm
Initial Layer Line Width: 100%
Shell
Wall Thickness: 0.8 mm
Wall Line Count: 2
Outer Wall Wipe Distance: 0.2 mm
Top Surface Skin Layers: 0
Top/Bottom Thickness: 0.8 mm
Top Thickness: 0.8 mm
Top Layers: 8
Bottom Thickness: 0.8 mm
Bottom Layers: 8
Top/Bottom Pattern: Lines
Bottom Pattern Initial Layer: Lines
Top/Bottom Line Directions: [ ]
Outer Wall Inset: 0 mm
Compensate Wall Overlaps: Check
Compensate Outer Wall Overlaps: Check
Compensate Inner Wall Overlaps: Check
Fill Gaps Between Walls: Everywhere
Filter Out Tiny Gaps: Check
Horizontal Expansion: 0 mm
Initial Layer Horizontal Expansion: 0 mm
Z Seam Alignment: Sharpest Corner
Seam Corner Preference: Hide Seam
Ignore Small Z Gaps: Check
Extra Skin Wall Count: 1
Infill
Infill Density: 20%
Infill Line Distance: 4.0 mm
Infill Pattern: Grid
Infill Line Directions: [ ]
Infill X Offset: 0 mm
Infill Y Offset: 0 mm
Infill Overlap Percentage: 10%
Infill Overlap: 0.04 mm
Skin Overlap Percentage: 5%
Skin Overlap: 0.02 mm
Infill Wipe Distance: 0.1 mm
Infill Layer Thickness: 0.1 mm
Gradual Infill Steps: 0
Infill Before Walls: Check
Minimum Infill Area: 0 mm2
Skin Removal Width: 0.8 mm
Top Skin Removal Width: 0.8 mm
Bottom Skin Removal Width: 0.8 mm
Skin Expand Distance: 0.8
Top Skin Expand Distance: 0.8
Bottom Skin Expand Distance: 0.8
Maximum Skin Angle for Expansion: 90˚
Minimum Skin Width for Expansion: 0.0
Material
Enable Retraction: Check
Retraction Extra Prime Amount: 0 mm3
Retraction Minimum Travel: 0.8 mm
Maximum Retraction Count: 90
Minimum Extrusion Distance Window: 6.5 mm
Nozzle Switch Retraction Distance: 16 mm
Nozzle Switch Retraction Speed: 20 mm/s
Nozzle Switch Retract Speed: 20 mm/s
Nozzle Switch Prime Speed: 20 mm/s
Speed
Print Speed: 45 mm/s
Infill Speed: 50 mm/s
Wall Speed: 22.5 mm/s
Outer Wall Speed: 22.5 mm/s
Inner Wall Speed: 45 mm/s
Top/Bottom Speed: 15 mm/s
Travel Speed: 120 mm/s
Initial Layer Speed: 30 mm/s
Initial Layer Print Speed: 30 mm/s
Initial Layer Travel Speed: 60 mm/s
Skirt/Brim Speed: 30 mm/s
Maximum Z Speed: 0 mm/s
Number of Slower Layers: 2
Travel
Combing Mode: All
Avoid Printed Parts when Traveling: Check
Travel Avoid Distance: 0.625 mm
Layer Start X: 0.0 mm
Layer Start Y: 0.0 mm
Cooling
Enable Print Cooling: Check
Fan Speed: 100%
Regular Fan Speed: 100%
Maximum Fan Speed: 100%
Regular/Maximum Fan Speed Threshold: 10 s
Initial Fan Speed: 0%
Regular Fan Speed at Height: 0.3 mm
Regular Fan Speed at Layer: 2
Minimum Layer Time: 5 s
Minimum Speed: 10 mm/s
Support
Generate Support: Check
Support Placement: Everywhere
Support Overhang Angle: 60°
Support Pattern: Zig Zag
Connect Support ZigZags: Check
Support Density: 15 %
Support Line Distance: 1.3333 mm
Support Z Distance: 0.3 mm
Support Top Distance: 0.3 mm
Support Bottom Distance: 0.3 mm
Support X/Y Distance: 0.7 mm
Support Distance Priority: Z overrides X/Y
Minimum Support X/Y Distance: 0.2 mm
Support Stair Step Height: 0.3 mm
Support Stair Step Maximum Width: 5.0 mm
Support Join Distance: 2.0 mm
Support Horizontal Expansion: 0.2 mm
Support Infill Layer Thickness: 0.1 mm
Use Towers: Check
Tower Diameter: 3.0 mm
Minimum Diameter: 3.0 mm
Tower Roof Angle: 65°
Build Plate Adhesion
Build Plate Adhesion Type: Brim (for all parts of locks use "Skirt")
Skirt/Brim Minimum Length: 250 mm
Brim Width: 8.0 mm
Brim Line Count: 18
Brim Only on Outside: Check
Mesh Fixes
Union Overlapping Volumes: Check
Merged Meshes Overlap: 0.15 mm
Special Modes
Print Sequence: All at Once
Surface Mode: Normal
Experimental
Slicing Tolerance: Middle
Maximum Resolution: 0.01 mm
Flow rate compensation max extrusion offset: 0 mm
Flow rate compensation factor: 100%
Disclaimer: This model will look outstanding if printed on SLA/SLS 3D printer. The accuracy of the model printed on FFF printer can vary from the result shown in the pictures.
This model was tested with PLA material.
To avoid printing problems, we recommend the following settings:
Extruder
Nozzle Diameter: 0.4 mm
Extrusion Multiplier: 0.97
Extrusion Width: Auto
Retraction Distance: 5.00 mm
Extra Restart Distance: 0.00 mm
Retraction Vertical Lift: 0.08 mm
Retraction Speed: 5400.0 mm/min
Wipe Distance: 5.00 mm
Layer
Primary Layer Height: 0.1 mm
Top Solid Layers: 8
Bottom Solid Layers: 5
Outline/Perimeter Shells: 2
Outline Direction: Inside-Out
First Layer Height: 90%
First Layer Width: 100%
First Layer Speed: 20%
Additions
Use Skirt/Brim: Check
Skirt Layers: 1
Skirt Offset from Part: 6.00 mm
Skirt Outlines: 5
Infill
Internal Fill Pattern: Fast Honeycomb
External Fill Patern: Rectilinear
Interior Fill Percentage: 10%
Outline Overlap: 22%
Infill Extrusion Width: 100%
Minimum Infill Length: 5.00 mm
Combine Infill Every: 1 layers
External Infill Angle Offsets: 45/-45 deg
Support
Generate Support Material: Check
Support Infill Percentage: 15%
Extra Inflation Distance: 1.00 mm
Support Base Layers: 0
Combine Support Every: 1 layers
Dense Support Layers: 0
Dense Infill Percentage: 70%
Support Type: Normal
Support Pillar Resolution: 5.00 mm
Max Overhang Angle: 60 deg
Horizontal Offset From Part: 0.50 mm
Upper Vertical Separation Layers: 1
Lower Vertical Separation Layers: 1
Support Infill Angles: 45 deg
Temperature
Extruder 1 Temperature: 210
Heated Bed: 60
Cooling
Increase fan speed for layers below: 45.0 sec
Maximum Cooling fan speed: 50%
Bridging fan speed override: 100%
Speeds
Default Printing Speed: 4800.0 mm/min
Outline Underspeed: 50%
Solid Infill Underspeed: 80%
Support Structure Underspeed: 80%
X/Y Axis Movement Speed: 10800.0 mm/min
Z Axis Movemen Speed: 1002.0 mm/min
Adjust printing speed for layers below: 15.0 sec
Allow speed reduction down to: 20%
Other
Unsupported area threshold: 20.0 sq mm
hero, anime, manga, dragon-ball, dragonball, human, dragon-ball-z, super-dragon-ball
You are about to report Yamcha & Puar 3D Printing Figurines in Diorama | Assembly for violating our Terms and Conditions. Please take a few moments to fill in the following information.


Comments
comments powered by Disqus