Anyone working with 3D models, printing figurines and collectibles, or useful things for a home could take full advantage of a free STL editor. Such software helps you to edit and repair STL files and improve (customize, scale up/down) your favorite projects.
Every 3D printer user should learn at least one of the many free STL editor software to work successfully with STL files. Gambody’s list of editing software includes Blender, Fusion 360, MeshMixer, SketchUp, FreeCAD, SculptGL, Netfabb, Tinkercad, Meshlab, and 3D Slash.

Read also: Best Free 3D Modeling Software
STL Editor
There are two types of STL file editor software: solid modeling and mesh modeling. The first is not designed for 3D printing, while the second is. Still, both have something a user can take advantage of.
For example, CAD tools such as Blender, Fusion 360, Tinkercad, and FreeCAD can create solid objects. Thus, when you make a cube or circle, you get what it is. Such computer-aided design tools can help you construct objects using exact measurements, and still, 3D printing enthusiasts can rely on CAD to edit STL files.
At the same time, you will look into specific STL editor tools that are created for 3D modelers. Using such mesh software, you can open, modify, edit STL files, combine (merge) them, etc. Such models only show you their shells but have no filling, and thus, you might need to make their walls thicker to 3D print a good project.
The list of 10 free STL editor tools you can quickly jump to in 2023:
1. Edit STL in Blender
One of the most famous software, Blender STL editor, is a popular tool among hobbyists who wish to add changes to their 3D models before printing them. The program has many useful features and tools that are perfect for modifying STL files and editing them.
Unlike some very simple STL editor software that lacks features, Blender has more than enough options, but it could take a while to learn how to use it and enjoy all the available commands.
Opening STL Files
If you see a cube when you launch the software, you can remove it before opening STL files. Just hover the mouse over the cube and click Del.
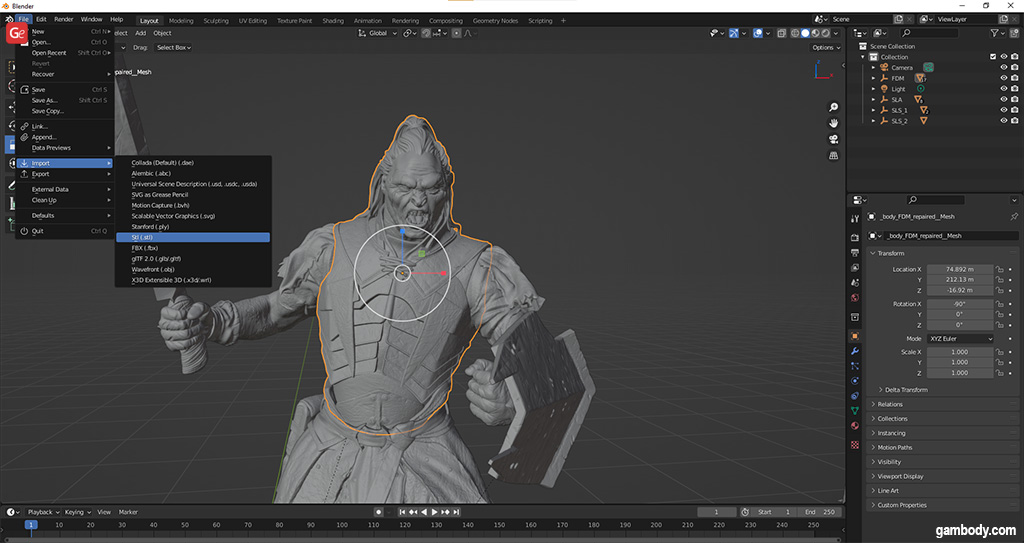
Now you should press File and select Import – STL. This allows you to browse through all your 3D printing and other files and select the one you wish to work on. The editor also works with OBJ, FBX, PLY, ABC, USD, and others.
Edit STL Files
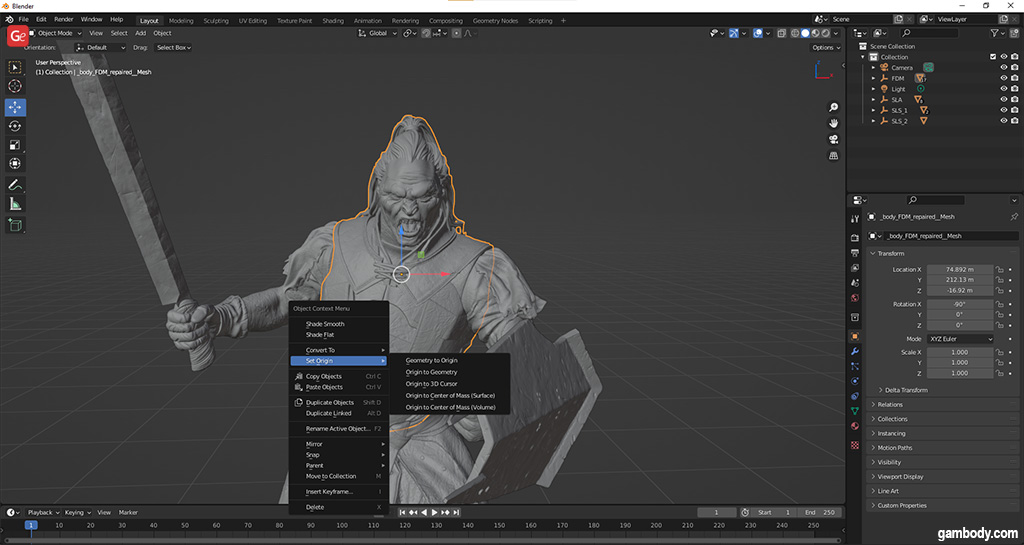
When you are in Object Mode, you can use the Set Origin option to move your 3D model to the origin and make the object’s origin the center of the object.
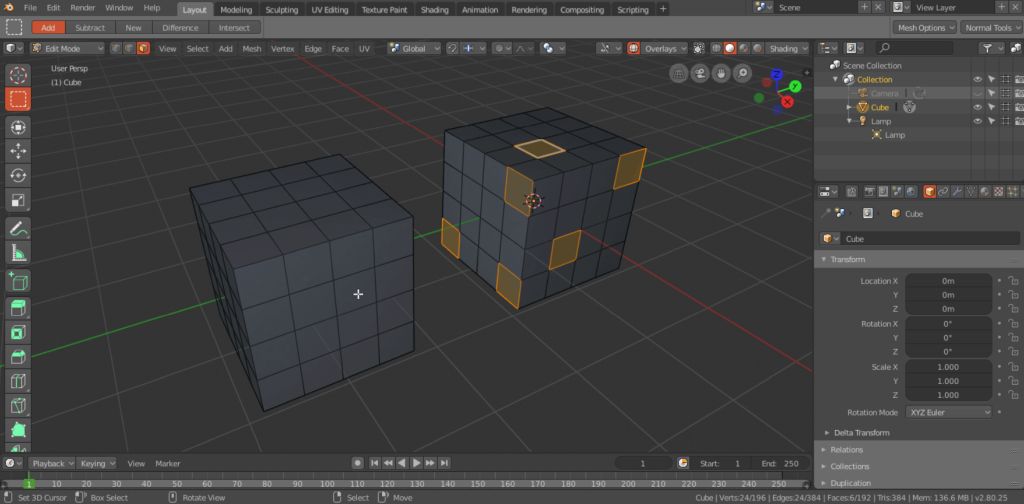
To use your STL editor to edit files, you should use the Edit feature instead of Object. This option reveals the model’s edges and allows you to select the whole project (press Alt+L) or individual edge, point, and plane (right-click whatever you wish to work with).
Users who wish to transform their 3D model triangles into rectangles shapes should press the combination Alt+J.
If you want your project to have more or fewer tiles, change that number using the Subdivide/Un-Subdivide feature (which you can also access by right-clicking the Subdivide menu).
To eliminate some model elements, extrude them, or move them, use the tools called Extrude, Face, Vertex, and Edge. To add a new shape to your 3D model, you should rely on tools like Cube, Sphere, and Plane.
To merge STL files, rely on the Boolean feature, which helps to create new forms by cutting or merging two.
Read also: Incredible Stuff You Can Make with a 3D Printer
Repair STL Files
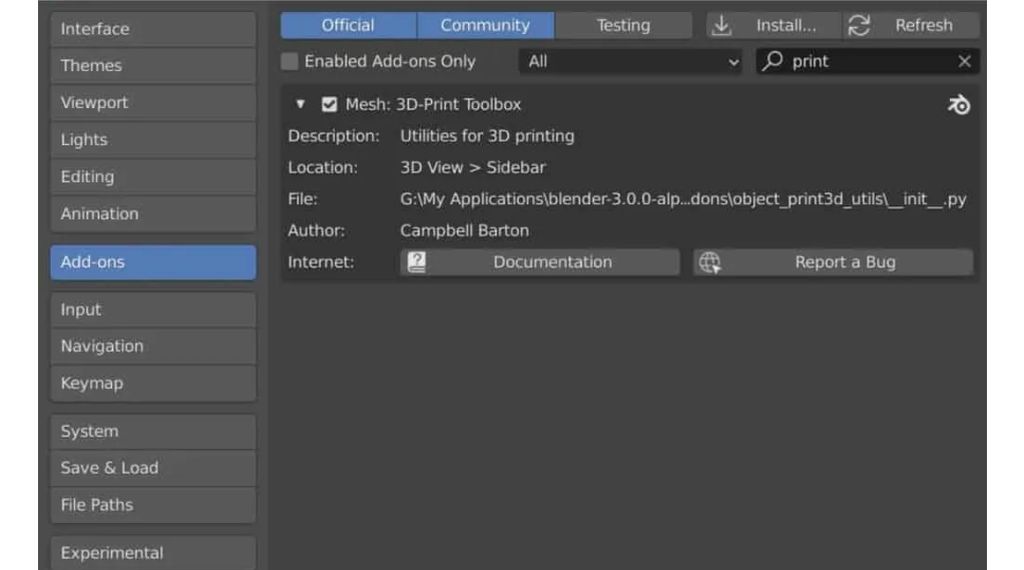
This popular STL editor has special features that allow you to easily repair your STL files in 2023. You will have to activate this feature by going to Edit and selecting Preferences – Add-ons and then activating Mesh: 3D-Print Toolbox.
The sidebar on the left offers many great tools you can use. If you can’t see it, you should turn it on (it will appear beneath View) by clicking the N letter. You will see various issues you can fix, including overhangs, wall thickness, and manifolds.
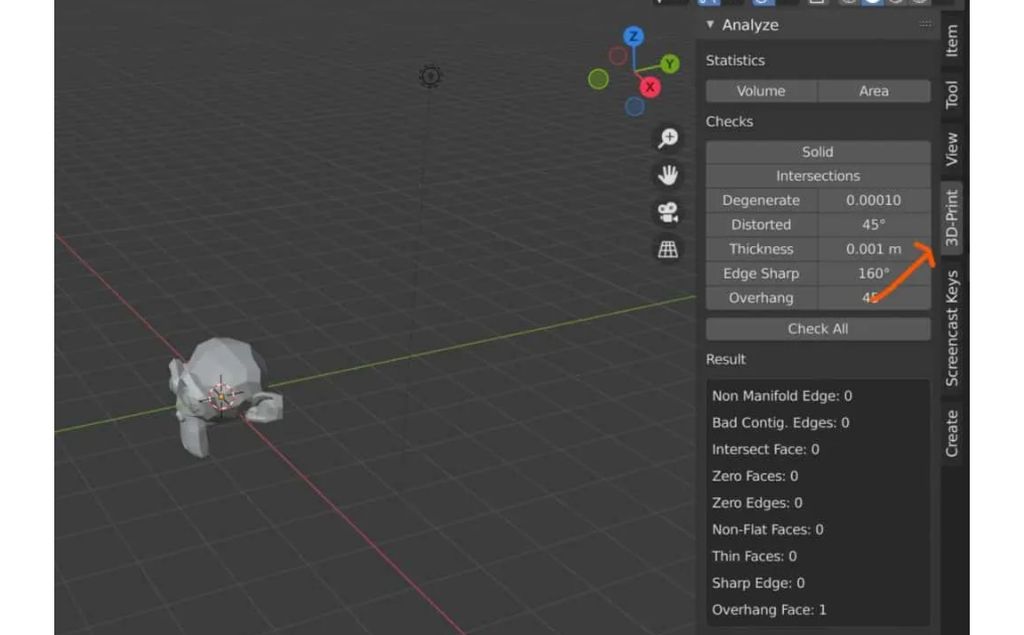
Choose one or all three at once to check if these issues exist in your project, and click Check All. Then you can repair your model using the STL editor tools and ensure the walls a thick enough to print well, supports are added for all the overhangs, etc.
When you are happy with modifying STL files, you can export your 3D model through the File menu. Choose Export – STL to save your project.
* * *
Once you learn how to edit STL files with Blender, you will love this fantastic software. With its help, you can work on high-poly 3D models, sculpt your favorite characters, and model complex objects. Still, it might take a long while to master this tool.
2. STL File Editor: Fusion 360
Hobbyists can rely on the free Fusion 360 STL editor to add changes to their 3D model, modify it and improve it. There is a paid version for professionals who use the tool for work (with a free 30-day trial period), but the free release works perfectly well for enthusiasts who 3D print figurines for their collections and need the tool for personal use only.
Edit 3D Models
Opening STL files is simple if you use Fusion 360. However, it is a must to convert your 3D model into a CAD-friendly format to take full advantage of all CAD software’s instruments.
If you look at Modify dropdown menu below the Mesh menu, you will see the Convert Mesh option, which might work for a simple project. However, if you are working on a complex STL file, it is best to listen to the warning given by Fusion 30 and abort the conversion. In this case, you can use a limited number of tools for STL 3D models.

Using the Insert – Insert Mesh option, you can place your project in the workspace and select your preferred units (inches or millimeters).
How to Repair STL
Every 3D model should be checked for various problems you can repair with the Fusion 360 STL editor. Once you import your STL files, the software will automatically check them and tell you if any minor issues exist. Then you can choose Repair and whatever you wish to repair (Close Holes, Stitch and Remove, etc).
When you need to split your 3D model into smaller elements, use the Plane Cut option. Also, you can leave your project with a shell or fill it.
If you want to merge STL files, you should select Modify on your Mesh tab and choose the Combine feature. After this, point to the Target Body for other bodies (Tool Bodies you will select next) to be combined with and choose Merge (other options you can use are Cut, Join, and Intersect).
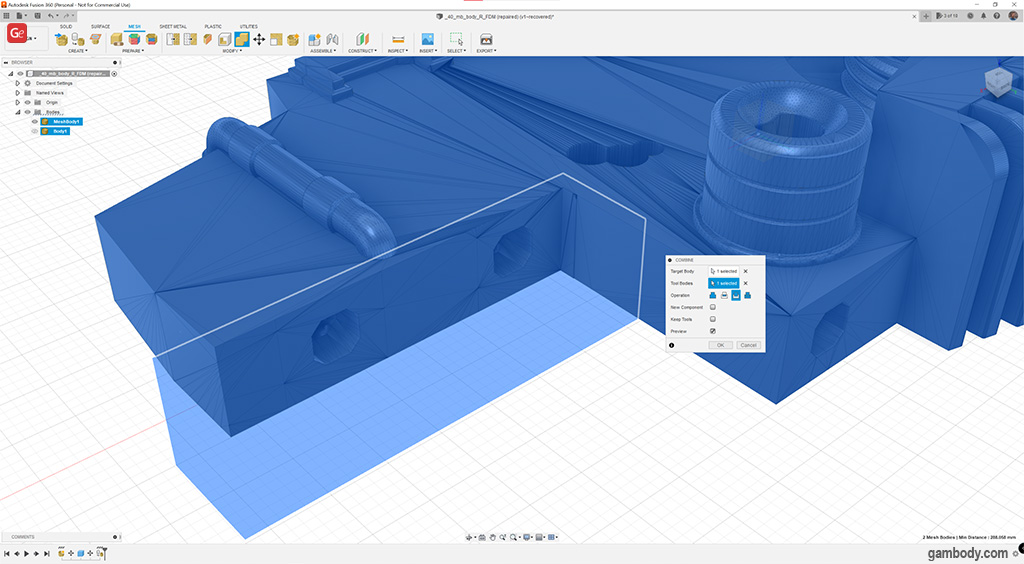
You can rely on Reduce option to get a lower number of facets in your project. This tool shows you a preview of what you get.
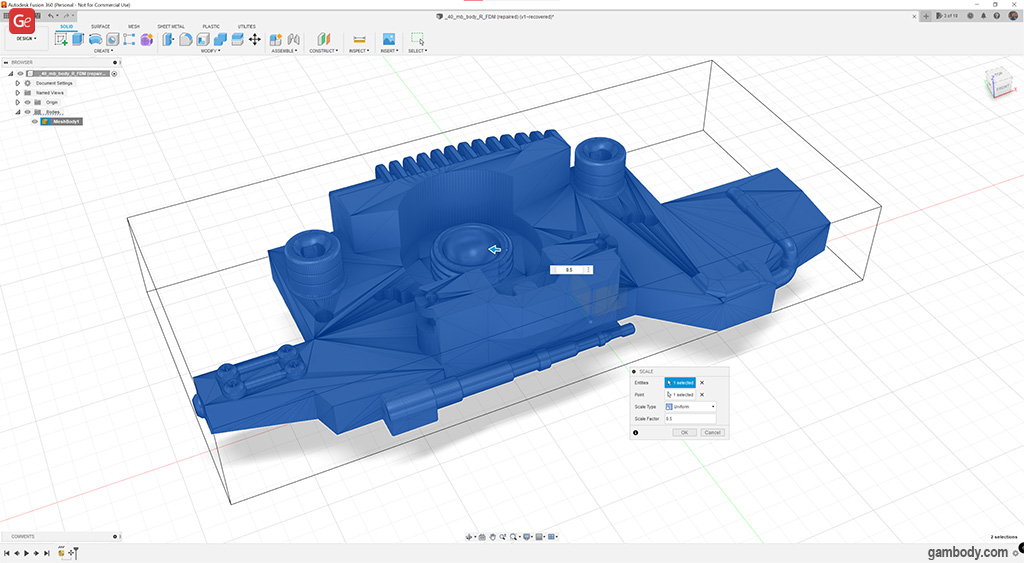
If you need to scale your 3D model, use the Solid tab in your Design space and choose Modify – Scale feature. It lets you use either Uniform or Non Uniform scale type. The first selects the project on all axes, and the second allows selecting along one of three axes (x, y, or z).
When done, you should select File – Export and choose STL or another file format (OBJ, 3MF) to save your project.
* * *
Fusion 360 may not be a perfect STL file editor 2023 because it can convert your STL model to CAD-solid-type-of-project with errors or even crash while you make that step. Thus, it could be better to work with your STL file without conversions and use basic options such as Combine, Line Scale, mesh-repair, quick technical screenshot, simple render in the cloud, and thus.
Read also: Best Online 3D Printing Service for Hobbyists
3. Meshmixer Repair STL
Let’s learn how to edit an STL file with Meshmixer, another free STL editor for Windows you might love using every day. This software is user-friendly and offers a slicer feature. Please note that Autodesk stopped developing Meshmixer in 2021 and suggests users would rely on Fusion 360 instead.

But you can edit STL files in Meshmixer in 2023 and then send the 3D printing model right to the 3D printer.
How to Edit STL Files
With MeshMixer, it is easy to modify STL, edit it, repair your project, etc. This STL file editor allows you to quickly Import an STL file using the Import menu and then choose Edit – Make Solid to continue.
Your left-column menu will have the following options:
- Import;
- Meshmix;
- Select;
- Sculpt;
- Stamp;
- Edit;
- Analysis;
- Shaders;
- Export;
- Print.
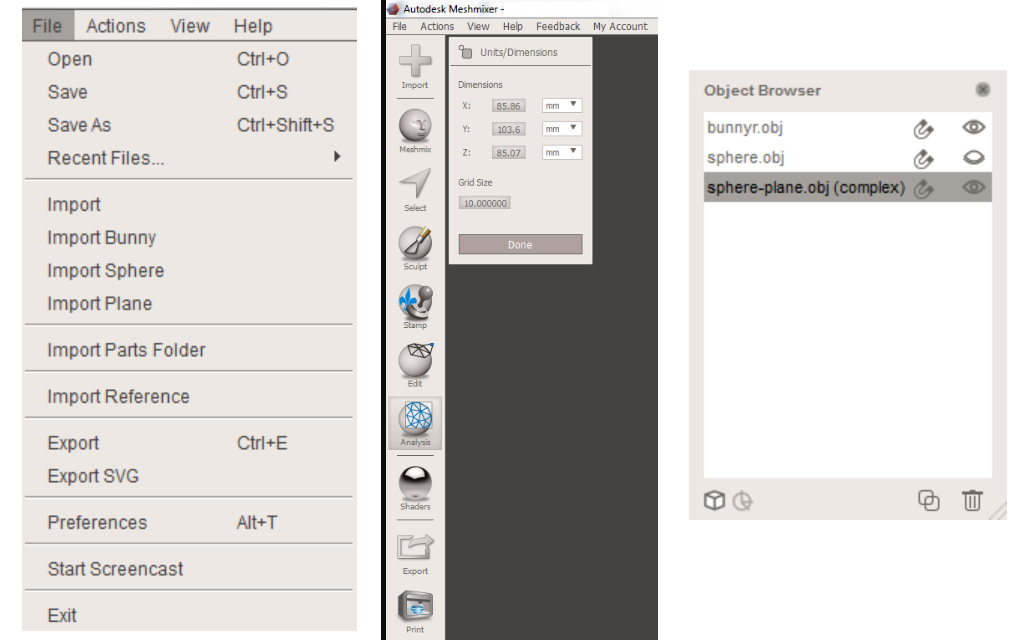
The Object Browser lists all 3D models in your scene. But it is hidden by default until you add multiple objects. You can also make it visible via View – Show Objects Browser. You can select the model(s) and click the Duplicate or Delete icon.
Meshmix STL editor lets you work with shapes, and basic and complex forms, rotate and move your project, scale it, extrude, and smoothen it while sculpting and modeling.
The Edit menu in this free STL editor offers many tools to fix issues and work on your 3D model. If your project is partially flipped, you can Generate Face Groups using the biggest Angle Threshold. Your flipped areas will each get a group, and the rest of the object will be a “positive” area.
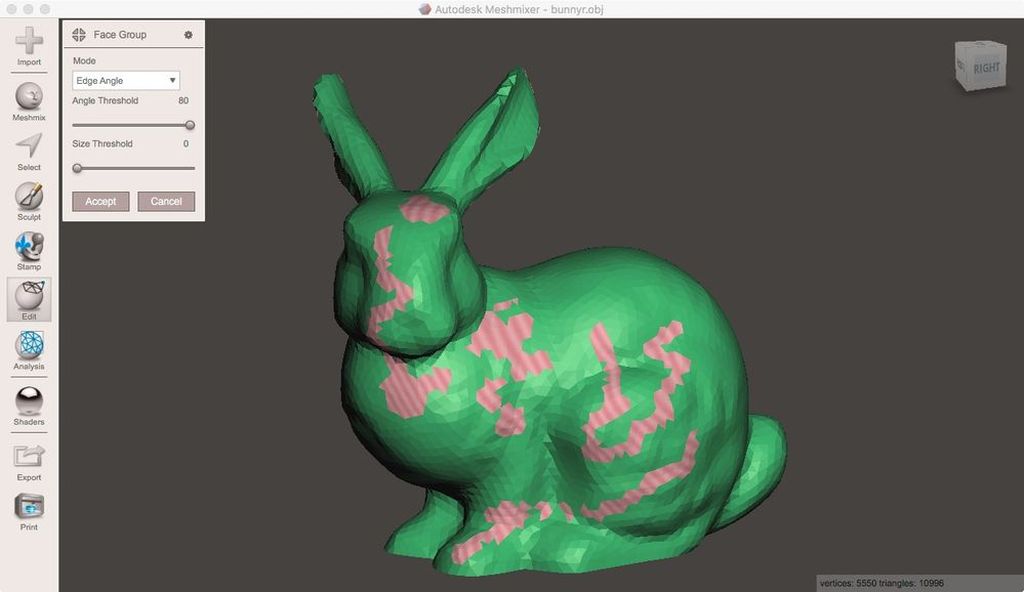
In the Select menu, you can double-press the “positive” area and then press I to invert that part to flipped faces. Then you can use Flip Normals under Edit to fix the model.
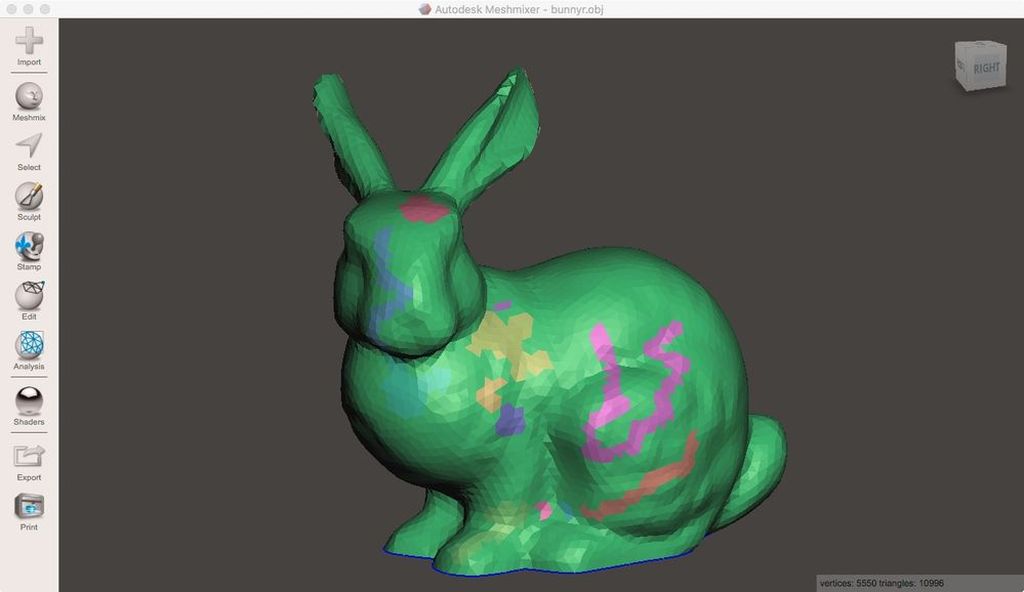
The Edit menu also allows you to use Boolean operation, Deform/Transform your 3D model, Separate Shells, Align, etc.
Modify STL & Repair Files
Hobbyists who use a free STL editor to prepare their 3D model for 3D printing will love the set of tools offered by Meshmixer.
When you choose the Analysis and Print menu on the software’s sidebar, you will see various features that can help you improve your project and ensure it has no errors.
Through Analysis – Generate Support feature, it is simple to create supports to ensure all the overhangs 3D print well. But you can also Add Supports via the Print option.
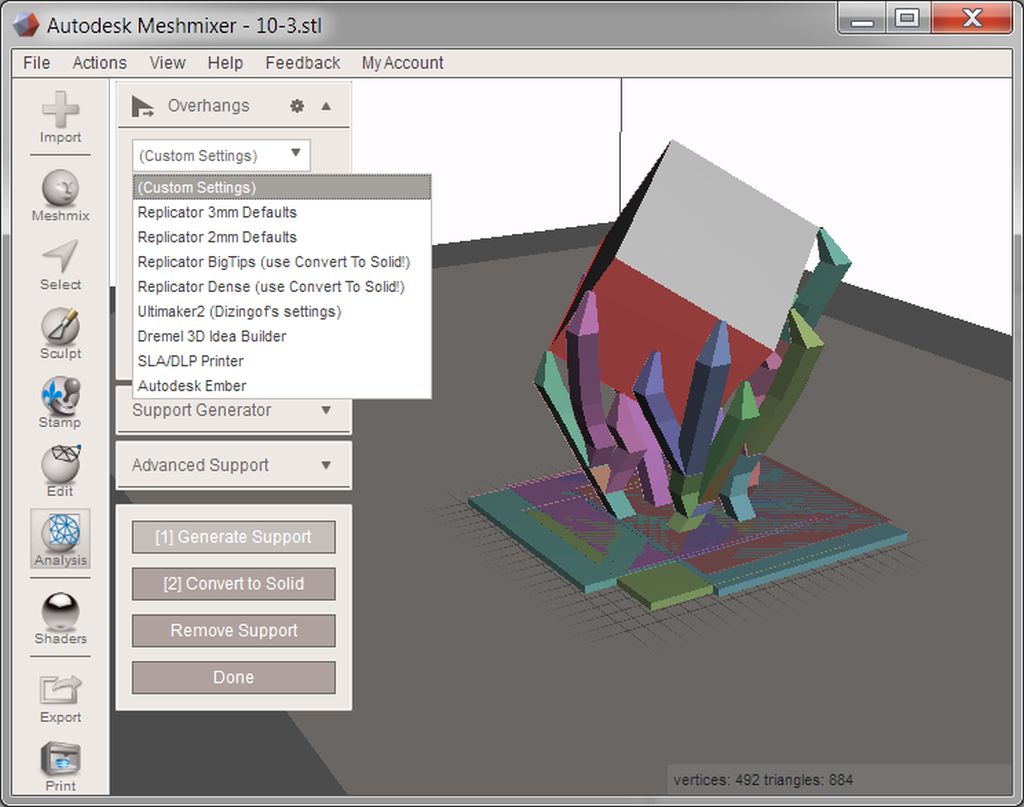
If you want to repair your 3D model, choose the Print – Repair Selected option. It just looks at your project and automatically resolves all issues, such as holes in the model, and non-manifold vertices, and lets you adjust the wall thickness and hollow some or all parts if needed.

Besides, you can adjust your 3D printer’s settings and go to Print – Send to Printer when your project is ready to be 3D printed.
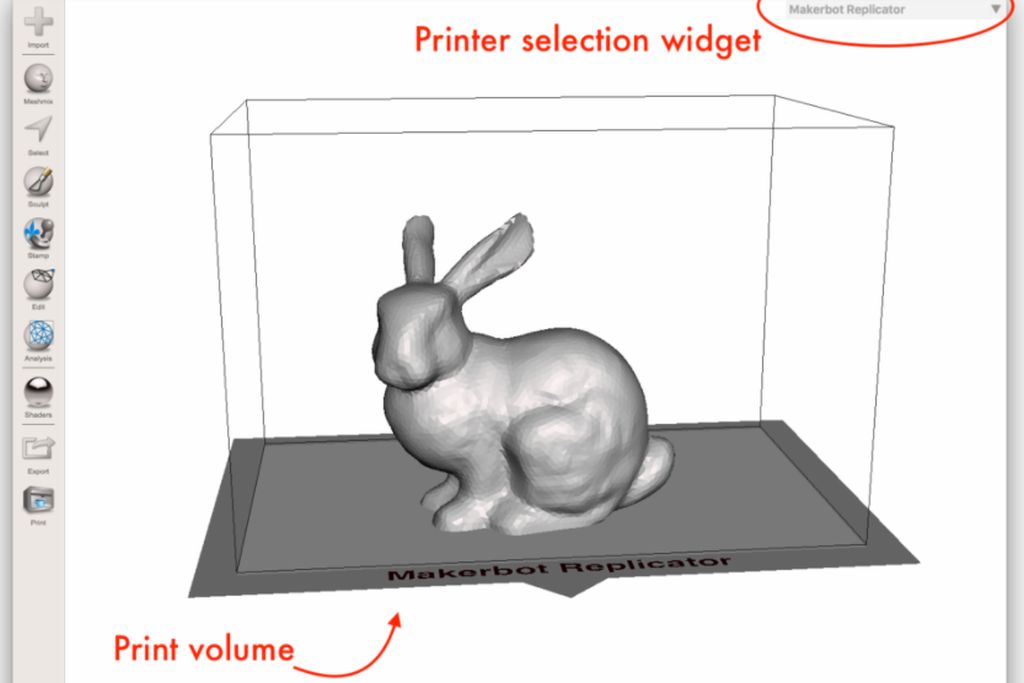
Users who learned how to edit STL files with MeshMixer and are happy with the results can export the project as STL via the File – Export menu.
* * *
Among different mesh software, MeshMixer is one of the best STL editors you can find in 2023. It helps you modify your 3D printing object from head to toe and develop an ideal model that would turn into a fantastic physical print.
Read also: How to 3D Print Without Supports
4. STL Editing Software: SketchUp
When you want to learn how to edit STL files with SketchUp, you will need some good tips. If you choose SketchUp online STL editor as your free tool (you can use this software at no cost for personal projects), you will need to get one extra plugin to edit STL files.
How to Edit STL
Firstly, as you launch SketchUp, you need to get the free STL plugin. You will find it in the Window – Extension Warehouse menu. Its name will be SketchUp STL.
To work on an STL file, you should first create a new model. Then select File – Import to search for your project (remember that you need to switch your files to Stereo Lithography Files (.stl)).
Repairing your files means getting rid of different issues. With SketchUp, you should search for extra plugins that fix problems. For instance, a Cleanup plugin can do miracles by removing subdivided faces and extra edges. Install it and find it under Plugins – CleanUp, then select Merge Faces or Erase Stray Edges. You can also use Repair Edges, Erase Hidden Geometry, Merge Materials features, and optimize the plugin settings.
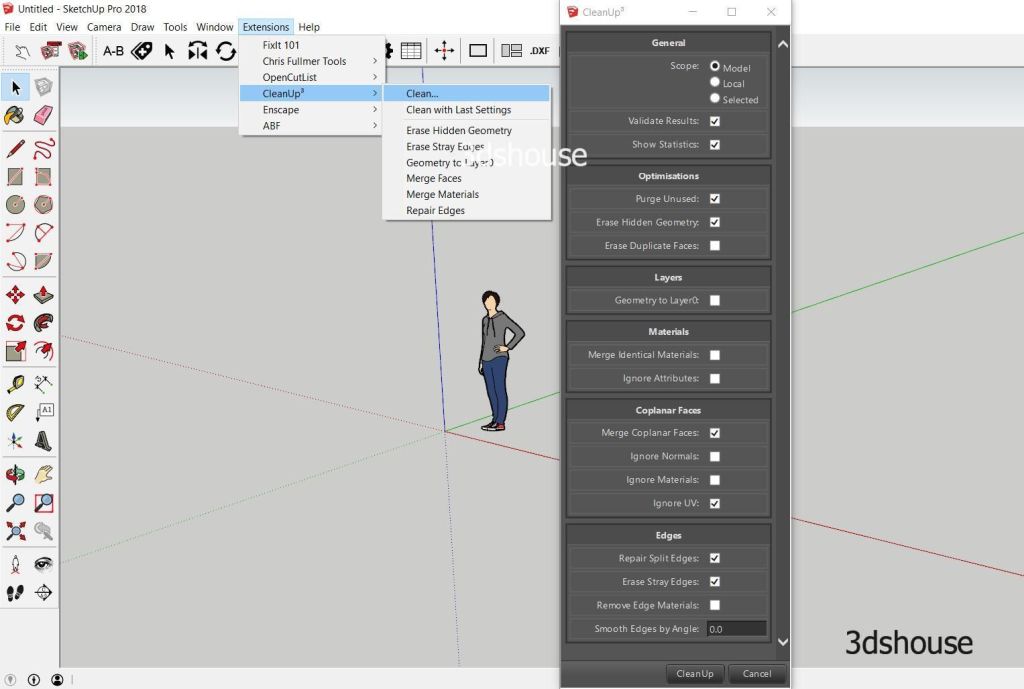
Besides, it is possible to Merge Coplanar Faces by using Import – Options and checking the box that says precisely what you wanted to do.
The software allows you to move, and rotate your model to position it how you like.
How to Export STL
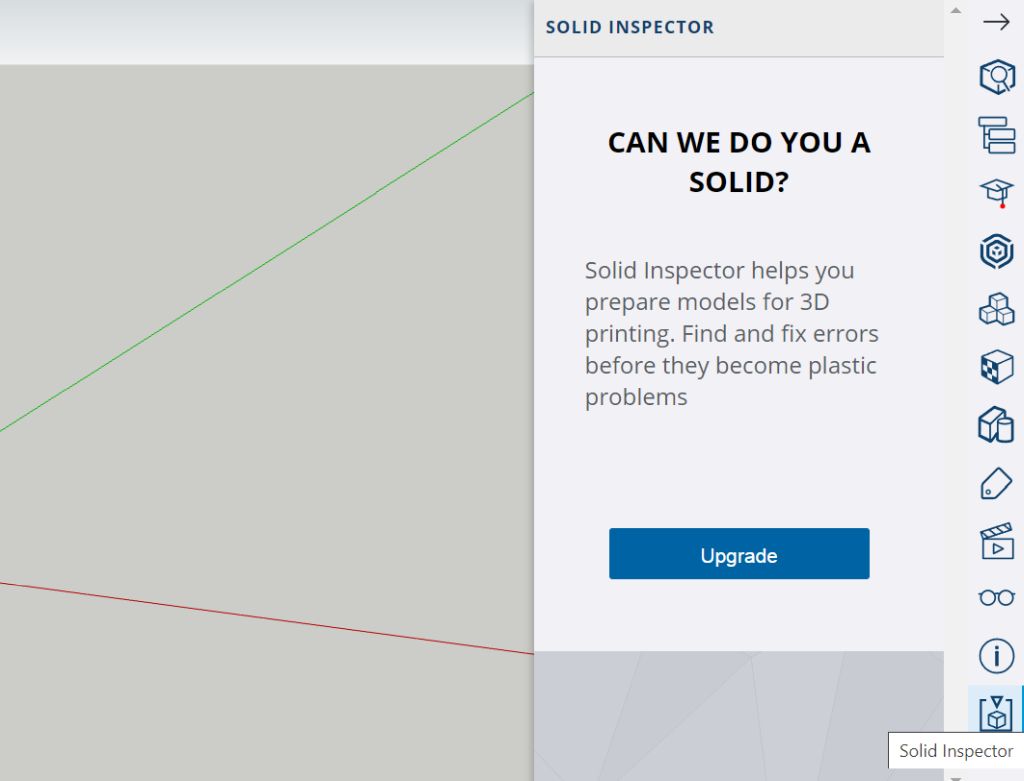
If you believe your project could miss some edges or have extra faces, download the Solid Inspector plugin and let it do the job and help you fix the problem. It’s best to do this before exporting STL.
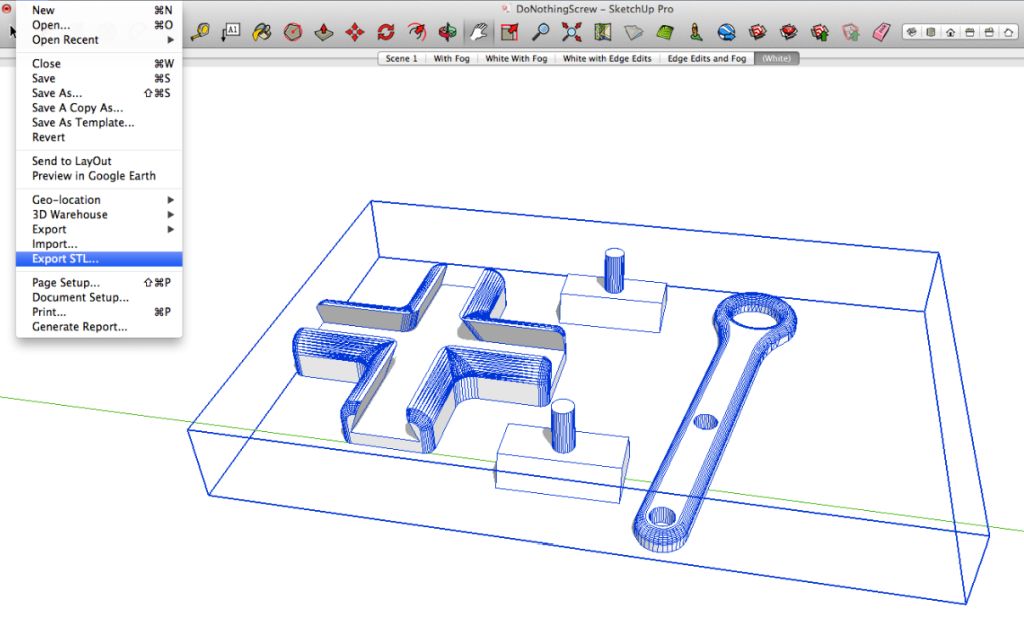
Now select File – Export STL, and then after choosing your unit of measurement press Ok.
Or, if you are using the free online STL editor, you can try Download – STL option.
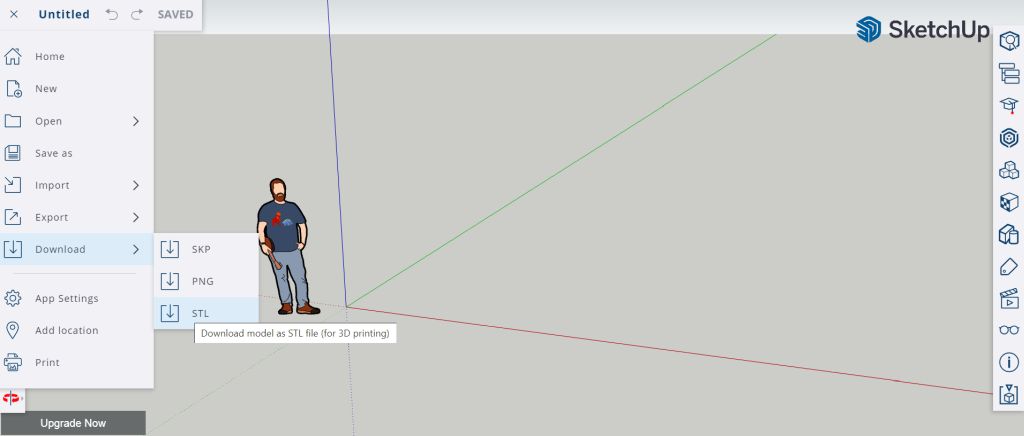
* * *
SketchUp is not the best STL editor. In fact, it can have issues such as missing or subdivided faces, edges over cutouts and holes, etc. But you can still use this software.
5. FreeCAD Edit STL
FreeCAD is another free software you can use as an STL file editor in 2023. But you should be very attentive because users report that this tool might ruin your mesh structure because it cannot intercept edges and other parts correctly.
Still, it is free to use. And it has some useful tools you might give a try.
How to Open STL File
Your FreeCAD software lets you create new projects through the File menu, where you can press New to start a new project and then Import to choose the 3D model in STL format. You can also use FreeCAD as an OBJ editor and for other types of mesh models.
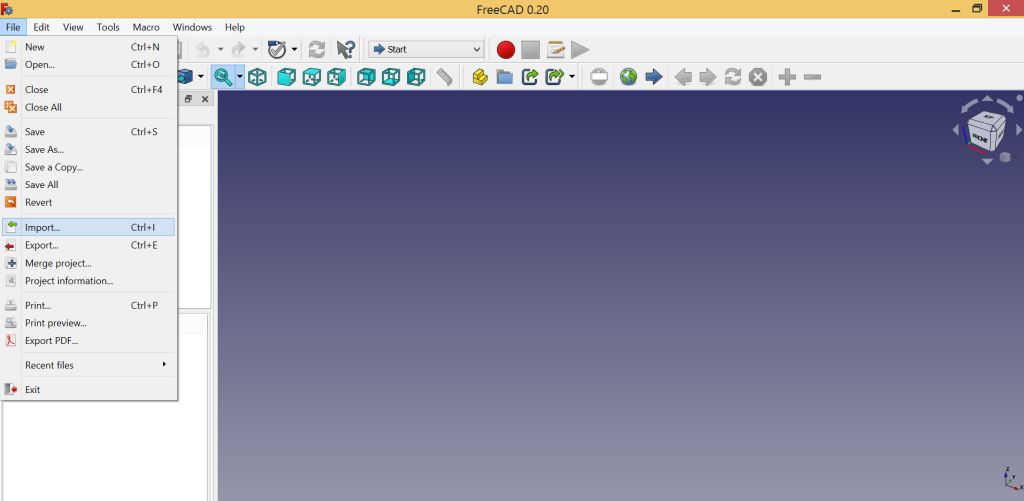
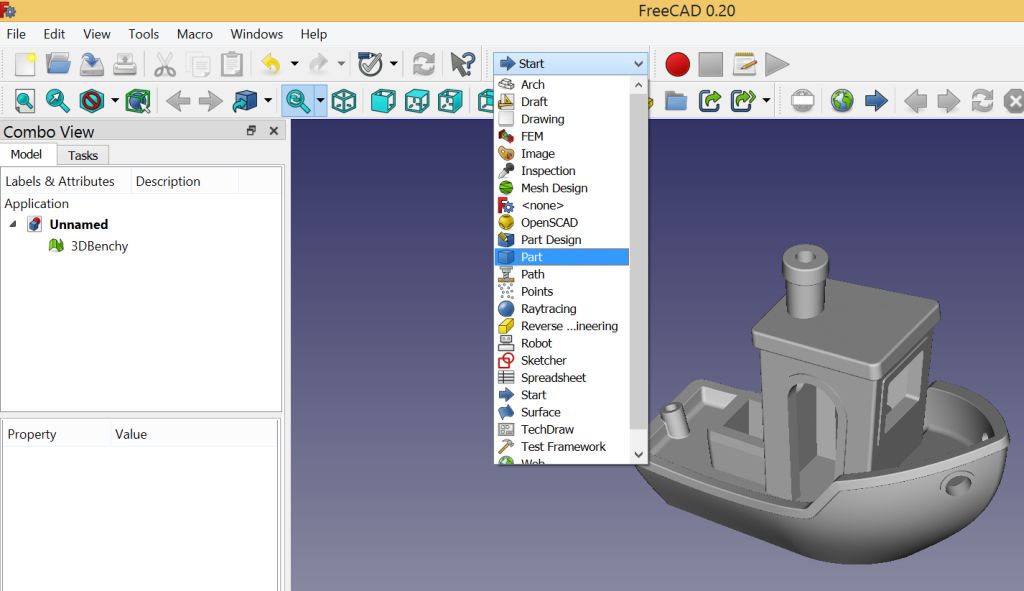
Before editing 3D models in STL format, you should create a solid object. And there are several steps to take before you can complete this task:
- Firstly, switch from workbench to Part and then select your 3D model.
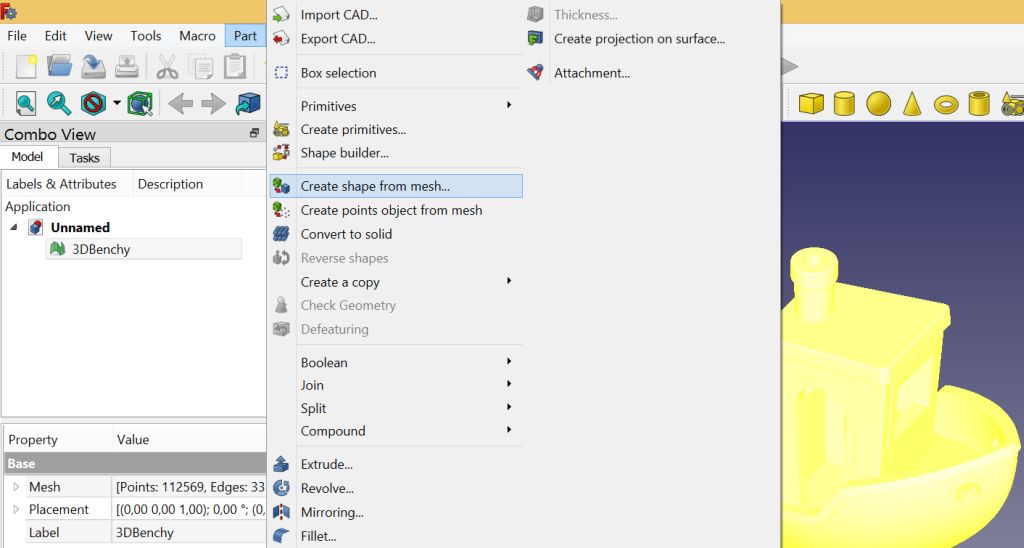
- Secondly, press the Part menu to Create shape from mesh… so that the tool creates a bunch of triangles and lets you remove the mesh (or delete it).
- Thirdly, you should press Advanced utility – Solid from shell and then click one of the triangles and choose Create. There will be no apparent changes, but you should know that now your 3D model has become a solid one. So you can Close this menu and prepare to edit the STL file.
Edit STL
The FreeCAD edit STL feature allows you to work with your model by cutting and extruding its parts.
To use the available tools, you should go to Part Design from the workbench, and select the face to work on, then press Create sketch.
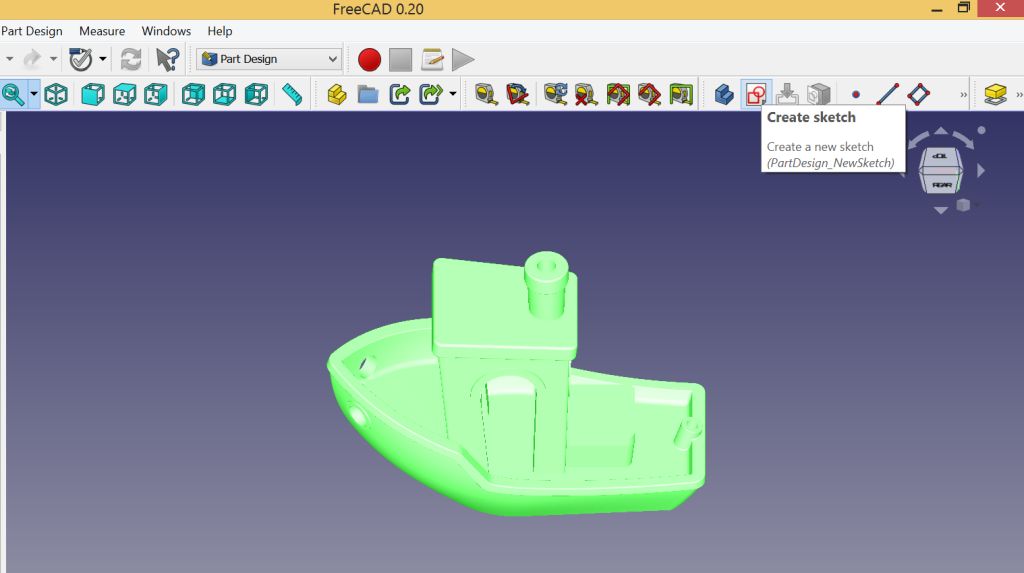
Make the shape you wish to cut/extrude (draw a line, circle, or rectangle) and confirm it by pressing Close. Users wishing to edit their sketches should double-click the project tree and choose the Pad (if you want to extrude) or Pocket (to cut) the parts.
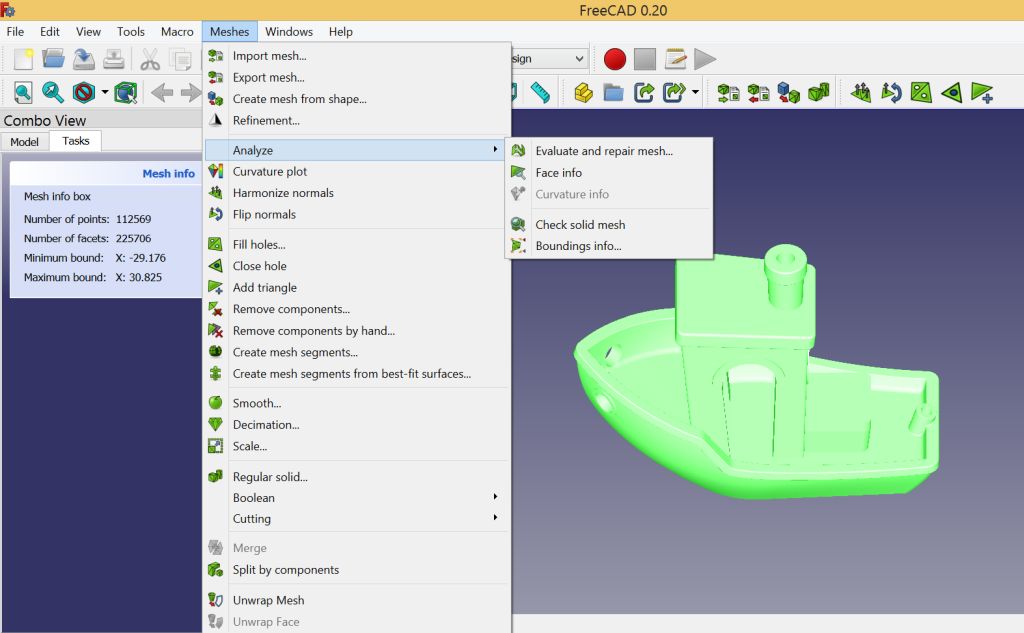
If you want to repair your STL files, choose Meshes (if you don’t see this menu select Mesh Design from the workbench). Choose Analyze and click Evaluate and repair mesh. FreeCAD will look at your 3D model, and after it analyzes the object, you will see the option to Repair your files.
When you are happy with your project, you can export it. Choose Last from the model tree and then go to File – Export. Choose STL format or another mesh format and have it saved.
* * *
FreeCAD is perfect for users who work on construction projects. It is not suitable for modeling and sculpting 3D models. But you can use it for quick STL repair (when the mesh has no corners or is a very simple object) and fast extruding/cutting.
Read also: Best Free STL Files for 3D Printing: Websites with 3D Models
6. Modifying STL Files: SculptGL
You can learn how to modify STL files with SculptGL. It is a free online STL editor with many important tools you will love using.
STL Editor Online
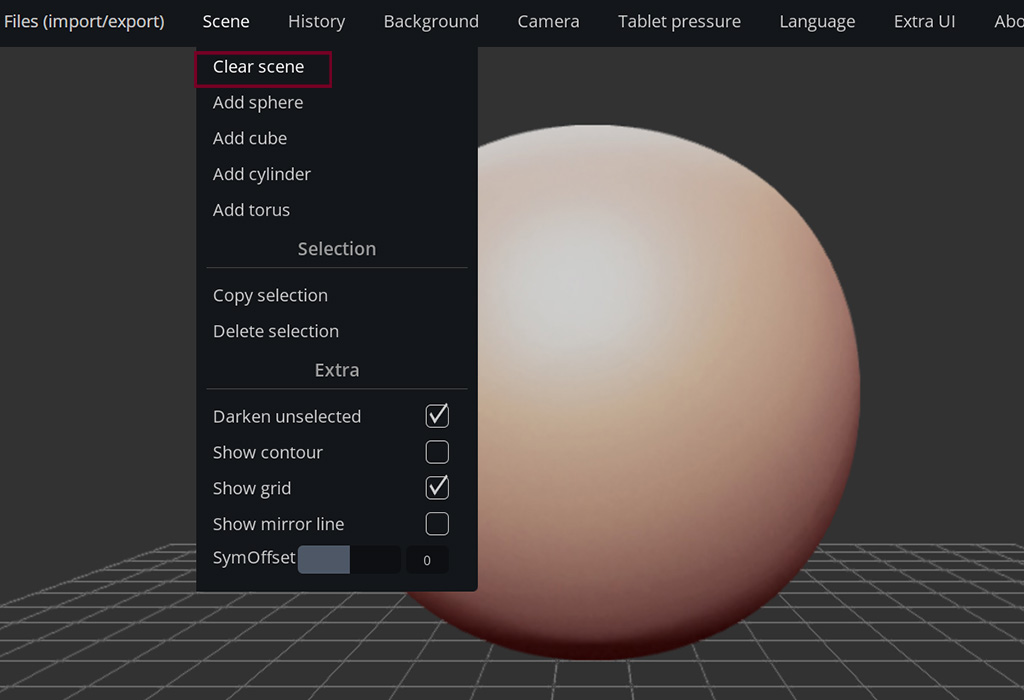
Using SculptGL is not complicated. You can easily open and edit STL by going to Scene and selecting Clear Scene to remove the primitive that appears there by default (you will have to confirm your decision).
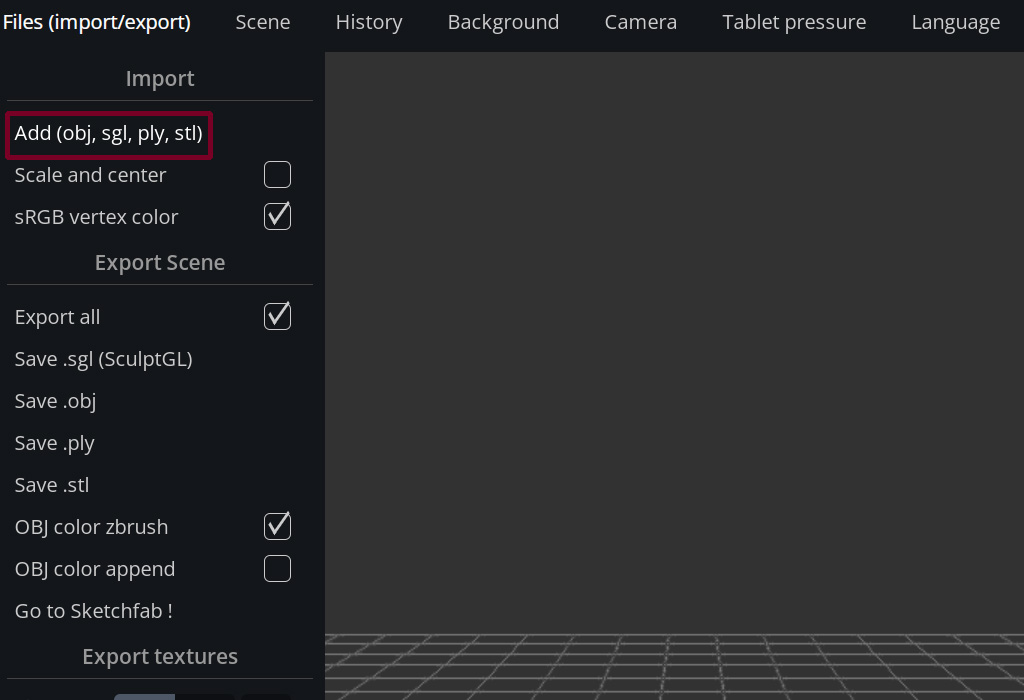
Now you can upload your 3D model via Files (Import/Export) – Add (obj, sgl, ply, stl). The software can be used as OBJ and STL editor (it also supports PLY and SGL formats).
You can use a large and small brush to sculpt your project and work on the limbs, bodies, arms, legs, and face. To change the size of your brush, go to the Sculpting & Painting menu. You will find this option at Radius (-X).
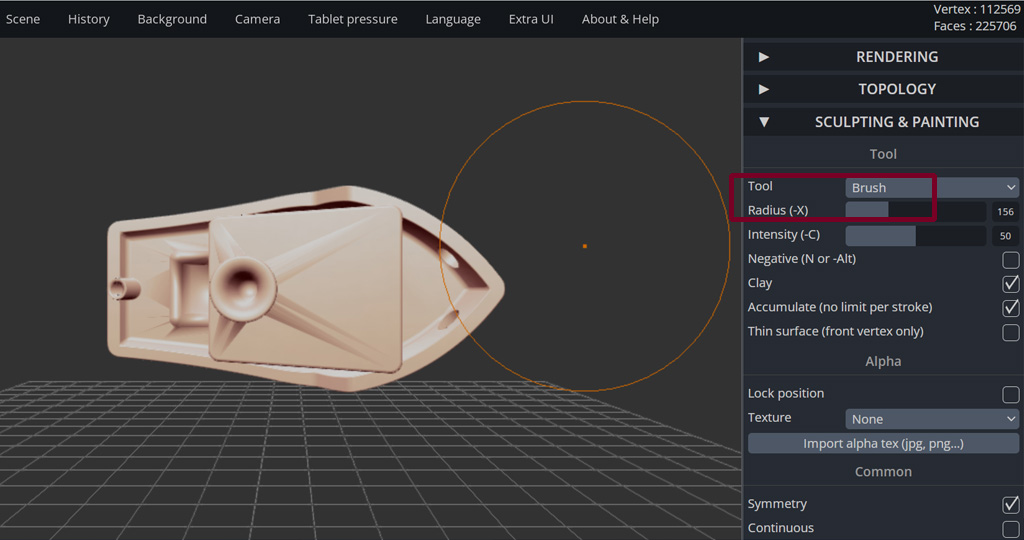
It is way easier to sculpt and edit STL files using the Symmetry feature. Activate it, and you will only have to work on one part of your mesh because the other part will mirror whatever you create.
To change the resolution, go to Topology and select either Multiresolution – Subdivide or Voxel remeshing (quads) – Resolution – Remesh.
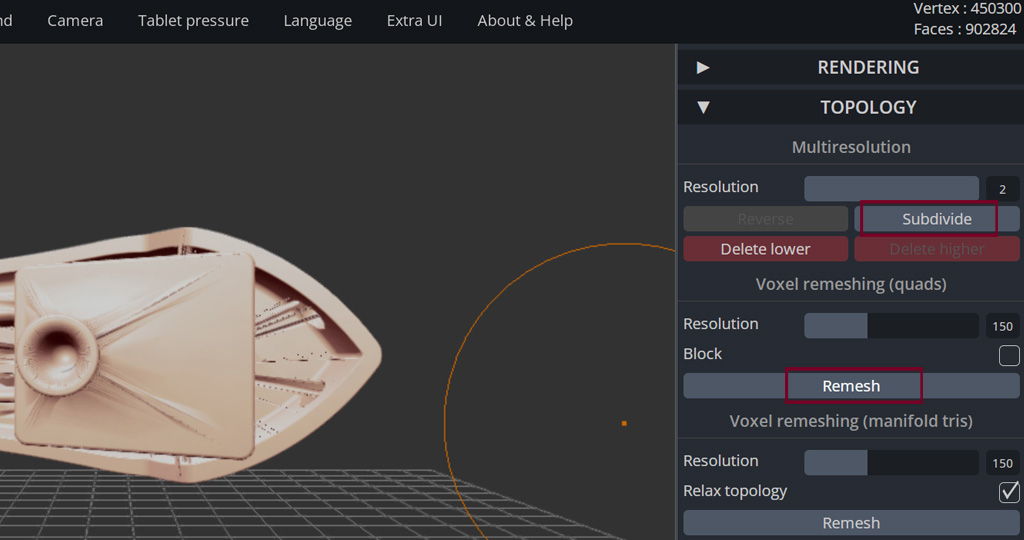
Once you have learned how to edit STL files with SculptGL, you can Save .stl using the File (import/export) menu.
* * *
The free online STL editor has one major issue. Sometimes it creates non-manifold vertices. So beware of this flaw and double-check your 3D model for errors using a different tool. But overall, it is a fantastic tool for sculpting and modifying STL files.
7. Software for STL Files: Netfabb
Anyone who needs a simple STL editor for educational purposes can try the old free Netfabb Basic release (if you can find a source to download it), the free Netfabb for students/educators, or use the 30-day free trial version of Netfabb. This stunning software boasts a great automated repair feature, and you will love other options too.
How to Edit 3D Models
To start editing STL files, you should select Add STL – search for your files, and press Open. Your object should fit your cell by being automatically scaled.
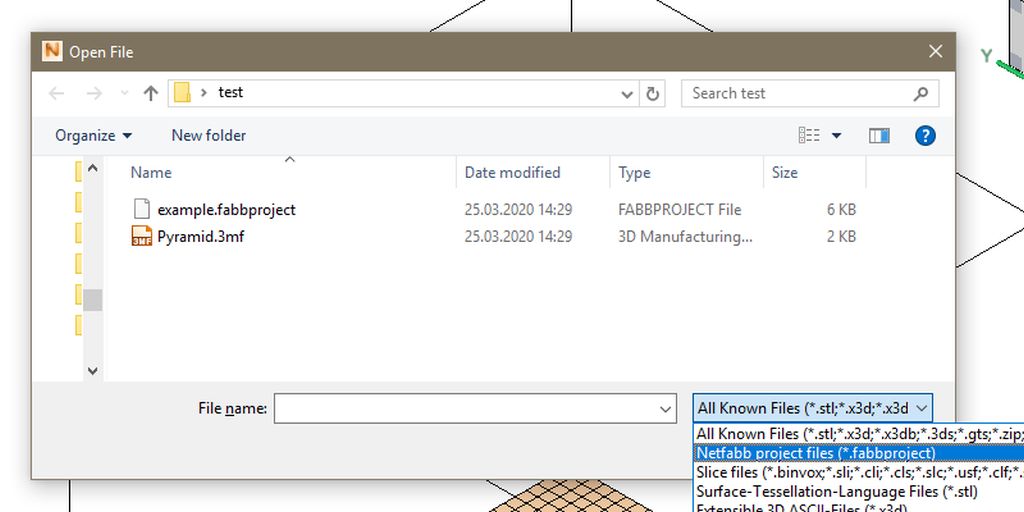
You can also Import CAD File as Mesh using the File menu if you need to work with different files such as SolidWorks, Sketchup, SAT, STEP, etc. And when you wish to import a mesh and run it through minor issues, go to File – Add part. After this, select Extended Repair and let the STL editor fix errors in the 3D model you wish to 3D print later on.
You can also improve your 3D model that has lattice bars by removing them. Go to Lattice and choose Advanced for Surface Trim. After this, choose the Coarse setting for the Smooth feature. Also, look under Skin Modifications in Surface Regions and apply Coarse to Smooth Skin.
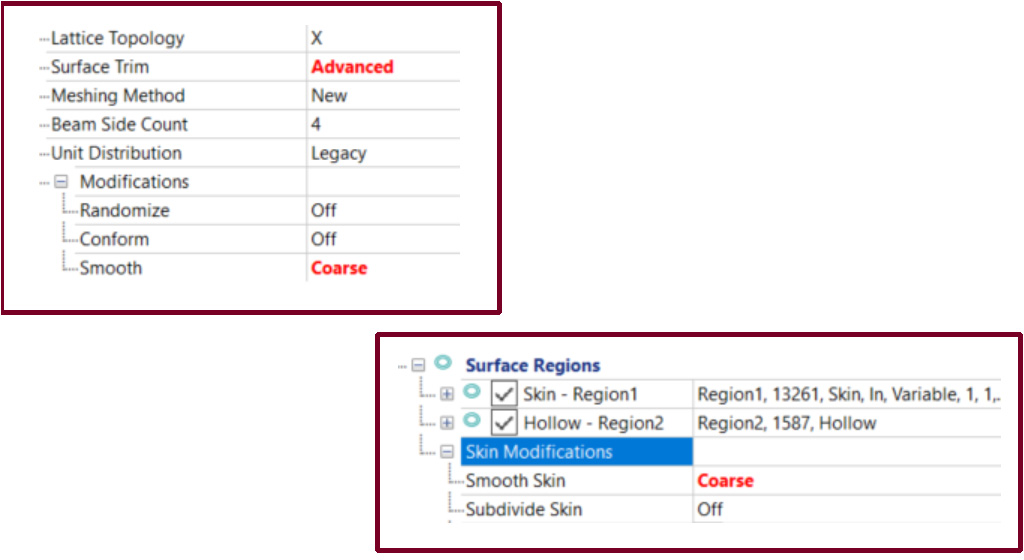
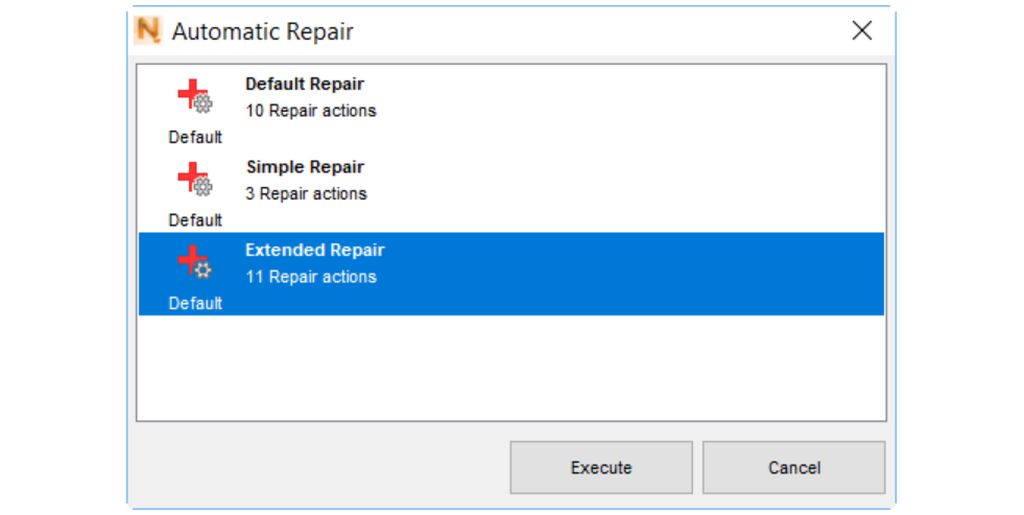
You should generate an improved object by choosing Create Component (you will see it on the Toolbar). Now go to Export to Netfabb and select Component as Mesh. In the STL editor, right-click the element and choose Prepare – Run Repair Script. You will see a new window called Automatic Repair with several features. Select Extended Repair (or Default, or Simple) and press Execute.
You can repair the wall thickness by using the tools under the Analysis icon (look in your taskbar). When you create a New Analysis and choose which part to look at, the STL editor will check your wall thickness. To select the wall thickness, go to Analyse – New Measurement. Also, it is easy to find the ruler image on the taskbar and use it for specifications.
You will find the red Repair option in the taskbar. This feature opens the Part Repair menu, and usually, it shows the green statuses for Mesh is Oriented, and Mesh is Closed when the special script runs while you are importing your files.
If you want the STL editor to fix the holes in your project, select Detect (under Self Intersections) – Trivial, Remove Denegerate Faces, Stitch Triangels, Split Off, etc. – Remove, and you will enjoy the result.
You can rely on Wrap Part Surface if you want to use a manifold outer skin. And the Shell can show if your 3D model has any noise shells or not.
Using Netfabb, you can fill the holes (if they are open), delete holes (via Select Surfaces – Delete), remove triangles you choose, and add some if they are missing. The STL editing software comes with some great features.
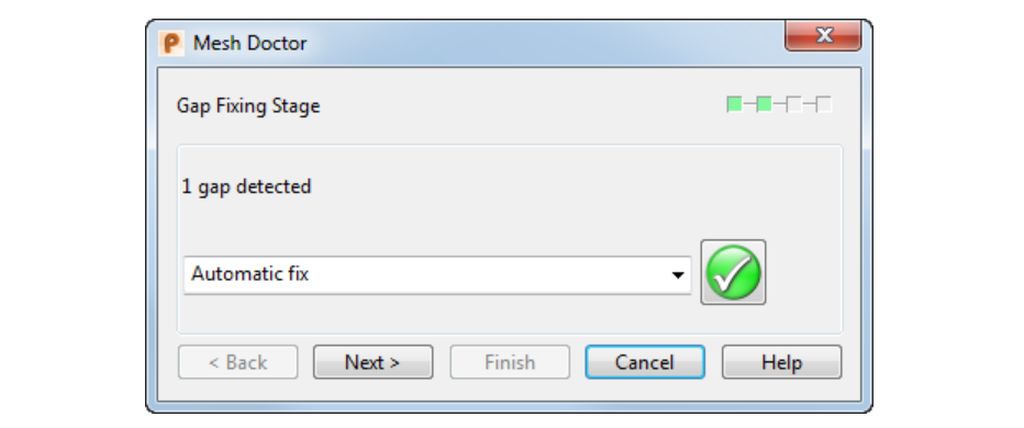
Also, you can use Mesh Doctor to analyze your STL files and close gaps, delete triangles and fix minor flaws.
Remember to export your project when you are done.
* * *
Among different professional and newbie-friendly STL editor tools, Netfabb stands out with its great features. It can be excellent software for modifying your 3D model before you 3D print it.
Read also: Sanding and Painting 3D Prints: Easy Steps
8. Online STL Editor: Tinkercad
If you need a free online STL editor, Tinkercard could be your favorite software one day. This is a CAD tool that you can use to create a 3D model with the help of primitive shapes (blocks, cubes, spheres, etc.) and to modify STL files.
Tinkercad is relatively simple if compared to other STL editor tools you can use in 2023. But it still lets you get rid of some parts of the 3D model, combine STL files, and add a piece of text.
How to Open STL Files
Tinkercad requires you to have an account to edit STL files. But it is free to do, so register and log in using your credentials.
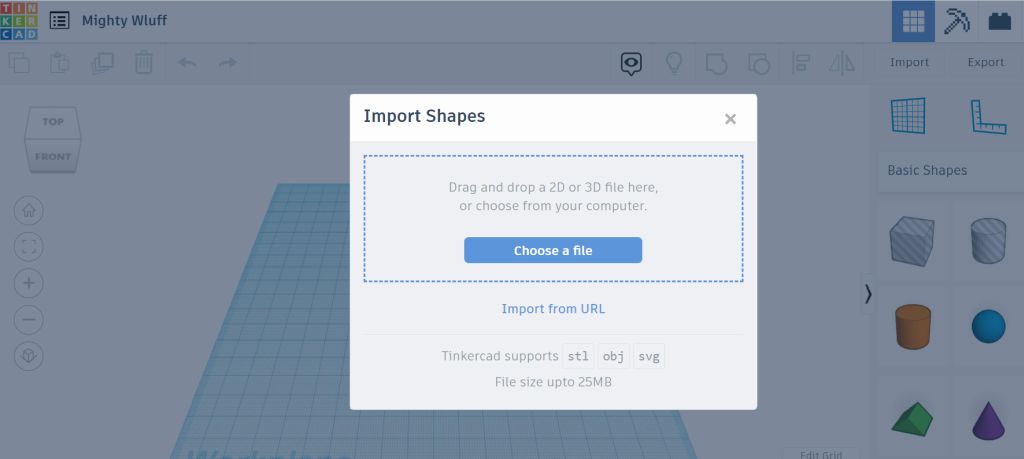
After this, you need to start the new design and press the Import button – Choose a file and select the STL file you wish to edit (the software also supports OBJ and SVG files). Then press Ok to proceed.
How to Scale 3D Model (Up/Down)
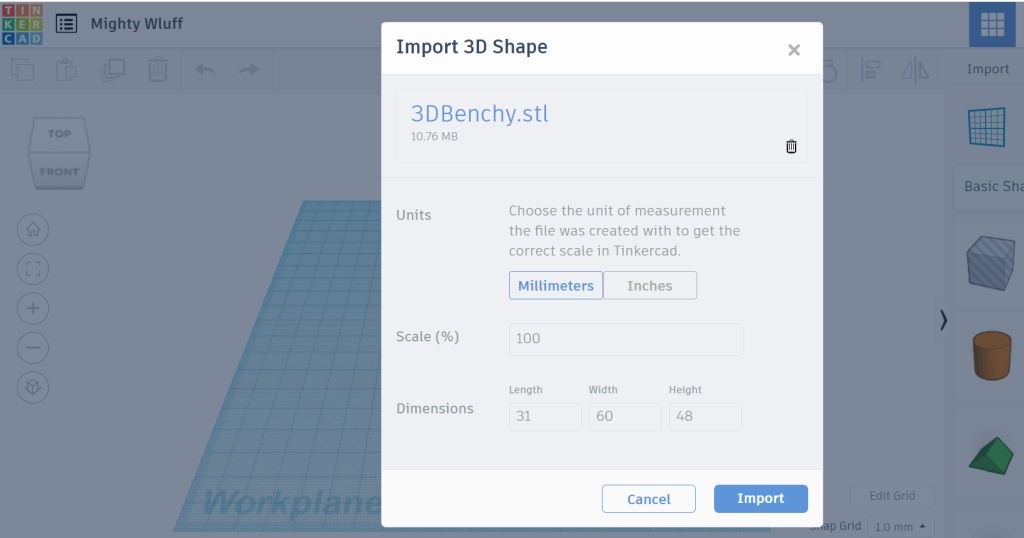
The STL editor will show you some information about your files. At this stage, you can scale your 3D model by entering the scaling up/down percentage and your dimensions into the particular fields before you press the Import button. At this point, your project will be uploaded into the software workspace.
How to Edit an STL File
When you are ready to edit STL files, you should use the tools provided by the Tinkercad STL editor. This software provides some simple and more complex shapes you can use to modify the model. Some tools let you change the size, scale your project, duplicate the 3D model or its parts, etc.
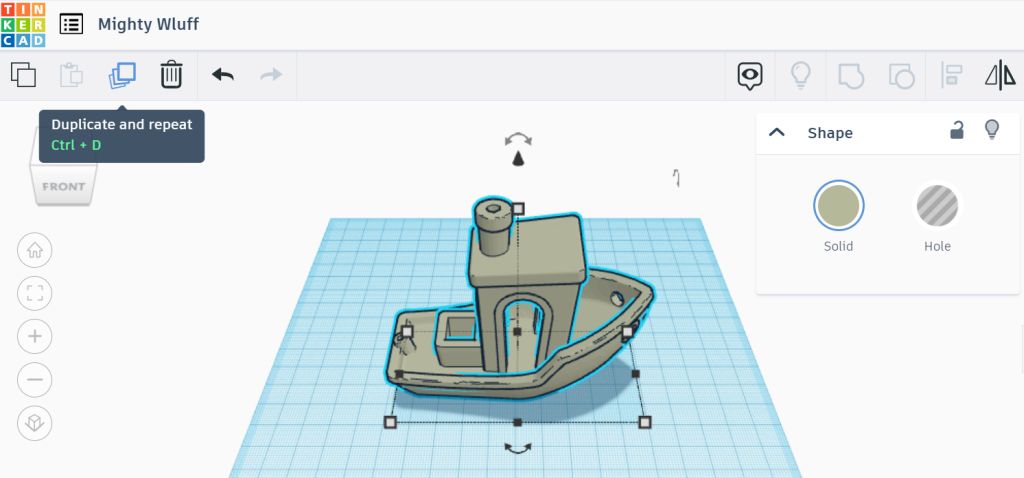
When you are ready to export your files, you should make a selection of all parts of your project and press Export (at the top right) to save the design as an STL file.
* * *
Tinkercard might not be a good solution for complex and highly-detailed 3D printing models. This online STL editor is great for quick and simple projects, and it lacks many features a professional STL editing software 2023 would have.
Read also: Top 15 3D Printing Models for Beginners
9. Mesh Software: MeshLab
MeshLab is another free mesh software you would love. This STL editor is an excellent tool for editing STL, OBJ, 3DS, and other file formats. You can work with layers, fill holes, transform and rotate objects, merge STL files into one project, etc. But it is not possible to make new objects or create your vertices.
OBJ Editor
When you start the software and want to edit 3D models, you should first open the file. So select File and choose Import Mesh to select the project you want to modify.
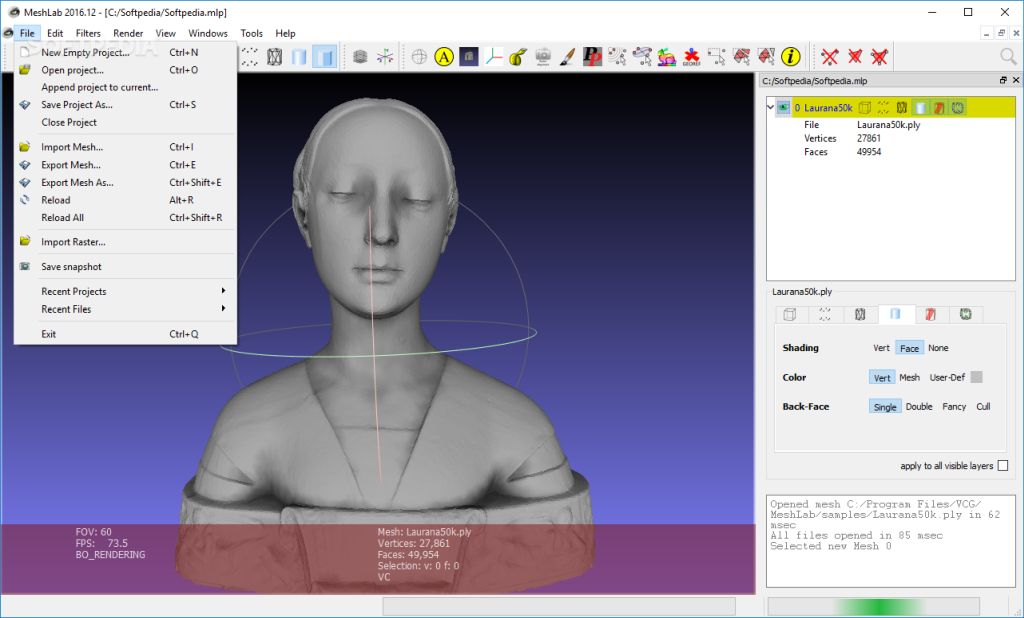
Hobbyists who like to use an OBJ, STL editor to merge STL files (combine OBJ files) of 2 models into one mesh can do this by loading two projects into MeshLab. Then press the Show Layers menu and select both models. Now it is time to manipulate the objects in your scene through the Layer – Manipulator Tools menu, which allows you to rotate (click R), transform (click T), and scale (click S). Drag-drop the arrows and adjust the models to your likes.
If you want to rotate the view, click Escape, and once you get to the view you love, click Escape to keep adding transformations. Once you click Enter, the placement will be confirmed. As soon as you are happy with all the adjustments, right-click on the mesh and choose Flatten Visible Layers (there will be 3 boxes you must check) – Apply.
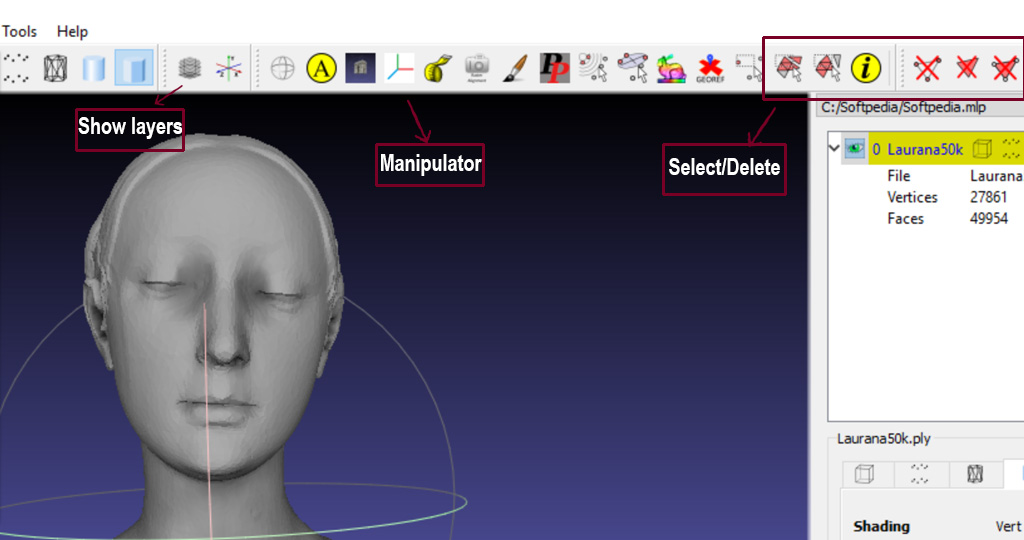
This free OBJ editor lets you remove parts of the 3D model. You only need to press Select and then Delete the Current Selected Face and Vertices.
OBJ Repair
It is essential to check your 3D model for errors and repair STL or OBJ files (or other formats). To let the STL and OBJ editor search for issues such as holes, press Edit Hole, and the tool will search and reveal each hole your project has.
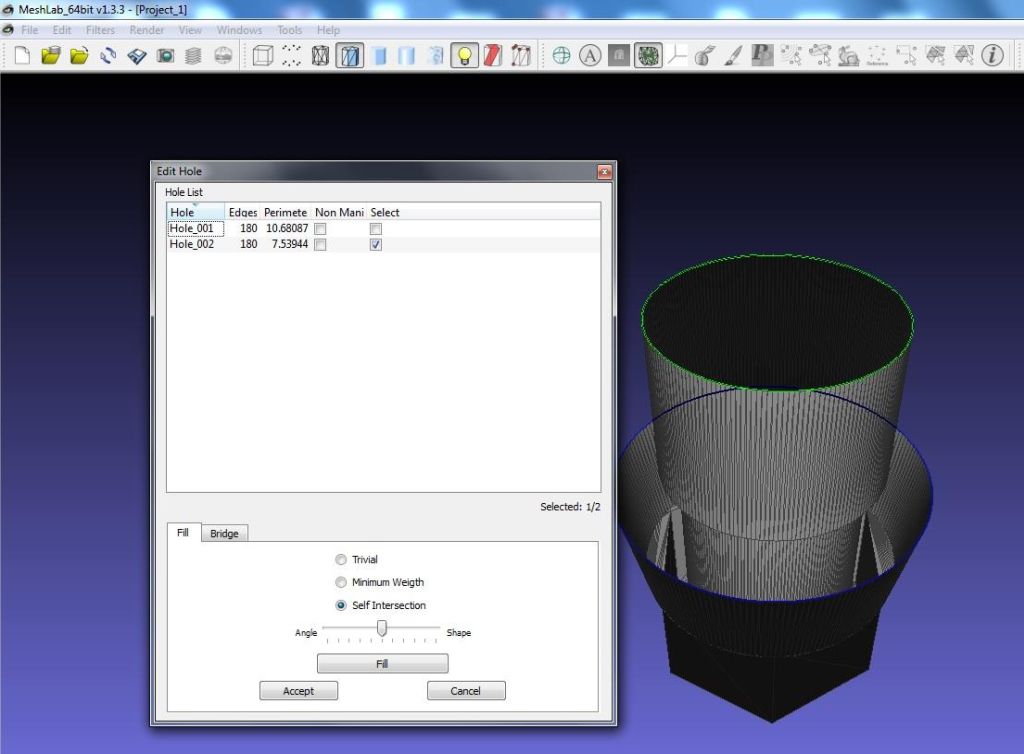
Then you can select every hole you would like to fill (you will see them in green) and press Fill – Accept to fix this problem.
There is more stuff to repair with MeshLab. Some objects are not watertight, and you can check yours by choosing the Filters menu and going for Quality Measures and Computations – Compute Geometric Measures. if you need to repair this problem, then from Filters, select the Cleaning and Repairing option, and press Merge Close Vertices – Apply.
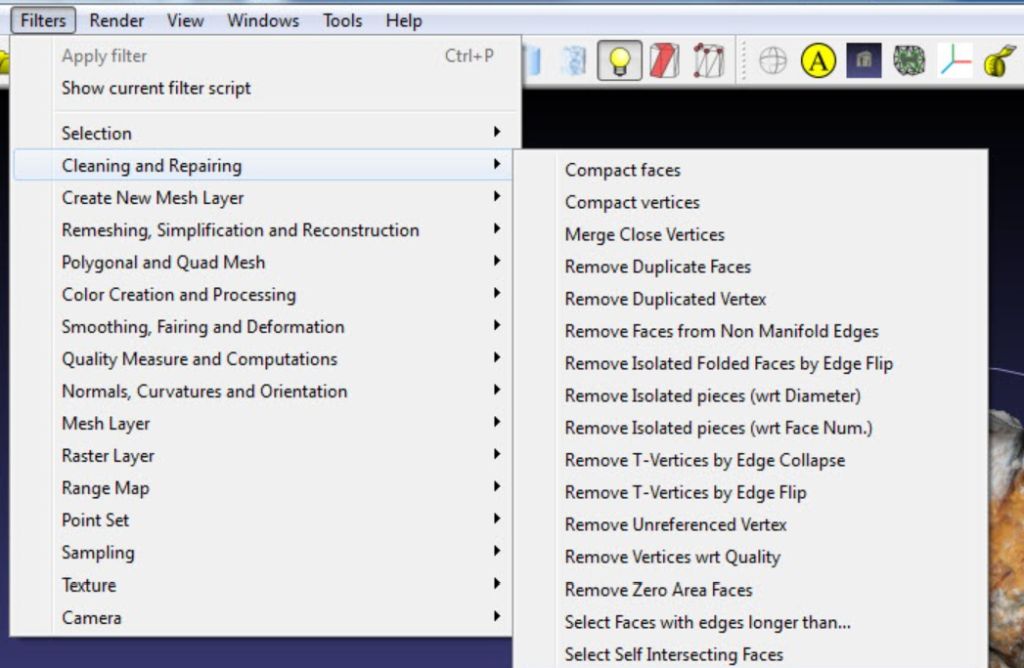
If there are duplicate faces or vertices you want to delete, then from Filters, click Cleaning and Repairing once again and select Remove Duplicate Faces (or Remove Duplicated Vertex) – Apply.
Once finished, just Export Mesh through the File menu and save your project.
* * *
MeshLab is kind of limited as an STL editor or OBJ fixer. And while it will not let you create new 3D models in 2023 because it lacks such features, it allows you to repair your files, combine two meshes into one project and make something new using this method.
10. Free STL Editor: 3D Slash
Let’s look at another free STL file editor called 3D Slash. It is user-friendly and offers you to make projects by building blocks. This tool can be downloaded and installed on a computer, or you can use its online STL editor version.
Edit STL File Online
You can open your project by clicking Start a new model – From a 3D file. If you are using an STL editor online, just drag-drop your project or select one from your computer’s hard drive. Any method works just fine.
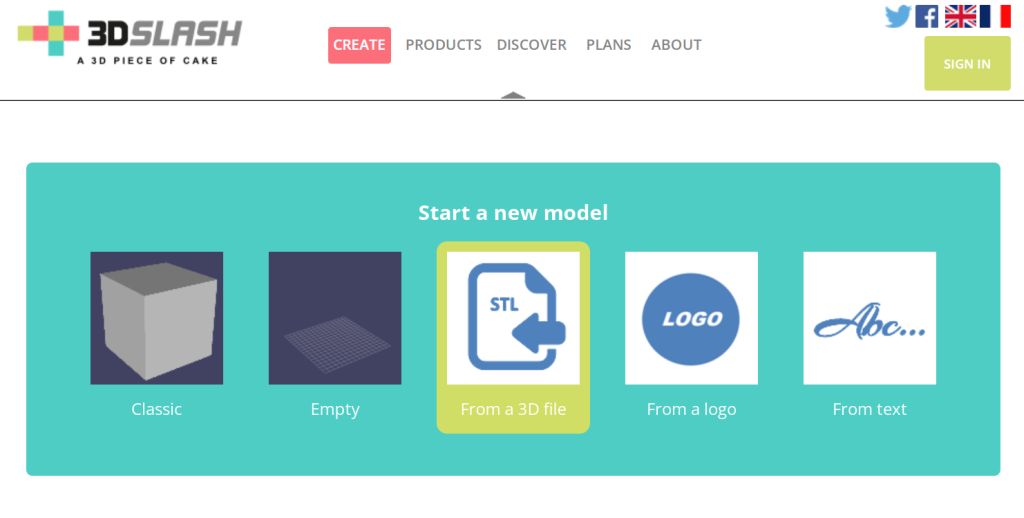
Whatever mesh you have uploaded, the tool will automatically convert it into a pixelated model. Then you can begin to edit your 3D model online or offline.
Look at your viewport. There are tools to use in the top left part of it, and here is a list of what you can use. The Trowel feature allows rebuilding your cubes. The Hammer option lets you delete the cubes, and Chisel is there to help you delete cube slices. There is also the Drill tool to delete the inside of the selected parts and the Wall to rebuild your cube slices.
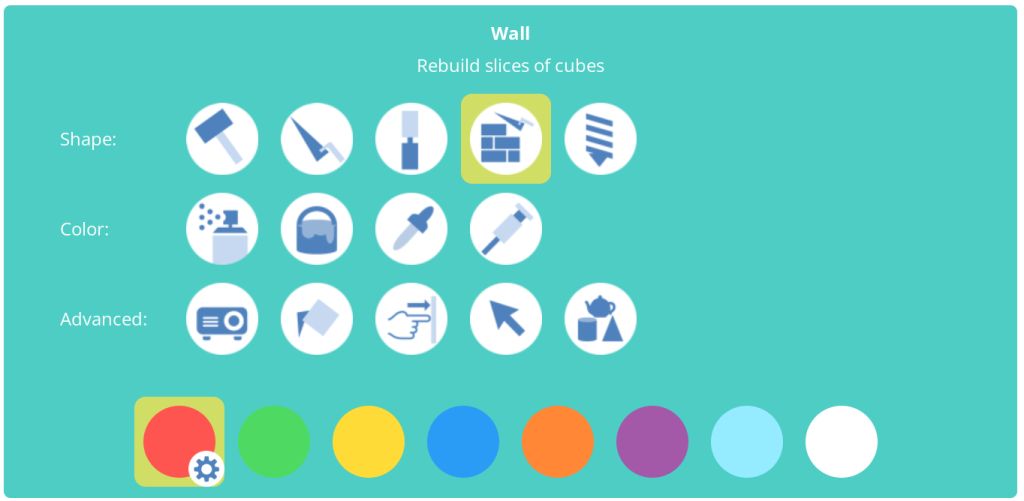
The online STL editor allows you to work with primitive shapes, add them to your scene, change their sizes, etc.
When you love what you have created, you can Save your project as an STL file.
* * *
Hobbyists who don’t have time to get into the details of 3D modeling and sculpting using a professional STL editor software might like using the free online STL editing software 3D Slash. It does not have too many features, but it lets you work with simple shapes, edit STL, and save your files.
