Jasmine & Genie 3D Printing Figurines in Diorama | Assembly

(5)
cm: 34.5 w x 34.2 d x 27.2 h
in: 13.583 w x 13.465 d x 10.709 h

Source Files

|

Description

|

Printing Details

This 3D Diorama consists of files in StereoLithography (.Stl) format that is optimized for 3D printing.

Before printing the files, we strongly recommend reading the PRINTING DETAILS section.

Jasmine & Genie 3D Printing Figurines in Diorama come in 4 versions for each 3D printer type (FFF/FDM, DLP/SLA and SLS). Files for each version are available for download after the purchase.

Detailed information about this 3D printing diorama is available in the DESCRIPTION section.

File Name File Size Time / Filament Object Size
(x/y/z mm)
2_Genie_hair_FDM(repaired ).stl
10.09 MiB 44 min <1 m 35 x 28 x 23 Download
3_Genie_body_FDM(repaired ).stl
55.14 MiB 43 h 55 min 29 m 149 x 82 x 111 Download
4_Genie_arm_R_FDM(repaire d).stl
39.63 MiB 12 h 6 min 7 m 51 x 72 x 103 Download
5_Genie_hand_R_FDM(repair ed).stl
27.91 MiB 5 h 27 min 3 m 46 x 51 x 85 Download
6_Genie_hand_R_gem_FDM(re paired).stl
4.96 MiB 12 min <1 m 12 x 18 x 11 Download
7_Genie_arm_L_FDM(repaire d).stl
43.80 MiB 13 h 55 min 9 m 65 x 74 x 108 Download
8_Genie_hand_L_FDM(repair ed).stl
27.59 MiB 6 h 11 min 4 m 47 x 52 x 82 Download
9_Genie_hand_L_gem_FDM(re paired).stl
4.42 MiB 9 min <1 m 16 x 12 x 10 Download
10_Genie_tail_1_FDM(repai red).stl
30.43 MiB 18 h 57 min 13 m 86 x 62 x 107 Download
11_Genie_tail_2_FDM(repai red).stl
30.41 MiB 6 h 50 min 4 m 67 x 54 x 77 Download
12_Genie_tail_3_FDM(repai red).stl
40.10 MiB 10 h 14 min 7 m 59 x 70 x 98 Download
13_Genie_tail_4_FDM(repai red).stl
29.84 MiB 4 h 17 min 3 m 48 x 41 x 75 Download
14_Genie_tail_5_FDM(repai red).stl
27.76 MiB 5 h 37 min 4 m 63 x 75 x 78 Download
15_Genie_tail_6_FDM(repai red).stl
19.35 MiB 2 h 13 min 1 m 29 x 49 x 78 Download
16_Genie_tail_7_FDM(repai red).stl
17.21 MiB 2 h 28 min 1 m 17 x 57 x 124 Download
17_smoke_FDM(repaired).st l
14.38 MiB 2 h 26 min 1 m 62 x 97 x 20 Download
19_Jasmine_hair_1_FDM(rep aired).stl
28.51 MiB 2 h 57 min 2 m 38 x 30 x 61 Download
20_Jasmine_hair_2_FDM(rep aired).stl
18.45 MiB 32 min <1 m 18 x 16 x 27 Download
21_Jasmine_hair_3_FDM(rep aired).stl
19.98 MiB 1 h 9 min 1 m 37 x 28 x 35 Download
22_Jasmine_body_FDM(repai red).stl
49.18 MiB 3 h 56 min 2 m 53 x 31 x 49 Download
23_Jasmine_legs_FDM(repai red).stl
48.39 MiB 8 h 54 min 5 m 45 x 64 x 119 Download
24_Jasmine_arm_R_FDM(repa ired).stl
21.25 MiB 31 min <1 m 9 x 17 x 31 Download
25_Jasmine_hand_R_FDM(rep aired).stl
13.89 MiB 16 min <1 m 12 x 13 x 21 Download
26_Jasmine_hand_R_bracele t_FDM(repaired).stl
4.94 MiB 4 min <1 m 9 x 8 x 4 Download
27_Jasmine_arm_L_FDM(repa ired).stl
19.28 MiB 37 min <1 m 13 x 19 x 37 Download
28_Jasmine_hand_L_FDM(rep aired).stl
15.05 MiB 18 min <1 m 13 x 8 x 24 Download
29_Jasmine_hand_L_bracele t_FDM(repaired).stl
3.61 MiB 3 min <1 m 11 x 12 x 2 Download
30_Jasmine_foot_R_FDM(rep aired).stl
18.39 MiB 28 min <1 m 14 x 27 x 27 Download
31_Jasmine_foot_L_FDM(rep aired).stl
15.59 MiB 25 min <1 m 11 x 29 x 22 Download
33_smoke_Genie_lamp_FDM(r epaired).stl
10.89 MiB 22 min <1 m 12 x 13 x 22 Download
34_carpet_FDM(repaired).s tl
44.07 MiB 48 h 12 min 35 m 130 x 146 x 123 Download
35_platform_FDM(repaired) .stl
43.52 MiB 21 h 52 min 12 m 153 x 153 x 32 Download
36_ge_lock_10H(x9)_FDM(re paired).stl
0.03 MiB 4 min <1 m 18 x 10 x 2 Download
37_ge_lock_7S(x1)_FDM(rep aired).stl
0.02 MiB 3 min <1 m 7 x 18 x 2 Download
Keychain (repaired).stl
0.35 MiB 23 min <1 m 30 x 30 x 2 Download
Tag (repaired).stl
1.70 MiB 1 h 16 min 1 m 150 x 18 x 5 Download
18_Jasmine_head_FDM(repai red).stl
41.51 MiB 1 h 9 min 1 m 21 x 27 x 39 Download
32_Genie_lamp_FDM(repaire d).stl
29.75 MiB 23 min <1 m 12 x 38 x 15 Download
1_Genie_head_FDM(repaired ).stl
39.71 MiB 3 h 37 min 2 m 62 x 40 x 40 Download
4_1_Genie_arm_R_FDM(repai red).stl
20.45 MiB 8 h 23 min 5 m 48 x 68 x 84 Download
4_2_Genie_bracelet_R_FDM( repaired).stl
18.02 MiB 3 h 14 min 2 m 41 x 45 x 33 Download
7_1_Genie_arm_L_FDM(repai red).stl
21.81 MiB 9 h 22 min 5 m 50 x 70 x 91 Download
7_2_Genie_bracelet_L_FDM( repaired).stl
17.78 MiB 3 h 15 min 2 m 43 x 45 x 33 Download
...

ABOUT THIS 3D FIGURINE

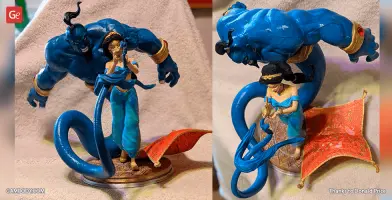
The 1992 Aladdin animated film made audiences of all ages fall in love with the adventures of a common thief, Sultan’s rebellious daughter and larger-than-life Genie. Loosely based on the character featured in the One Thousand and One Nights folk tale, Jasmine aspires to independence and dreams of seeing what's beyond her palace. Eccentric Genie, in his turn, possesses phenomenal cosmic power and longs to be freed from the magic lamp residence. The author of the Jasmine & Genie figurines in diorama got inspired by the Disney’s well-loved classics. The 3D artists decided to capture the deuteragonists of the Aladdin franchise in 3D printing form and spent circa 180 hours sculpting the scene. The diorama depicts the beautiful Princess Jasmine holding the magic lamp whose prisoner seems to have been freed from the itty bitty living space mere moments ago. The rebellious princess of Agrabah looks astounded - the young lady clearly did not expect the wish-granting Genie to escape the simple oil lamp! The 3D printing Jasmine has her straight, lush hair pulled in a ponytail in two sections and wears the 1992 cartoon-inspired crop top, puffy pants and curled shoes. The usually kind-hearted Genie must have been in his mischievous mood while posing for the 3D printing diorama since the posture and the look on the figurine’s face seem to aim at scaring the Princess. The flamboyant spirit for 3D printing spots the curly beard, high ponytail, wide waistband, and has his right ear pierced with an earring. Both 3D printing heroes are mounted on a simple round base that has an exquisite mandala pattern embossed on it. The whole dynamic scene is completed with a fine magic carpet, adorned with intricate patterns from both sides. We wonder what Jasmine’s first wish is going to be?

ADAPTATION FOR 3D PRINTING

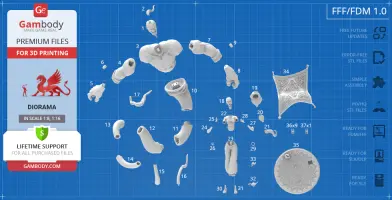
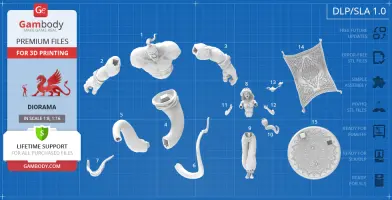
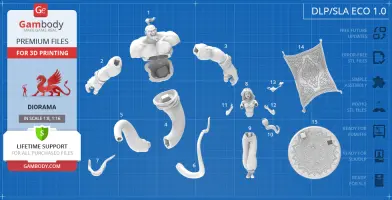
Jasmine & Genie figurines for 3D printing in diorama is a static assembly model and its moderation and adaptation for different types of 3D printers took Gambody team 52 hours in total. The diorama’s cutting was chosen by our team to minimize the amount of filament needed for generated support and some of the parts were hollowed out for you to save resin in the model’s Eco version. In order to conceal the places where the assembly parts of the model must be connected, the figurines were cut along the contour of both characters’ clothes seams and they were properly separated from the platform. What is more, in order to ensure an excellent quality of the 3D printed result, such smaller parts as magic lamp, magic carpet, both figurines’ hair, hands, jewels on Genie’s wrists, Jasmine’s bracelets, lamp smokes, etc. are provided as separate assembly elements. Genie’s large tail was divided into seven parts in order to fit the build plates of the smallest 3D printers. All the assembly parts come in STL files in recommended positions that were worked out in order to ensure the smoothness of the details’ surfaces after printing and to make sure that the 3D printing beginners won't face difficulties when placing the parts on a build plate. When downloading any model's file you will also receive "Assembly Manual" for FFF/FDM 1.0 and DLP/SLA 1.0 versions in PDF format.

The figurine is saved in STL files, a format supported by most 3D printers. All STL files for 3D printing have been checked in Netfabb and no errors were shown.

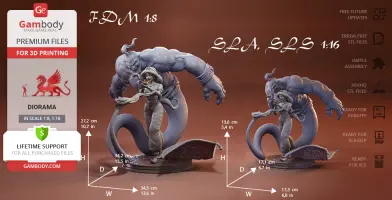
The model's scale was calculated from Jasmine's actual height that is 1700 mm. The 3D printing figurines' chosen scale is 1/8 for the FFF/FDM version and 1/16 for the DLP/SLA/SLS versions.

VERSIONS' SPECIFICATIONS

FFF/FDM 1.0 version features:
- Contains 37 parts;
- A printed model is 272 mm tall, 345 mm wide, 342 mm deep;
- The assembly kit includes locks to connect the model's parts securely without glue. Lock 36_ge_lock_10H(x9) needs to be printed 9 times; lock 37_ge_lock_7S(x1) needs to be printed once;
- All parts are divided in such a way that you will print them with the smallest number of support structures.

DLP/SLA 1.0 version features:
- Contains 15 parts;
- A printed model is 136 mm tall, 173 mm wide, 171 mm deep;
- All parts are divided in such a way to fit the build plates and to ensure that support structures are generated where needed.

DLP/SLA Eco 1.0 version features:
- Contains 15 parts;
- A printed model is 136 mm tall, 173 mm wide, 171 mm deep;
- Contains some hollowed out parts to save resin.

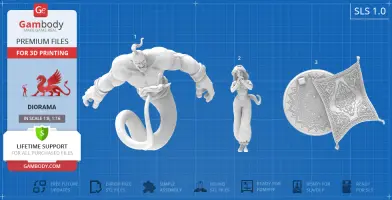
SLS 1.0 version features:
- Made as a solid one-piece figurine;
- A printed model is 136 mm tall, 173 mm wide, 171 mm deep;
- Contains 3 parts - a one-piece Jasmine figurine and a solid Genie with the platform separated.

WHAT WILL YOU GET AFTER PURCHASE?

- STL files of Jasmine & Genie Figurines in Diorama for 3D Printing which consist of 70 parts;
- 4 versions of files for this model for FFF/FDM, DLP/SLA, DLP/SLA Eco and SLS;
- High-poly detailed figurines of Jasmine & Genie​;
Assembly Manual for FFF/FDM 1.0 and DLP/SLA 1.0 versions in PDF format;
- Detailed settings that we provide as a recommendation for Cura , Simplify3D and Slic3r for the best print;
- Full technical support from the Gambody Support Team.

You can get the figurines of Jasmine & Genie in Diorama​ for 3D Printing immediately after the purchase! Just click the green Buy button in the top-right corner of the model’s page. You can pay with PayPal or your credit card.

Watch the tutorial on how to assemble Jasmine & Genie 3D Printing Figurines in Diorama at Gambody YouTube channel.

Also, you may like the other Cartoons 3D Printing Figurines.

_______
FAQ: 

Where can I print a model if I have no printer?
How to get started with 3D printing?
How to set up my 3D printer?
How to choose right 3D model print bed positioning? 
How to paint printed figurine?

Below you can find printing recommendations for CuraSimplify3D and Slic3r software.

Cura printing recommendations:

These are basic settings that were tested in Cura 4.8.0 slicer. 

The test models were printed on Ultimaker 2, Creality Ender 3, Creality CR-10S Pro V2, Anycubic I3 Mega, Anycubic I3 MegaS 3D printers with PLA and PETG filaments.

Disclaimer: The following printing settings are a recommendation, not an obligation. The parameters can vary depending on the peculiarities of your 3D printer, the material you use and especially the particular assembly part at hand. Each part that any model comprises often needs preliminary review and you are free to tweak the settings the way you find suitable.

Note:
- You can scale up the model (downscaling is not recommended!);
- All connectors should be printed at 100% Infill;
- For all parts of locks (“ge_lock” in “Source files”) you need to change "Brim" type to "Skirt" in Build Plate Adhesion section.

Quality
Layer Height: 0.12 mm (you can also set Layer Height at 0.16 or 0.2mm for 0.4mm nozzles)
Initial Layer Height: 0.2 mm (carefully level the print bed and keep your Initial Layer Height the same as the main Layer Height)

Line Width: 0.4 mm
Wall Line Width: 0.4 mm
Outer Wall Line Width: 0.4 mm
Inner Wall(s) Line Width: 0.4 mm
Top/Bottom Line Width: 0.4 mm
Infill Line Width: 0.4 mm
Skirt/Brim Line Width: 0.4 mm
Support Line Width: 0.4 mm

Initial Layer Line Width: 100%

Shell 
Wall Thickness: 0.8 mm
Wall Line Count: 2

Outer Wall Wipe Distance: 0.3 mm
Top Surface Skin Layers: 0

Top/Bottom Thickness: 0.6 mm
Top Thickness: 0.6 mm
Top Layers: 5
Bottom Thickness: 0.6 mm
Bottom Layers: 5
Initial Bottom Layers: 5

Top/Bottom Pattern: Lines
Bottom Pattern Initial Layer: Lines
Top/Bottom Line Directions: [ ]
Outer Wall Inset: 0 mm
Optimize Wall Printing Order: Check

Compensate Wall Overlaps: Check
Compensate Inner Wall Overlaps: Check

Minimum Wall Flow: 0%
Fill Gaps Between Walls: Everywhere
Filter Out Tiny Gaps: Check
Horizontal Expansion: 0 mm
Initial Layer Horizontal Expansion: 0 mm
Hole horizontal expansion: 0

Z Seam Alignment: User Specified
Z Seam Position: Back
Z Seam X: Average length of your printer’s plate (e.g.”150” if your plate is 300mm on the X-axis)
Z Seam Y: A value higher than the length of your plate on the Y-axis (e.g. 700)

Seam Corner Preference: Hide Seam
Extra Skin Wall Count: 1
Skin Overlap Percentage: 10%
Skin Overlap 0.04 mm

Infill 
Infill Density: 20% (for all smaller parts and for all parts of connectors use 100% Infill)
Infill Pattern: Triangles
Connect Infill Lines: Check
Infill Line Directions: [ ]
Infill X Offset: 0 mm
Infill Y Offset: 0 mm
Infill Line Multiplier: 1
Extra Infill Wall Count: 0

Infill Overlap Percentage: 10-20%
Infill Overlap: 0.04 mm

Skin Overlap Percentage: 5%
Skin Overlap: 0.02 mm

Infill Wipe Distance: 0 mm
Infill Layer Thickness: 0.24 mm
Gradual Infill Steps: 0
Infill Before Walls: Check
Minimum Infill Area: 0 mm2

Skin Removal Width: 0.8 mm
Top Skin Removal Width: 0.8 mm
Bottom Skin Removal Width: 0.8 mm

Skin Expand Distance: 0.8
Top Skin Expand Distance: 0.8
Bottom Skin Expand Distance: 0.8

Maximum Skin Angle for Expansion: 90Ëš
Minimum Skin Width for Expansion: 0.0
Skin Edge Support Thickness: 0
Skin Edge Support Layers: 0

Material 
Initial Layer Flow: 100%
Printing Temperature: See your filament settings
Initial Printing Temperature: Your filament settings
Final Printing Temperature: Your filament settings
Build Plate Temperature: Your filament settings
Build Plate Temperature Initial Layer: Your filament settings + 5°
Flow: 100% (Important! If you face difficulty printing the model, you may need to adjust the Flow parameter. You may research the topic using the Internet or seek assistance at our Customer Support Team at support@gambody.com)

Speed 

You can increase the printing Speed by 20% when you print simple objects. For small/thin parts you need to decrease the Speed by 25% - 50%.

Print Speed: 50 mm/s
    Infill Speed: 50 mm/s
    Wall Speed: 25 mm/s
          Outer Wall Speed:25 mm/s
          Inner Wall Speed: 50 mm/s

Top/Bottom Speed: 25mm/s
Support Speed: 25 mm/s 
          Support Infill Speed: 45 mm/s
          Support Interface Speed: 25 mm/s
                Support Roof Speed: 25 mm/s
                Support Floor Speed: 25 mm/s

Travel Speed: 80 mm/s
Initial Layer Speed: 80 mm/s
Initial Layer Print Speed: 20 mm/s
Initial Layer Travel Speed: 80 mm/s

Skirt/Brim Speed: 20 mm/s
Z  Hop Speed: 5 mm/s
Number of Slower Layers: 2
Enable Acceleration Control: Check

When printing simple objects, you need to set all Acceleration parameters at 500 mm/s. For small/thin parts you need to decrease the Acceleration by 50% - 70%.

Travel 
Enable Retraction: Check
Retraction Distance: 4-8 mm, 1-3 mm for Direct Extruder (This is the most important retraction parameter. You can find your optimal value of Retraction Distance by printing any test object, e.g. bridges, towers etc.)

Retraction Speed: 25mm/s
Retraction Retract Speed: 25 mm/s
Retraction Prime Speed: 25 mm/s

Retraction Extra Prime Amount: 0 mm3 
Retraction Minimum Travel: 1.5 mm
Maximum Retraction Count: 100
Minimum Extrusion Distance Window: 6,5 - 10 mm
Limit Support Retractions: Check
Combing Mode: All
Max Comb Distance With No Retract: 30 mm
Retract Before Outer Wall: Check
Avoid Printed Parts When Travelling: Check
Avoid Supports When Travelling: Check
Travel Avoid Distance: 1 mm
Layer Start X: 0.0 mm
Layer Start Y: 0.0 mm
Z Hop When Retracted: Check
Z Hop Height: 0,3 mm

Cooling 
Enable Print Cooling: Check
Fan Speed: 100%
Regular Fan Speed: 100%
Maximum Fan Speed: 100% 

Regular/Maximum Fan Speed Threshold: 10 s
Initial Fan Speed: 0%
Regular Fan Speed at Height: 0.36 mm
Regular Fan Speed at Layer: 3 

Minimum Layer Time: 10 s
Minimum Speed: 10 mm/s

Support 
Generate Support: Check
Support Structure: Normal (you can try using Tree Support Structure if you have difficulty printing any particular assembly part)
Support Placement: Everywhere 
Support Overhang Angle: 60° (this parameter can range from 30° to 70° depending on the part at hand)
Support Pattern: Zig Zag
Support Wall Line Count: 1 (stronger support that might be more difficult to remove) 0 (less strong support but is easier to remove)

Support Density: 15%
Support Line Distance: 2.6667 mm
Initial layer support line distance: 2.667 mm

Support Z Distance: 0.12 mm
Support Top Distance: 0.12 mm
Support Bottom Distance: 0.12 mm

Support X/Y Distance: 0.8-1 mm
Support Distance Priority: Z overrides X/Y
Support Stair Step Height: 0.3 mm
Support Stair Step Maximum Width: 5.0 mm
Support Stair Step Minimum Slope Angle: 10°
Support Join Distance: 2.0 mm
Support Horizontal Expansion: 0.2 mm
Support Infill Layer Thickness: 0.2 mm
Gradual Support Infill Steps: 0
Minimum Support Area: 2 mm

Enable Support Interface: Check (generates additional “pillow” on the support structure that leads to a more even surface, but can be difficult to remove in hard-to-reach areas)
Enable Support Roof: Check
Enable Support Floor: Check

Support Interface Thickness: 0.8 mm
Support Roof Thickness: 0.8 mm
Support Floor Thickness: 0.8 mm

Support Interface Resolution 0.2 mm
Support Interface Density: 50-100%
        Support Roof Density: 50-100%
Support Roof Line Distance: 0.8 mm
        Support Floor Density: 50-100%
Support Floor line Distance:  0.4mm

Support Interface Pattern: Grid 
Support Roof Pattern: Grid (this parameter should differ from Bottom Pattern Initial Layer in “Shell” section)
Support Floor Pattern: Grid

Minimum Support Interface Area: 10mm
Minimum Support Roof Area: 10 mm
Minimum Support Floor Area: 10 mm

Support Interface Horizontal Expansion: 0.0 mm
Support Roof Horizontal Expansion: 0.0 mm
Support Floor Horizontal Expansion: 0.0 mm

Fan Speed Override: Check
Supported Skin Fan Speed: 100%
Use Towers: Check
Tower Diameter: 4 mm
Minimum Diameter: 3.0 mm
Tower Roof Angle: 65° 

Build Plate Adhesion 
Build Plate Adhesion Type: Skirt/Brim (For unsteady parts, and those parts that may come unstuck use “Brim”. For bigger assembly parts that have large adhesion area and for all parts of locks and claws that you want to come out clean use "Skirt")
Skirt/Brim Minimum Length: 250 mm
Brim Width: 8.0 mm
       Brim Line Count: 10
Brim Only on Outside: Check

Mesh Fixes 
Union Overlapping Volumes: Check
Merged Meshes Overlap: 0.15 mm

Special Modes
Print Sequence: All at Once
Surface Mode: Normal

Experimental
Slicing Tolerance: Middle
Maximum Resolution: 0.01 mm
Flow rate compensation max extrusion offset: 0 mm
Flow rate compensation factor: 100%

Simplify3D printing recommendations:

This model was tested with PLA material.

To avoid printing problems, we recommend the following settings:

Extruder
Nozzle Diameter: 0.4 mm
Extrusion Multiplier: 0.97
Extrusion Width: Auto

Retraction Distance: 5.00 mm
Extra Restart Distance: 0.00 mm
Retraction Vertical Lift: 0.08 mm
Retraction Speed: 5400.0 mm/min

Wipe Distance: 5.00 mm

Layer
Primary Layer Height: 0.2 mm
Top Solid Layers: 8
Bottom Solid Layers: 5
Outline/Perimeter Shells: 2
Outline Direction: Inside-Out

First Layer Height: 90%
First Layer Width: 100%
First Layer Speed: 20%

Additions
Use Skirt/Brim: Check
Skirt Layers: 1
Skirt Offset from Part: 6.00 mm
Skirt Outlines: 5

Infill
Internal Fill Pattern: Fast Honeycomb
External Fill Patern: Rectilinear
Interior Fill Percentage: 10%
Outline Overlap: 22%
Infill Extrusion Width: 100%
Minimum Infill Length: 5.00 mm
Combine Infill Every: 1 layers

External Infill Angle Offsets: 45/-45 deg

Support
Generate Support Material: Check
Support Infill Percentage: 15%
Extra Inflation Distance: 1.00 mm
Support Base Layers: 0
Combine Support Every: 1 layers

Dense Support Layers: 0
Dense Infill Percentage: 70%

Support Type: Normal
Support Pillar Resolution: 5.00 mm
Max Overhang Angle: 60 deg

Horizontal Offset From Part: 0.50 mm
Upper Vertical Separation Layers: 1
Lower Vertical Separation Layers: 1

Support Infill Angles: 45 deg

Temperature
Extruder 1 Temperature: 210
Heated Bed: 60

Cooling
Increase fan speed for layers below: 45.0 sec
  Maximum Cooling fan speed: 50%
Bridging fan speed override: 100%

Speeds
Default Printing Speed: 4800.0 mm/min
Outline Underspeed: 50%
Solid Infill Underspeed: 80%
Support Structure Underspeed: 80%
X/Y Axis Movement Speed: 10800.0 mm/min
Z Axis Movemen Speed: 1002.0 mm/min

Adjust printing speed for layers below: 15.0 sec 
  Allow speed reduction down to: 20%

Other
Unsupported area threshold: 20.0 sq m

Slic3r printing recommendations:

Layer height
  Layer height: 0.1 mm
  First layer height: 90%
Vertical shells
  Perimeters: 2
Horizontal shells
  Soid layers: 
              Top: 8
              Bottom: 5
Quality
  Detect thin walls: Check
  Detect bridging perimeters: Check
Advanced
  Seam position: Random
Infill
  Fill desity: 20%
  Fill pattern: Honeycomb
  Top/bottom fill pattern: Rectilinear
Reducing printing time
  Combine infill every: 1 layers
Advanced
  Solid infill every: 0 layers
  Fill angle: 25 deg
  Solid infill threshold area: 0mm
Skirt
  Loops: 2
  Distance from object: 6 mm
  Skirt height: 1 layers
  Minimum extrusion length: 4 mm
Brim 
  Brim width: 10 mm
Support material
  Generate support material: Check
  Overhang threshold: 45 deg
  Enforce support for the first: 3 layers
Raft
  Raft layers: 0 layers
Options for support material and raft
  Contact Z distance: 0.1 mm
  Pattern: Rectilinear
  Patter spacing: 2 mm
  Pattern angle: 0 deg
  Interface layers: 2 layers
  Interface pattern spacing: 0.2 mm
Speed for print moves
  Perimeters: 60 mm/s
  Small perimeters: 20 mm/s
  External perimeters: 20 mm/s
  Infill: 60 mm/s
  Solid infill: 60 mm/s
  Top solid infill: 30 mm/s
  Support material: 50 mm/s
  Support material interface: 100%
  Bridges: 30 mm/s
  Gap fill: 50 mm/s
Speed for non-print moves
  Travel: 60 mm/s
Modifiers
  First layer speed: 30 mm/s
Acceleration control
  Perimeters: 800 mm/s
  Infill: 1500 mm/s
  Bridge: 1000 mm/s
  First layer: 1000 mm/s
  Default: 1000 mm/s
Autospeed
  Max print speed: 100 mm/s
  Max volumetrix speed: 0 mm/s
Extrusion width
  Default extrusion width: 0.42 mm
  First layer: 0.42 mm
  Perimeters: 0.42 mm
  External perimeters: 0.42 mm
  Infill: 0.42 mm
  Solid infill: 0.42 mm
  Top solid infill: 0.42 mm
  Support material: 0.42 mm
Overlap
  Infill/Perimeters overlap: 20%
Flow
  Bridge flow ratio: 0.95
Other
  XY Size Compensation: 0 mm
  Threds: 8
  Resolution: 0 mm

Comments

comments powered by Disqus

Similar items

Browse more newly listed 3D printings