


Files
3D model format
Stereolithography (.stl)
Total files
Slicer settings
Mesh error check
Netfabb
Support
Lifetime support from Gambody team
Update requests
Available to verified buyers
Model complexity
Advanced: may require tuning print settings or support placement, plus precise fitting, gluing, or sanding.
Model versions
FFF/FDM
Assembly method
not specified
Features
FFF/FDM
Assembly method
not specified
Features
FFF/FDM
Assembly method
not specified
Features
Additional details
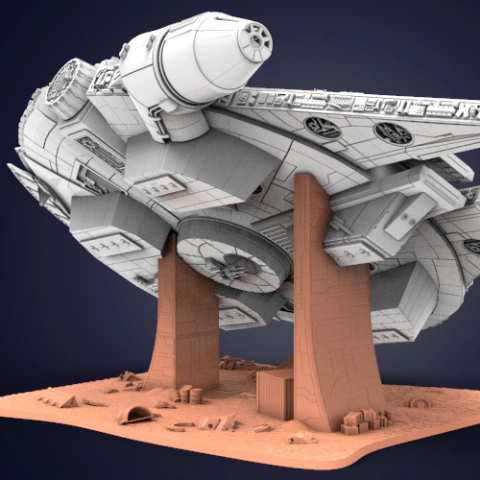
Part of diorama
Yes
Other model in diorama
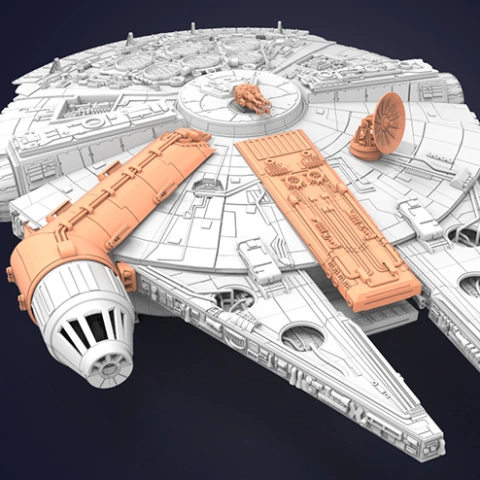
Special pack included
- Yes, Interior
- Millennium Falcon Interior 3D Printable Parts Kit 1: Cockpit and Engine Details
- Millennium Falcon Interior 3D Printable Parts Kit 2: Hyperdrive and Engineering Bay
- Millennium Falcon Interior 3D Printable Parts Kit 3: Main Hold, Lounge Seat, Technical Station
- Millennium Falcon Interior 3D Printable Parts Kit 4: Mandibles, Engine and Quad Laser
You will get instant access to the STL files of Millennium Falcon 3D Printing Model | Standard Assembly Kit after completing your purchase. Simply add the model to your cart and check out using PayPal, credit or debit card, Apple Pay, Google Pay, Alipay, or other available payment methods.
Watch the assembly video for Millennium Falcon 3D Printing Model | Standard Assembly Kit, and explore more tutorials, behind-the-scenes content, 3D printing timelapses, and painting guides on the official Gambody YouTube channel.
This 3D Model consists of files in StereoLithography (.Stl) format that is optimized for 3D printing.
Before printing the files, we strongly recommend reading the PRINTING DETAILS section.
Millennium Falcon Standard Assembly Kit 3D Printing Model comes in 3 versions for FFF/FDM 3D printers. Files for each version are available for download after the purchase.
It is recommended:
- STL files of FFF/FDM 1.0 version - old version;
- STL files of FFF/FDM 2.0 version - new updated version;
- STL files of FFF/FDM 2.1 version - new updated version for printers with larger build plates.
Before printing, take a look at Printing Details for recommended settings and tips to achieve better results.
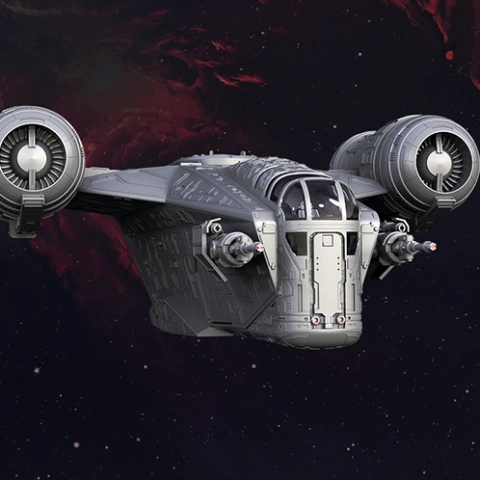
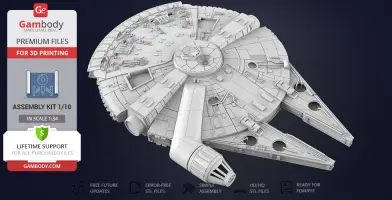
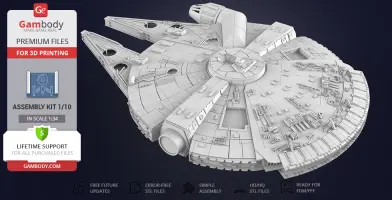
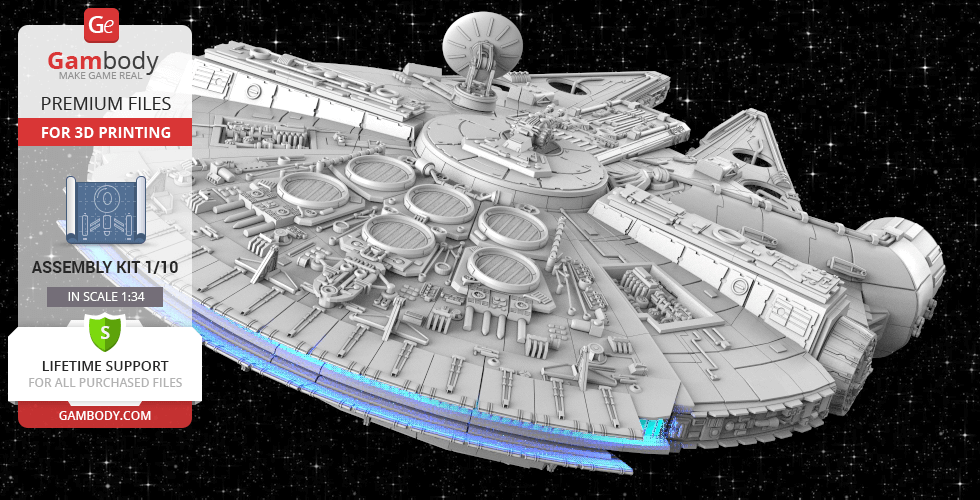
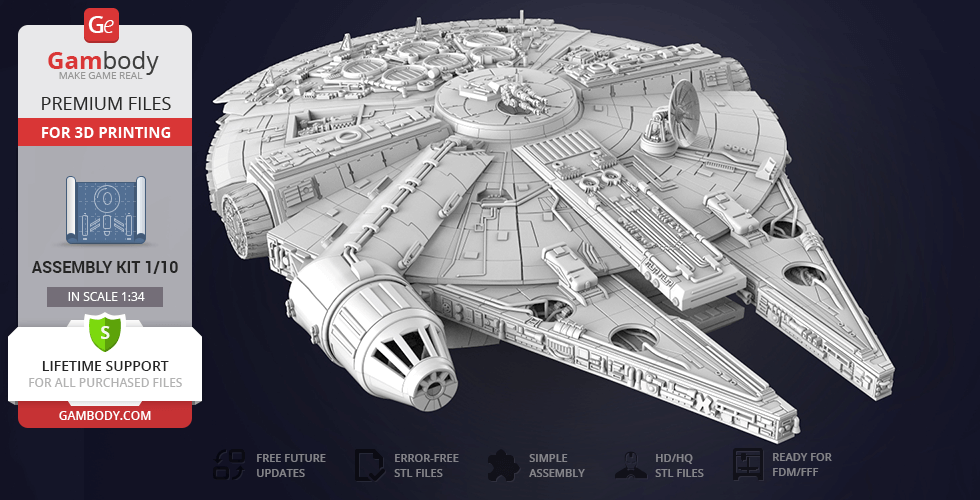
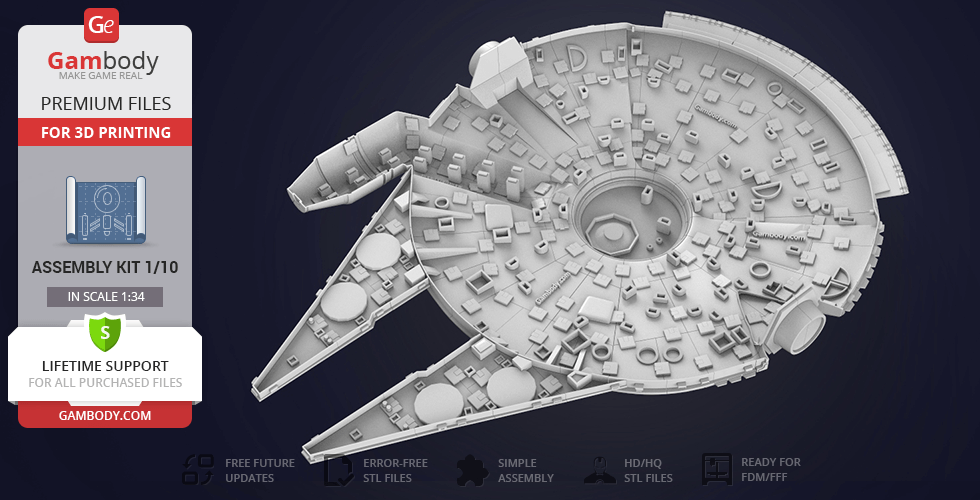
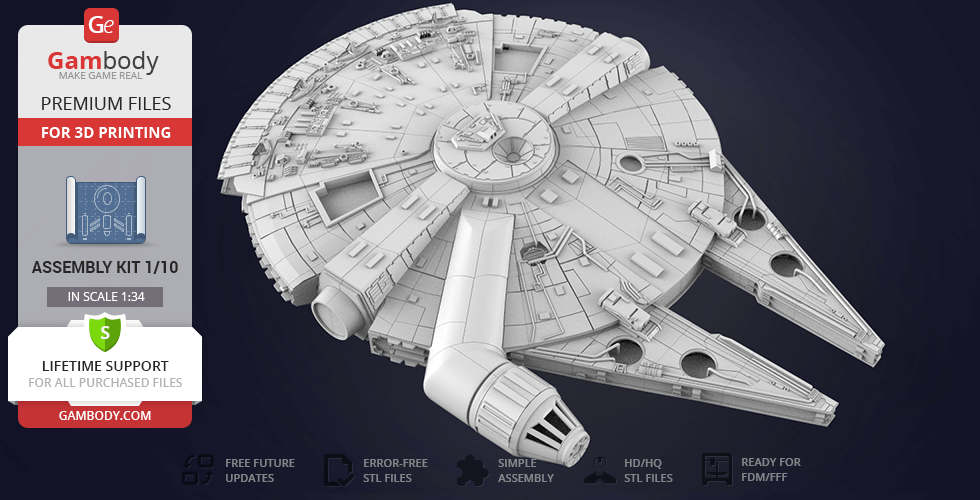
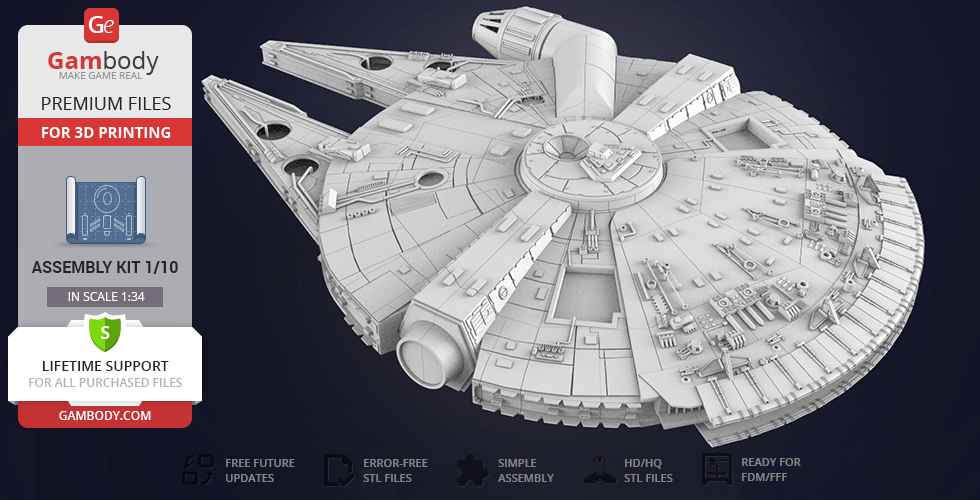
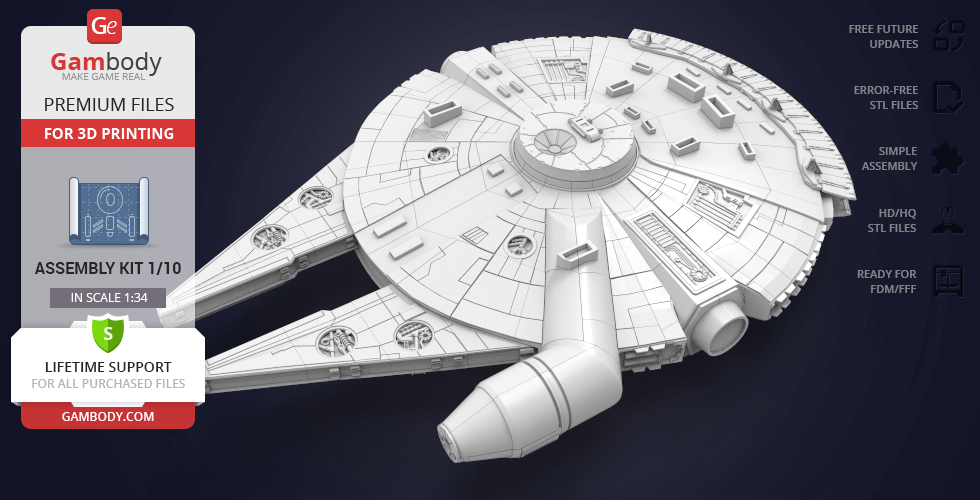
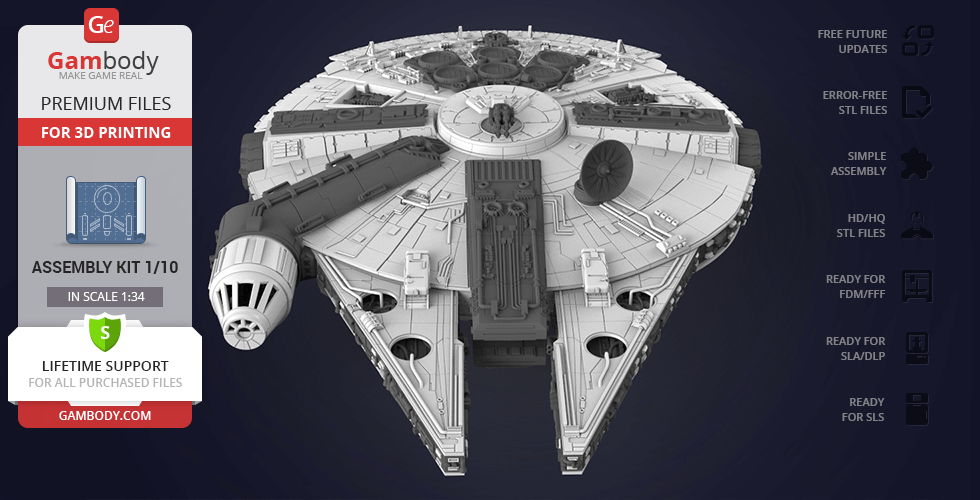
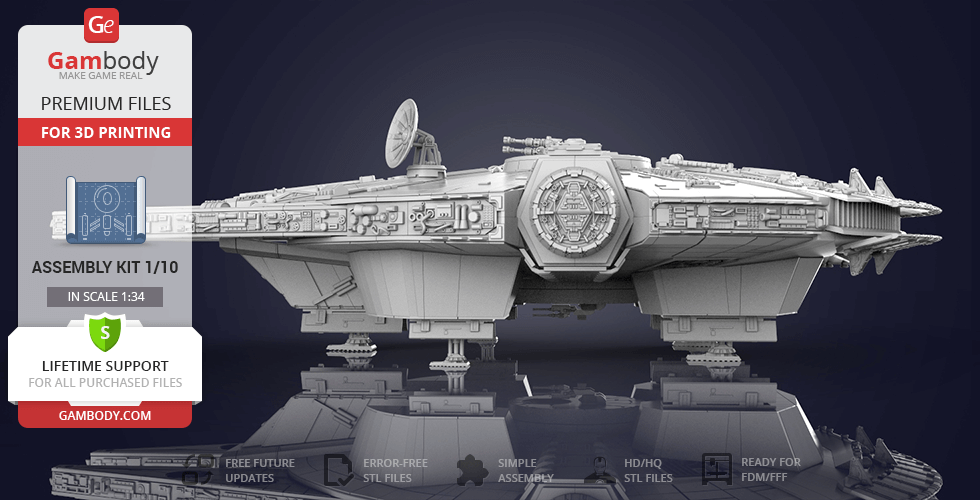
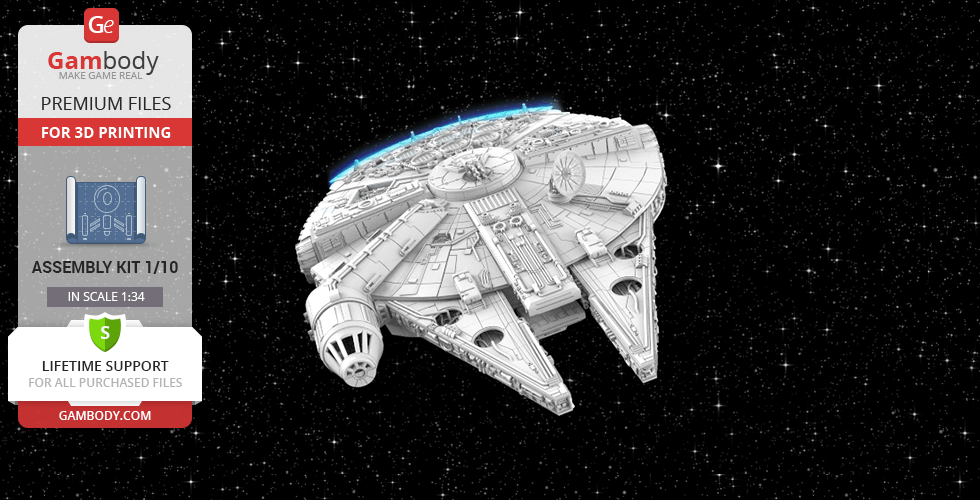
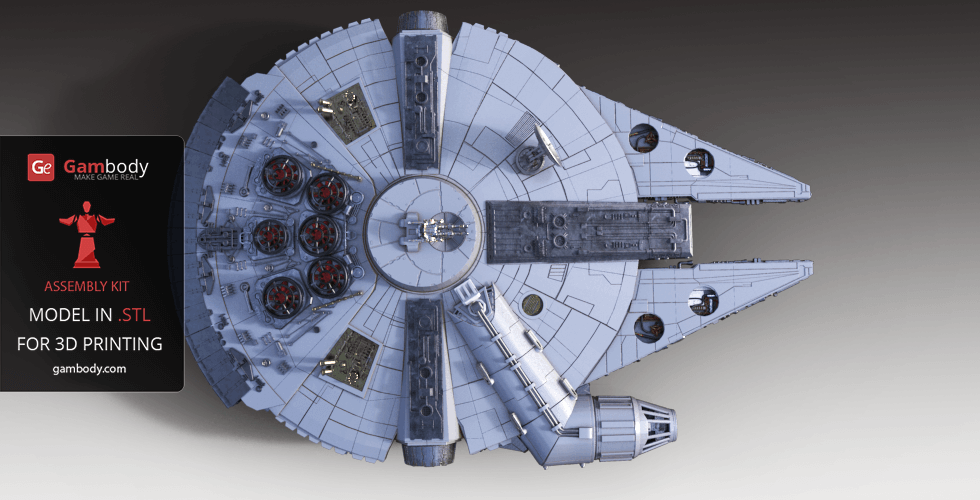
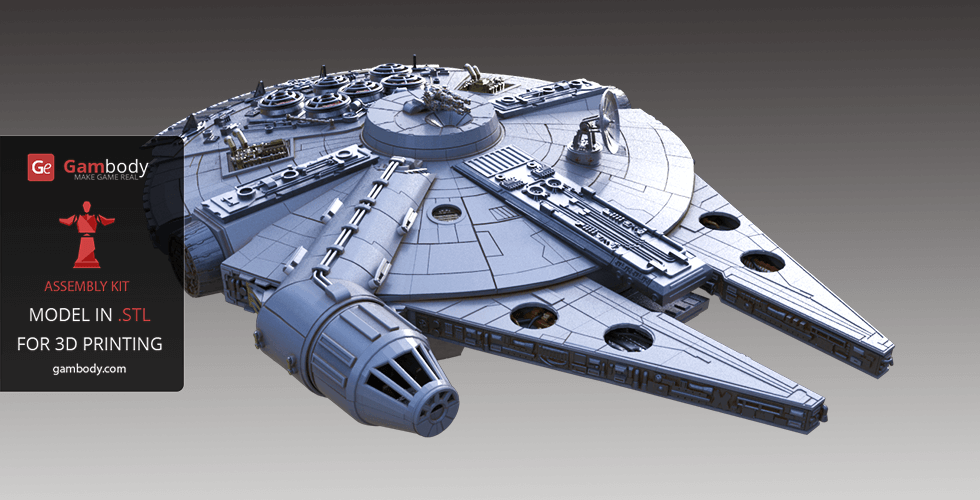
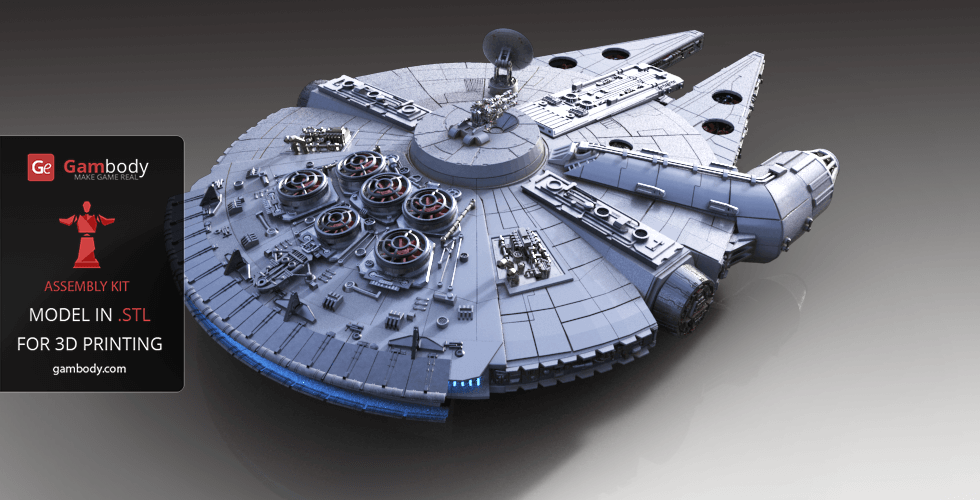
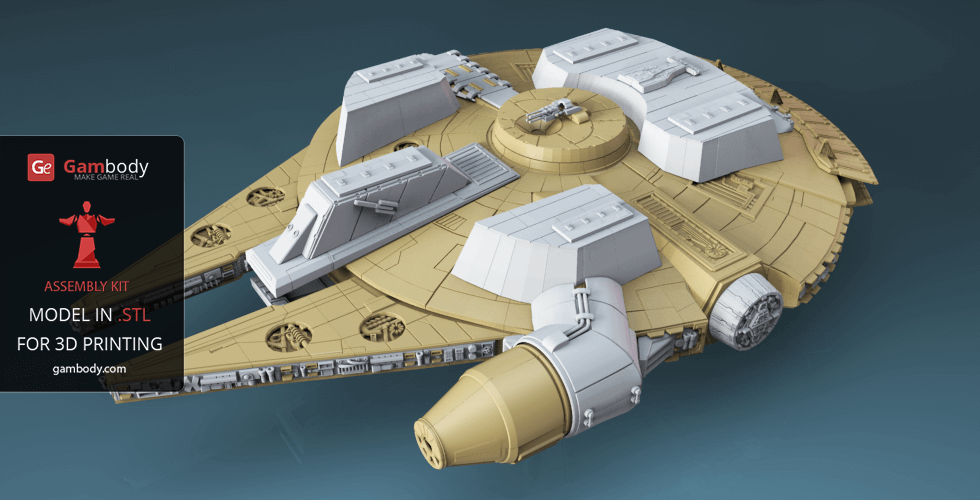
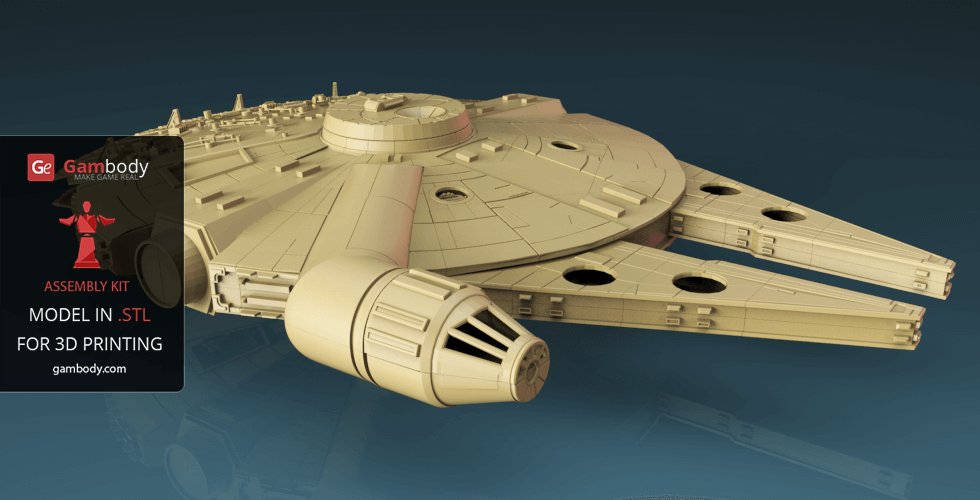
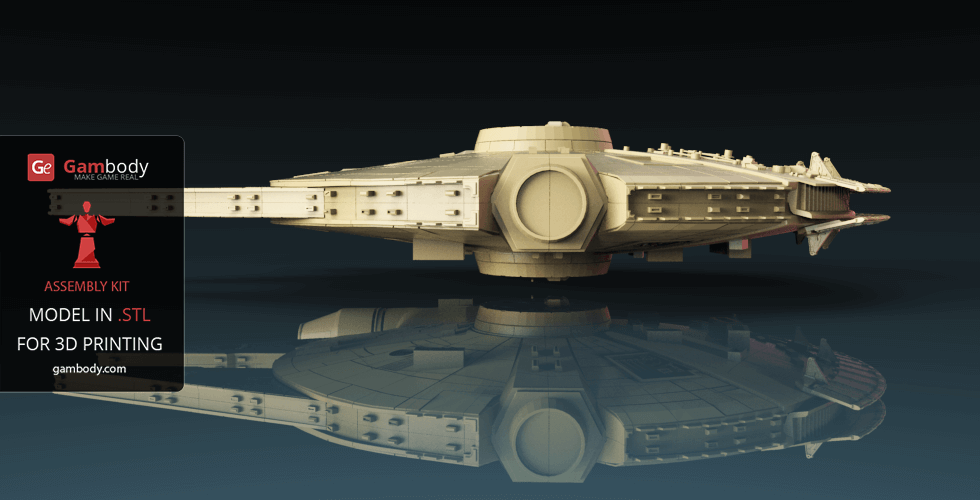
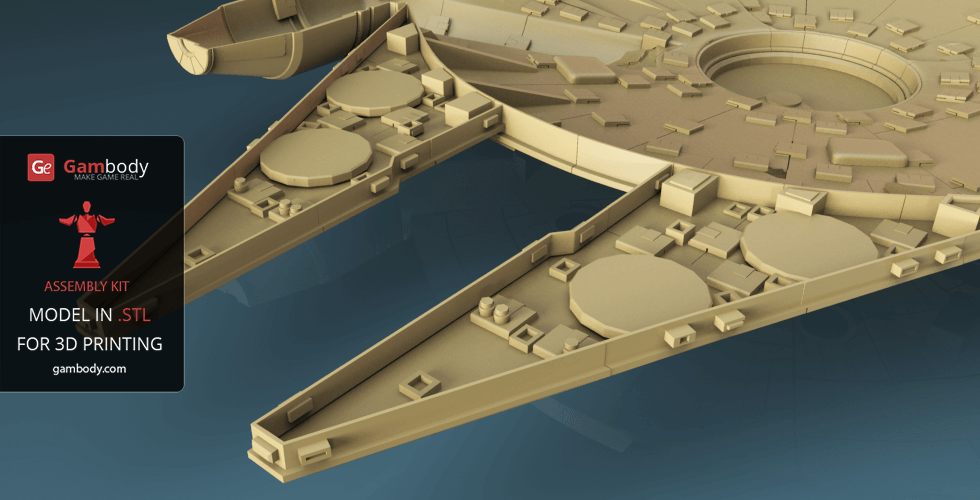
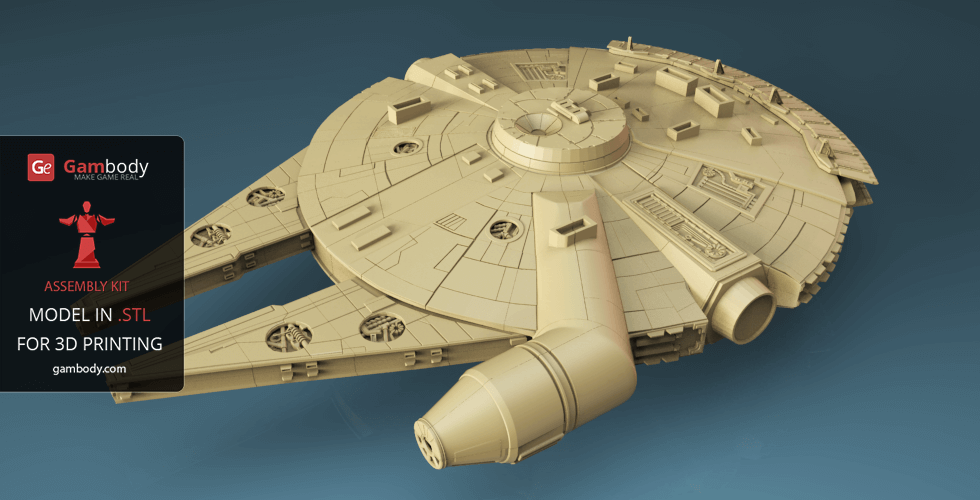
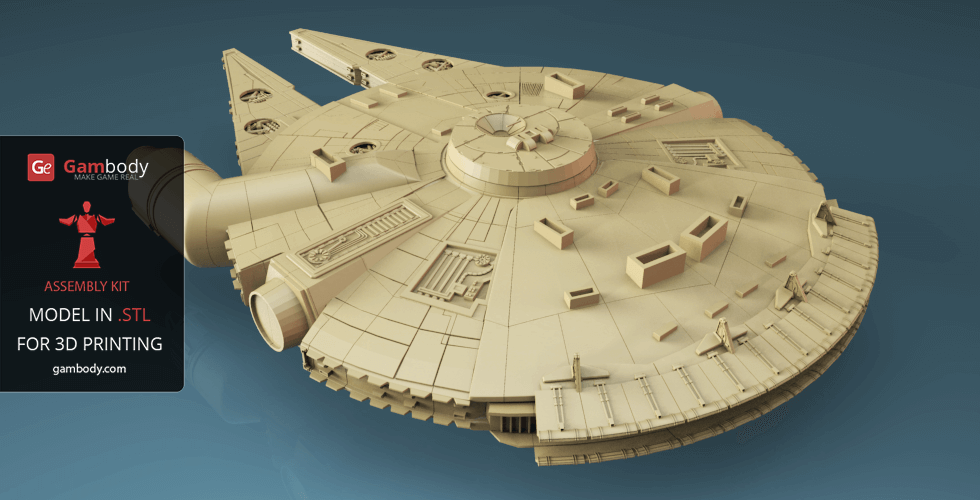
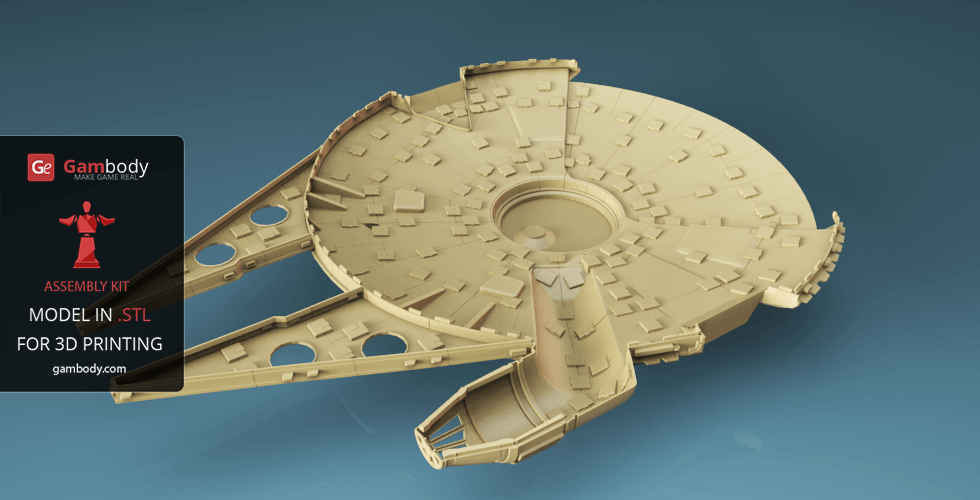
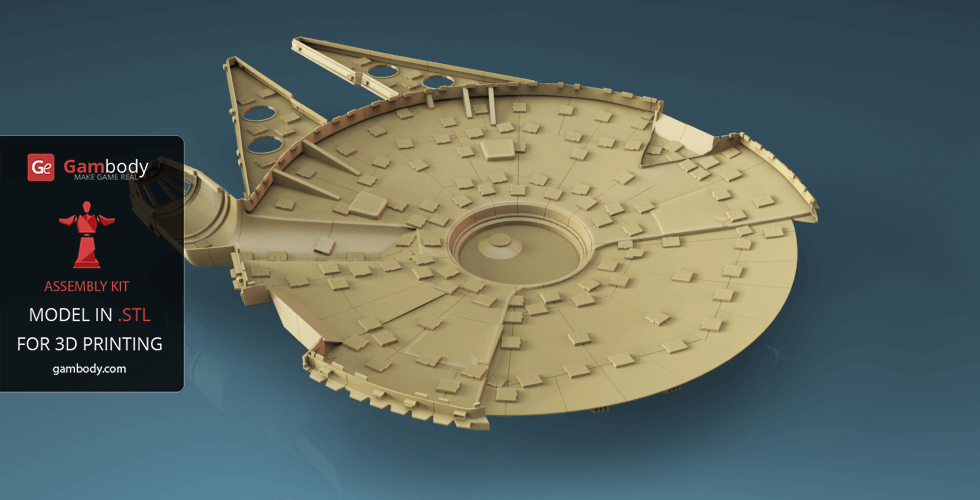
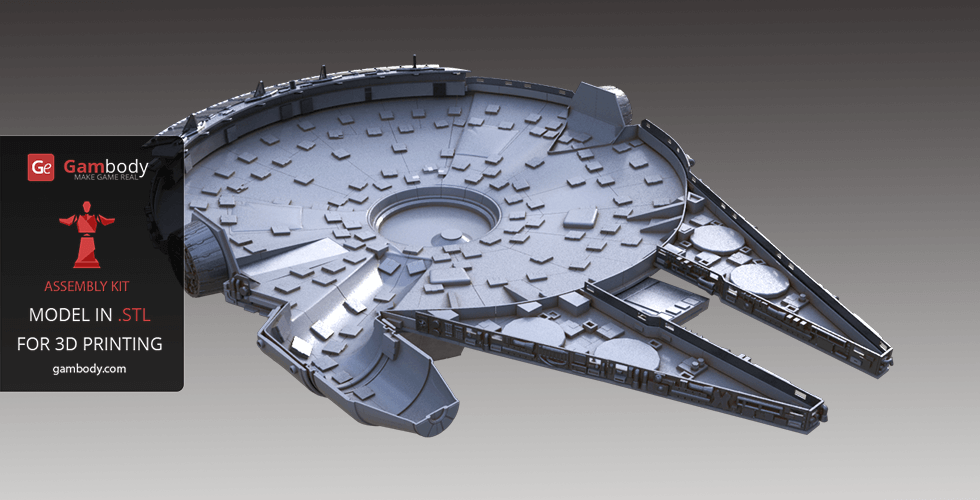
Millennium Falcon 3D model for 3D printing was a Corellian light freighter most famously used by the smugglers Han Solo and Chewbacca during the Galactic Civil War. If you are an avid fan of Space War Online aircrafts that are capable of traveling at the speed of light, developing it in just several fractions of a second, this 3D model is something you’ve been waiting for.
Its aged appearance belied numerous advanced modifications to boost the ship's speed, weapons, and shield, including a hyperdrive engine among the fastest in the entire galaxy, enabling it to outrun Imperial Star Destroyers.
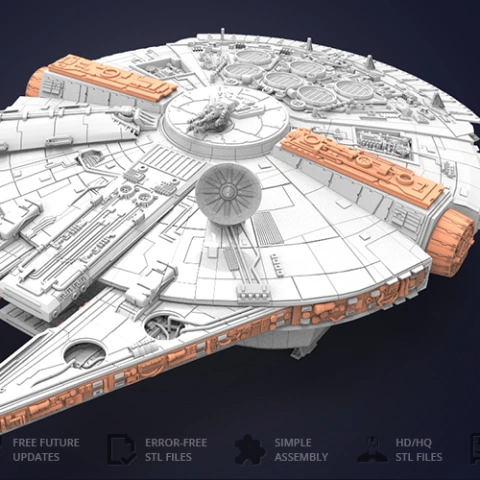
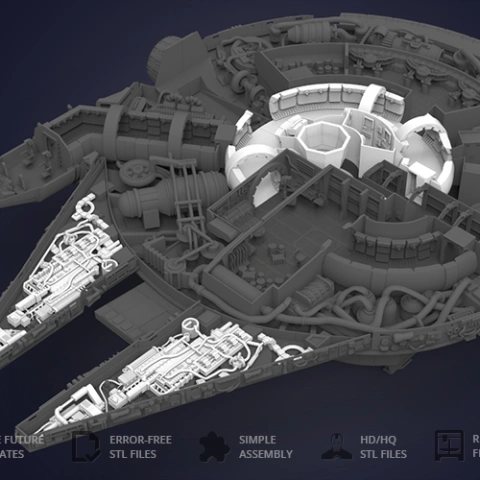
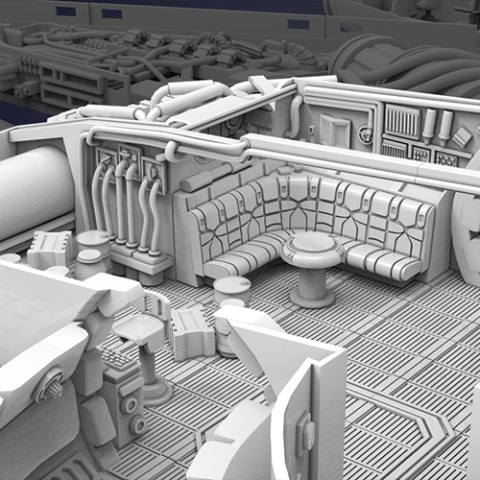
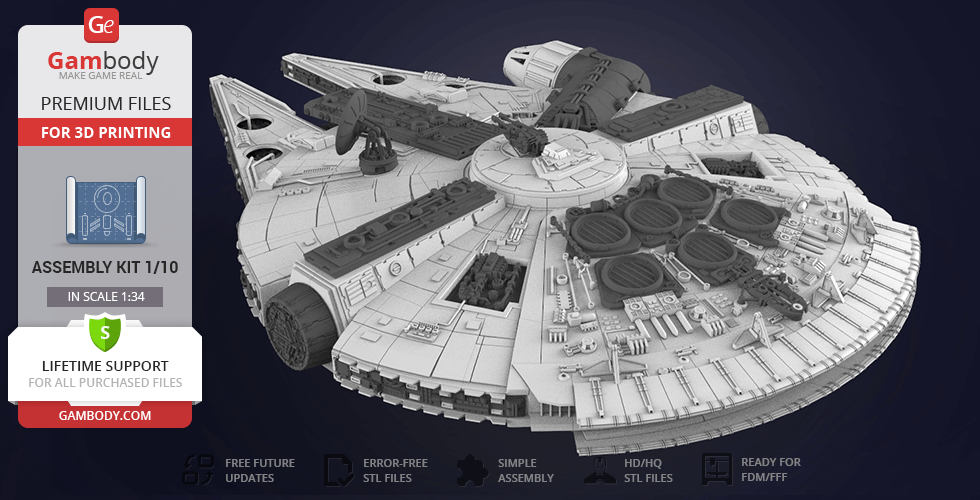
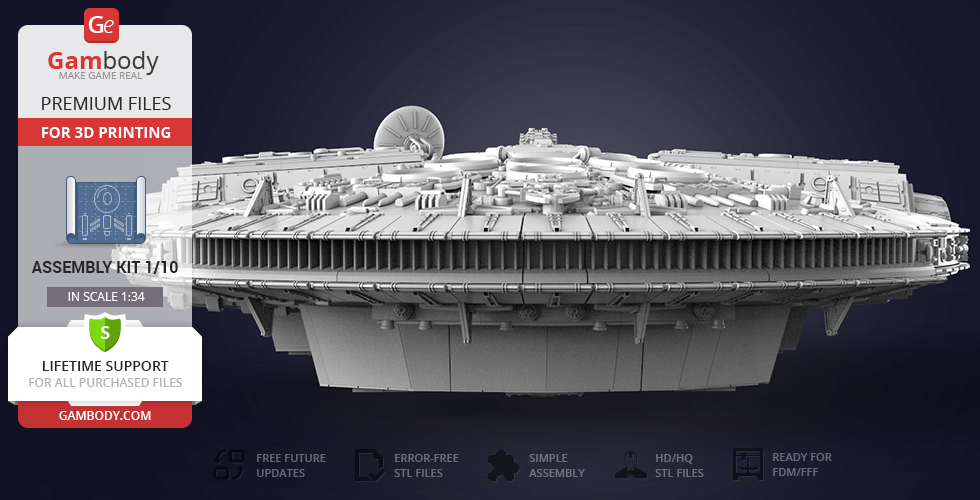
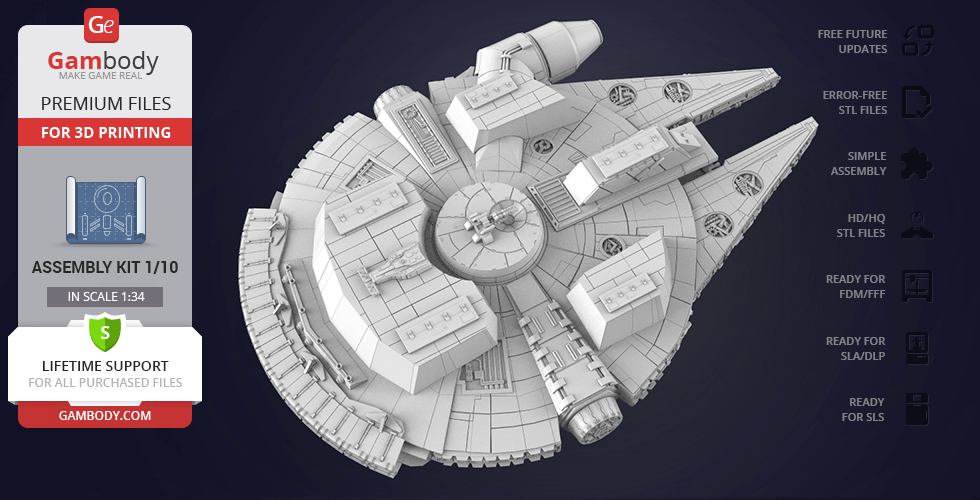
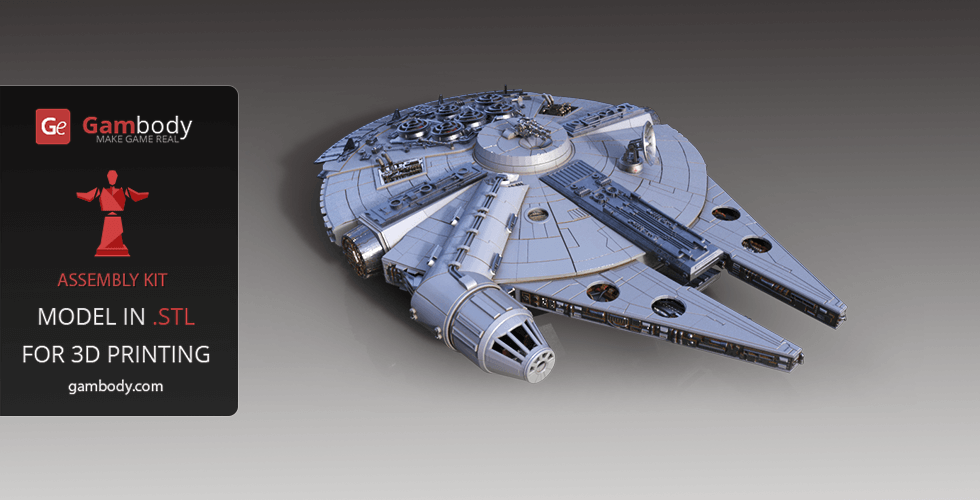
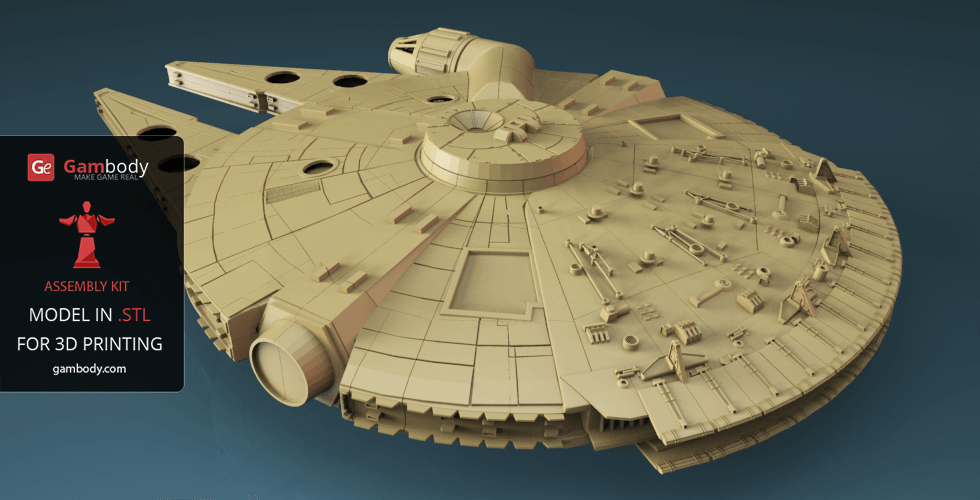
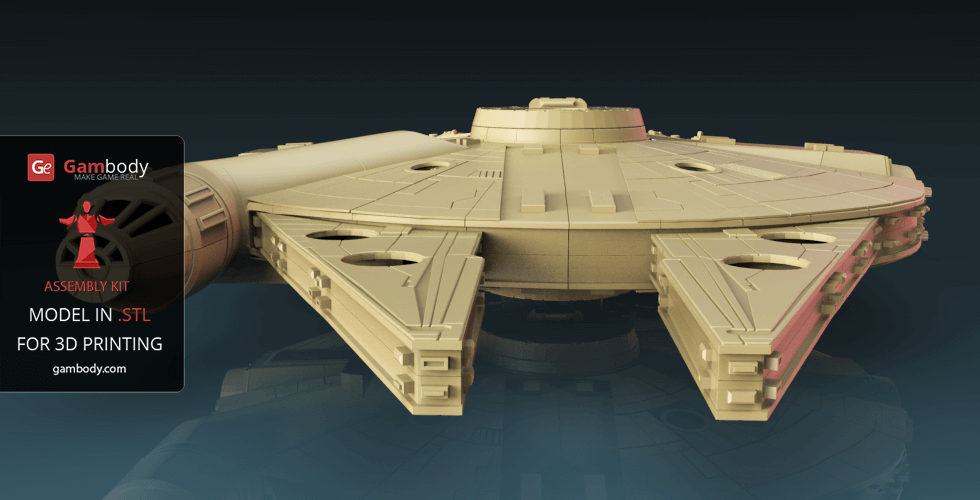
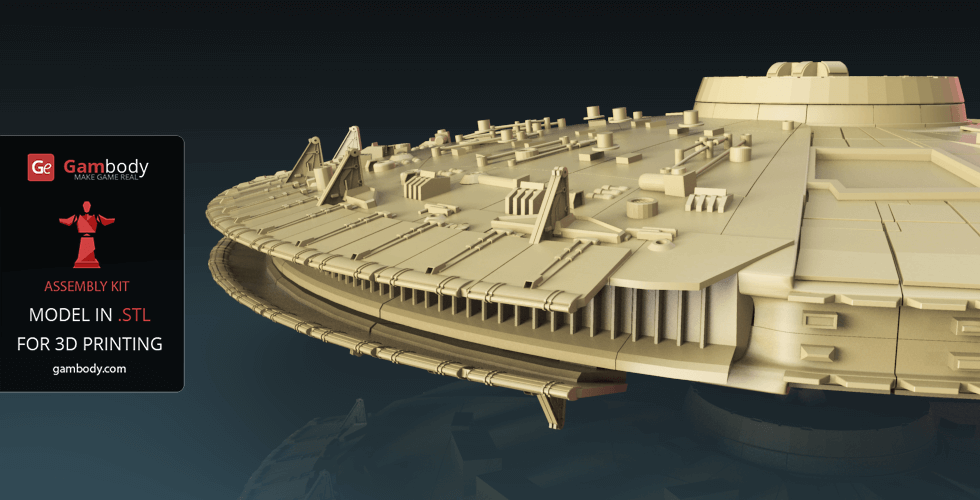
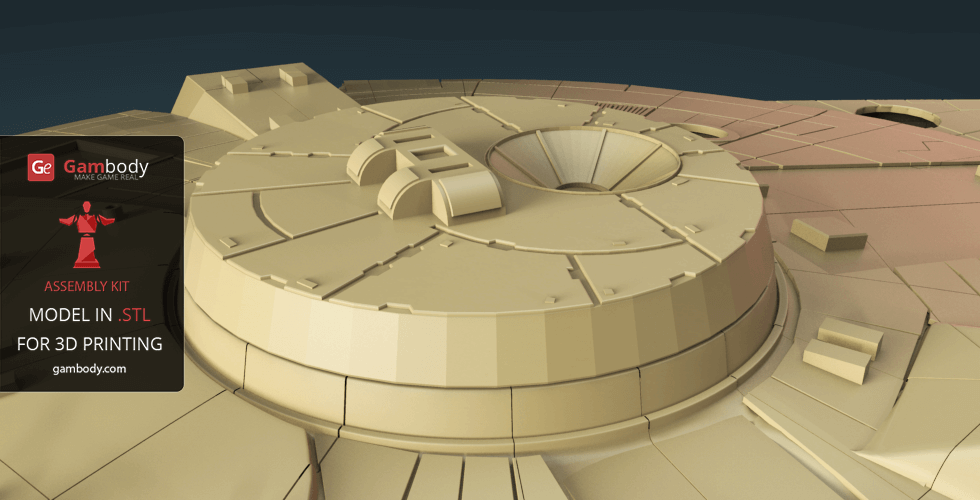
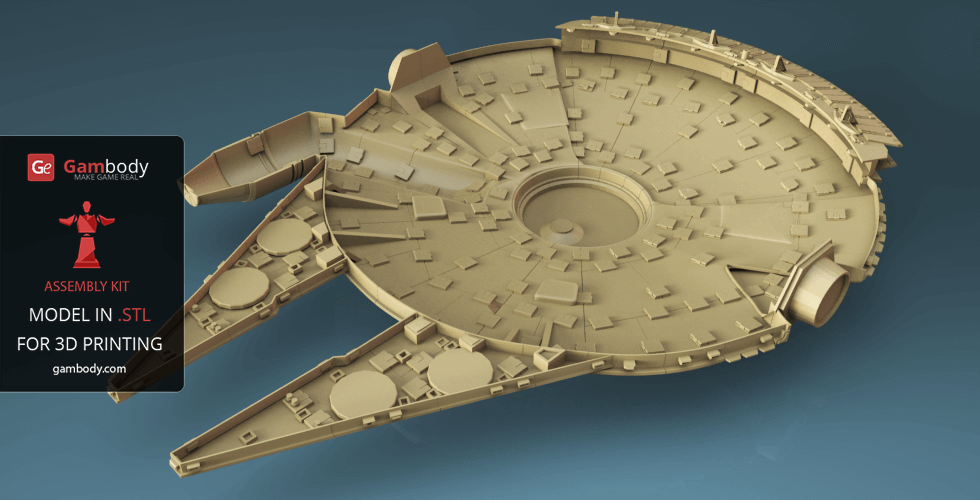
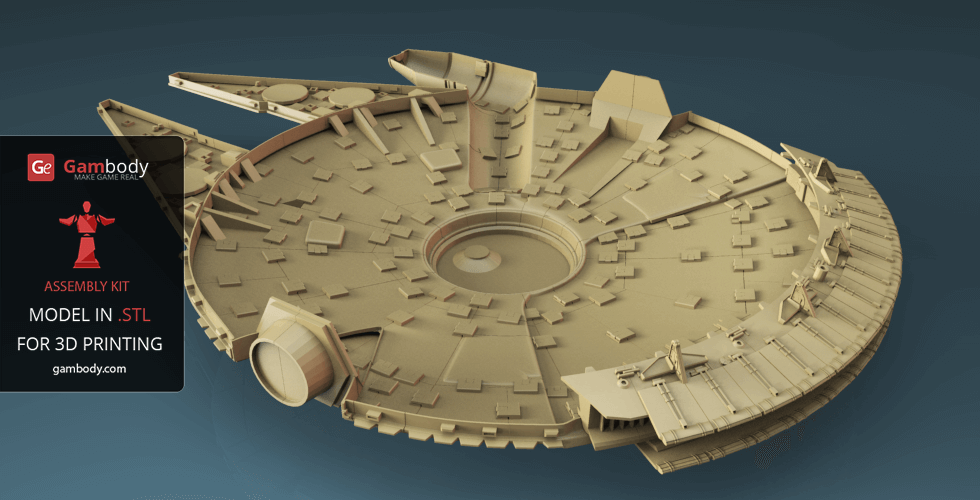
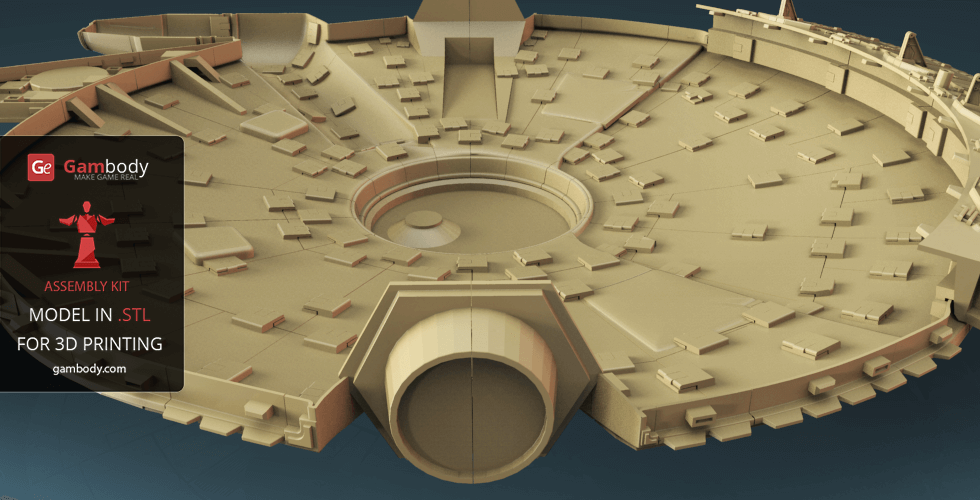
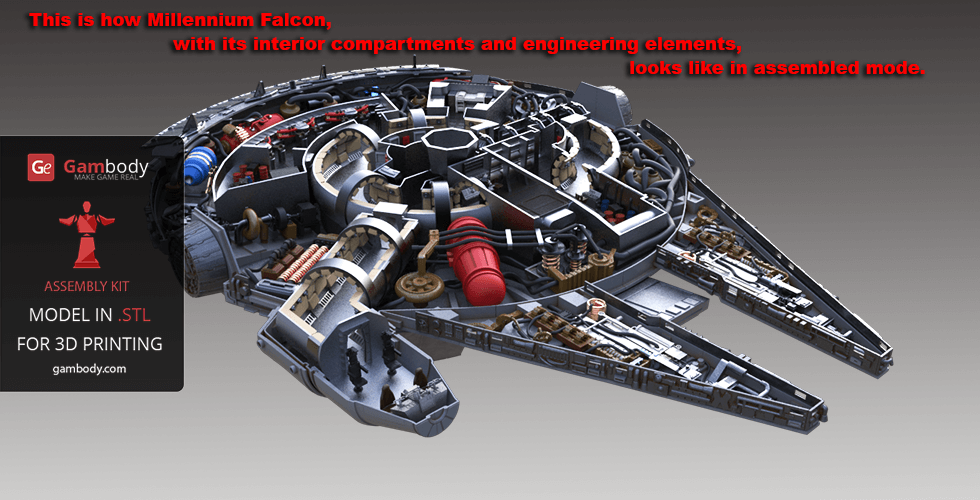
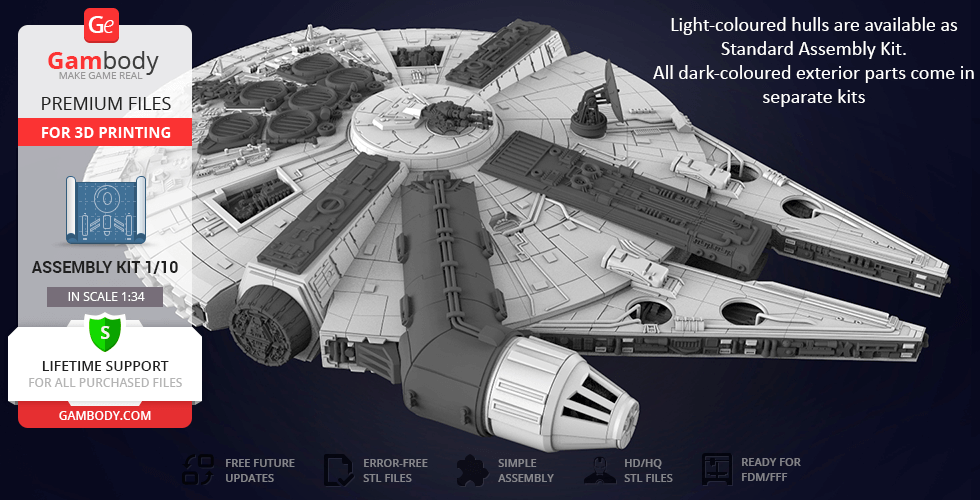
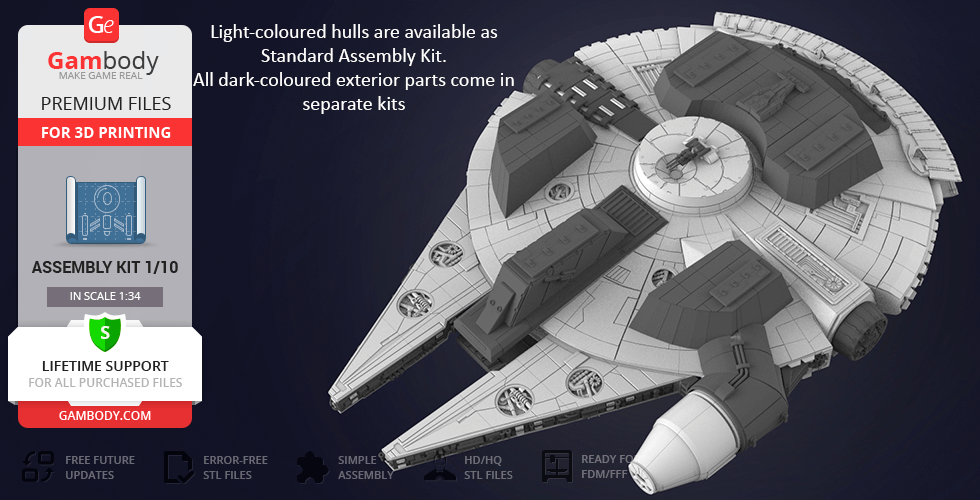
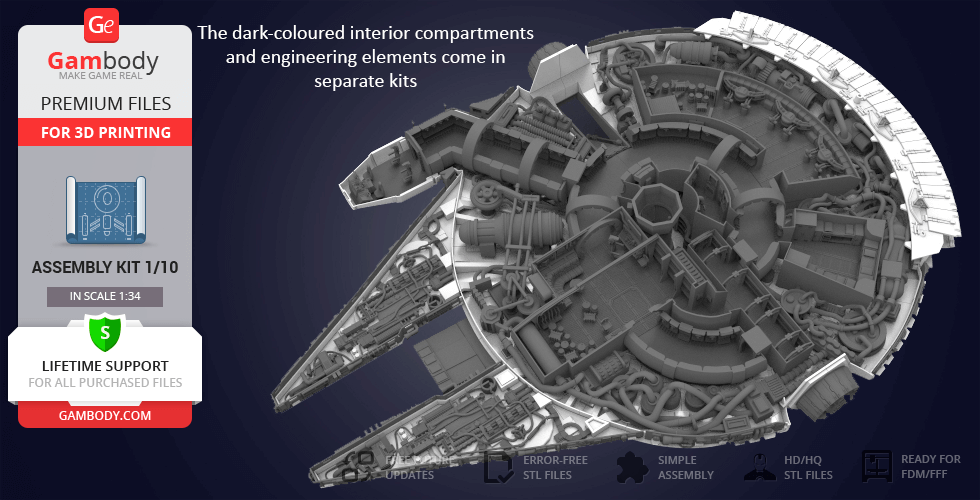
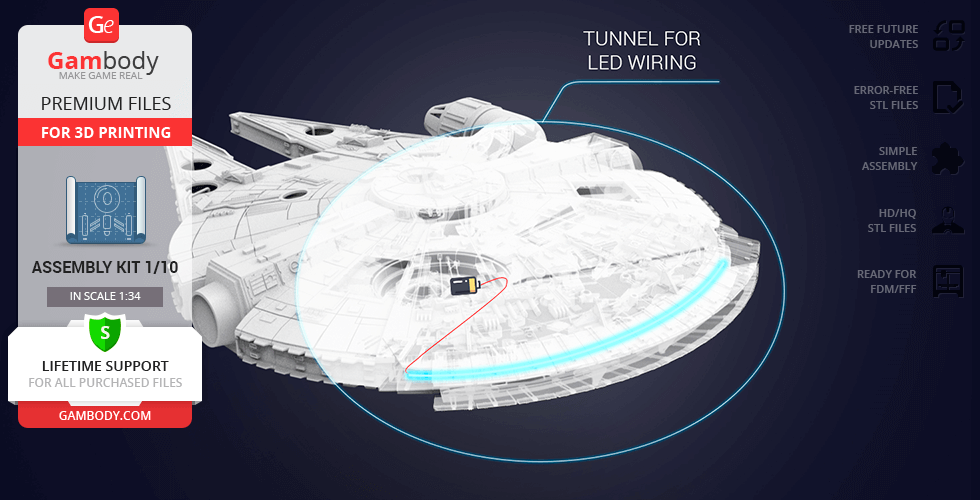
Visually, Millennium Falcon 3D print model is a massive construction, consisting of various detailed parts. Both the exterior and the interior design of the printable ship are enhanced with heavy engineering elements.
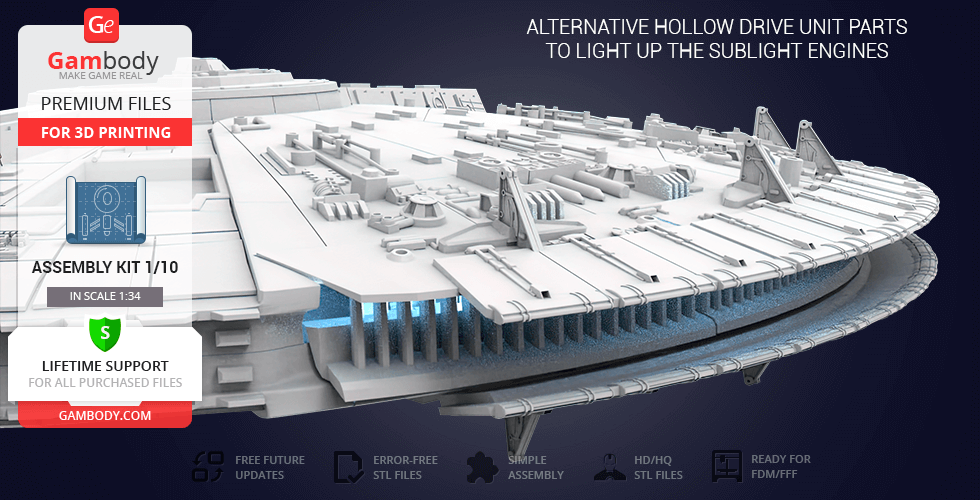
We considered every tiny detail of the game’s original spacecraft, but our Millennium Falcon 3D model showcases a lot of upgraded technical elements, such as heavier quad cannon, a more massive sensor dish, 6 impressive jet turbines that appear on the generally improved top hull. Details in this model have been improved and specially adapted for 3D printing. So you can get the best quality from your 3D printer.
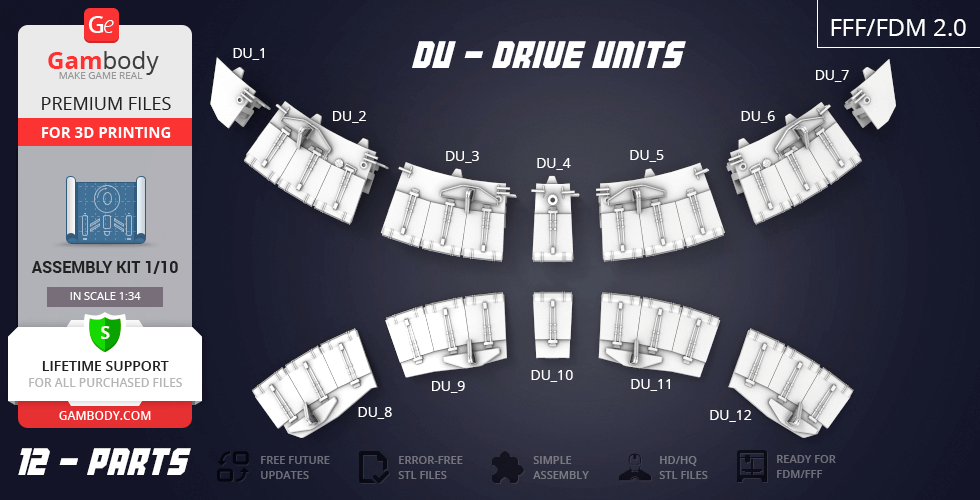
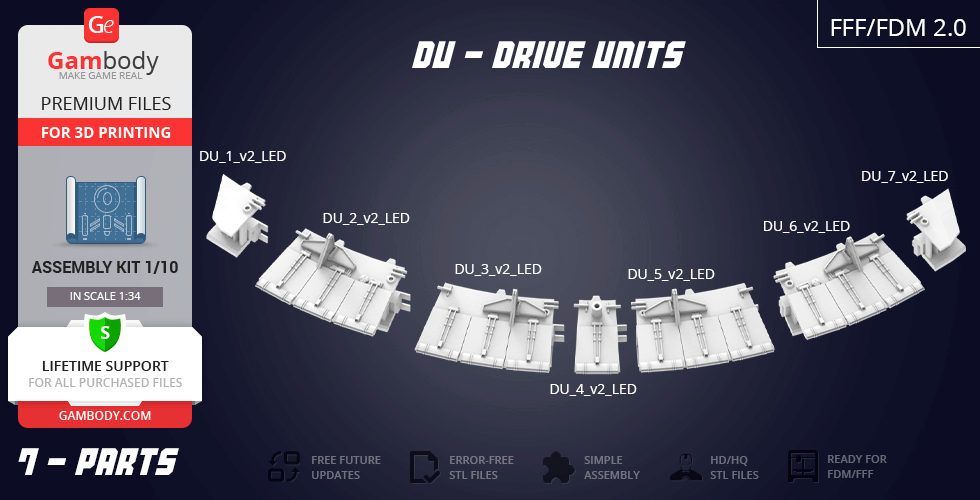
Millennium Falcon model is also equipped with super-fast hyperdrive engine, its primary drive force, which is representative of the starship, backup engines, giving it the capability to travel faster-than-light, and a functional landing gear. We have also modelled a fully detailed underside of the spaceship.
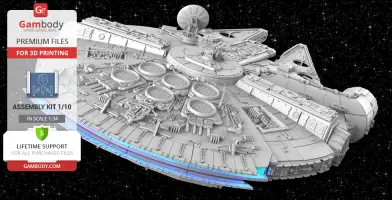
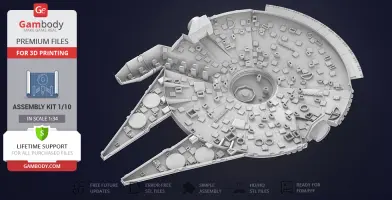
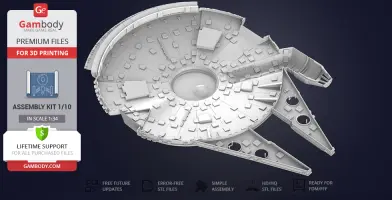
ABOUT MILLENNIUM FALCON 3D MODEL | STANDARD KIT
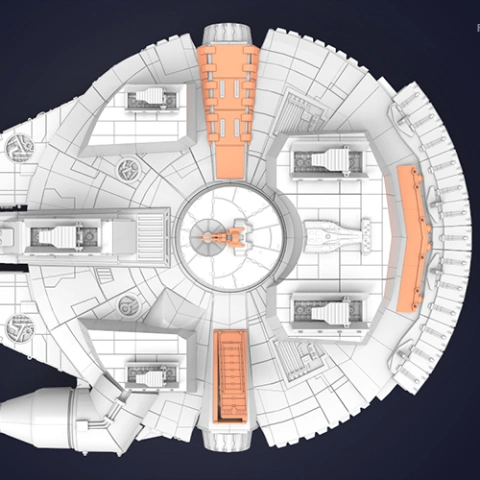
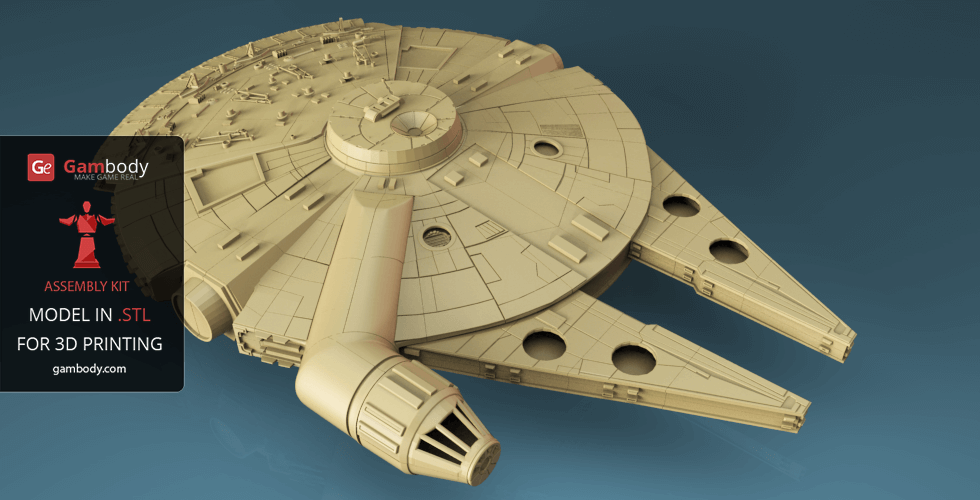
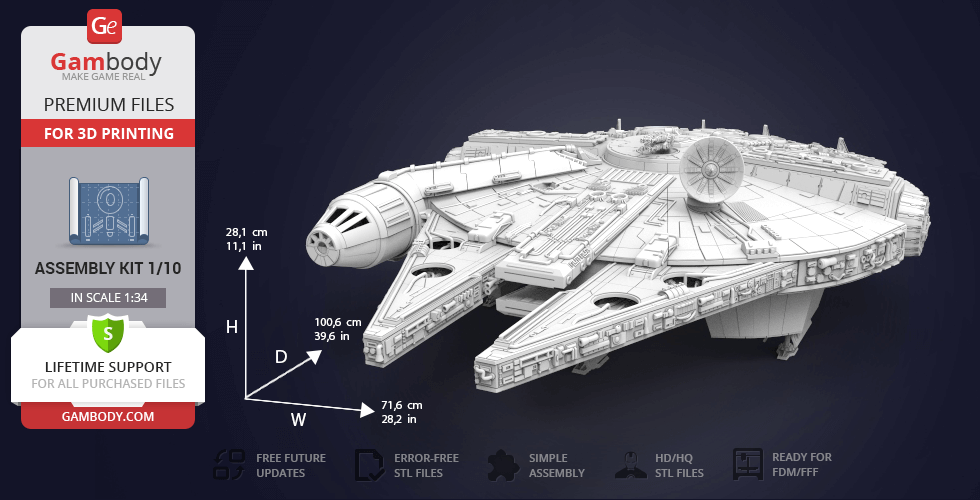
Scale: Its length is 34520 mm. Model made as 1/34. After being printed will stand - 281 mm tall, 716 mm wide, 1006 mm deep.
FFF/FDM 1.0, FFF/FDM 2.0:
- FFF/FDM 1.0 - old version (released back in 2016);
- FFF/FDM 2.0 - new updated recommended version;
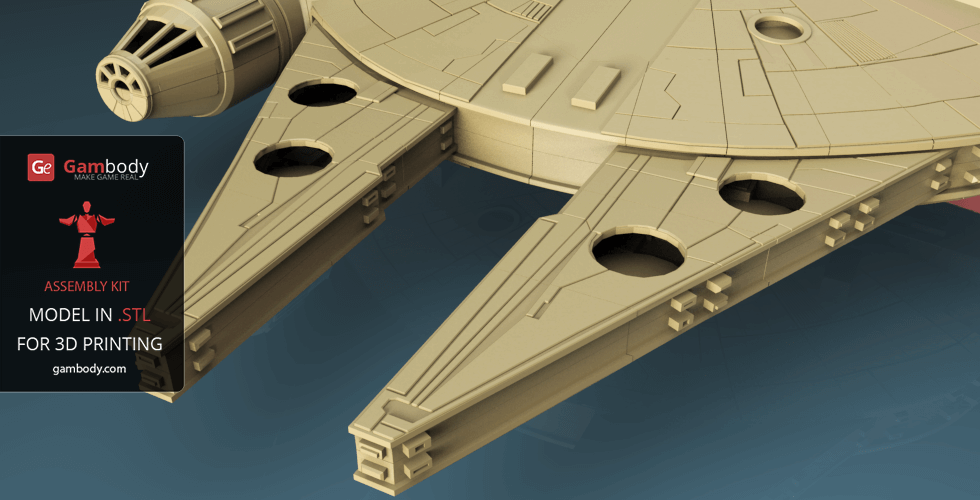
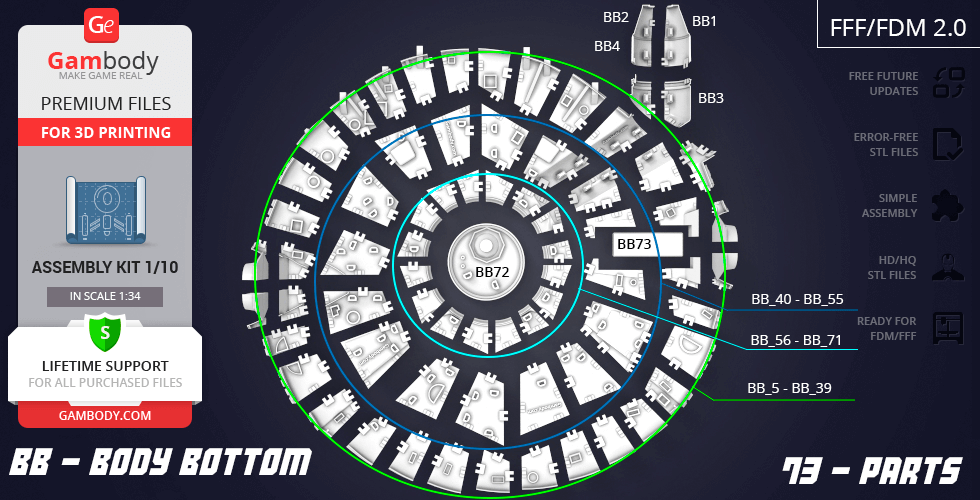
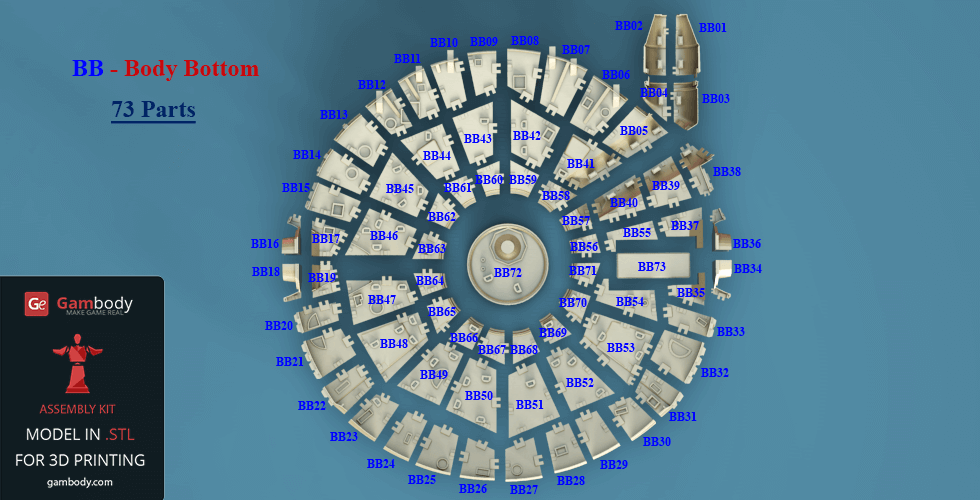
- Сonsists of the top and bottom hullsonly;
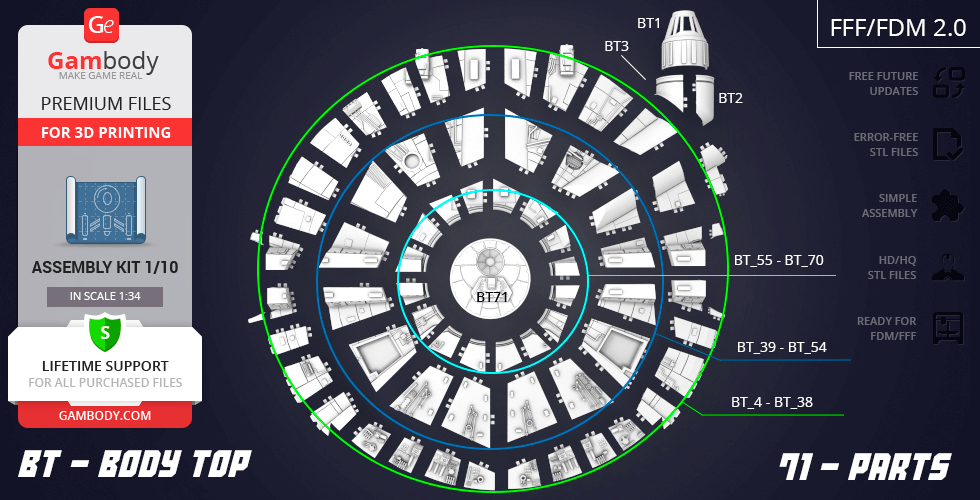
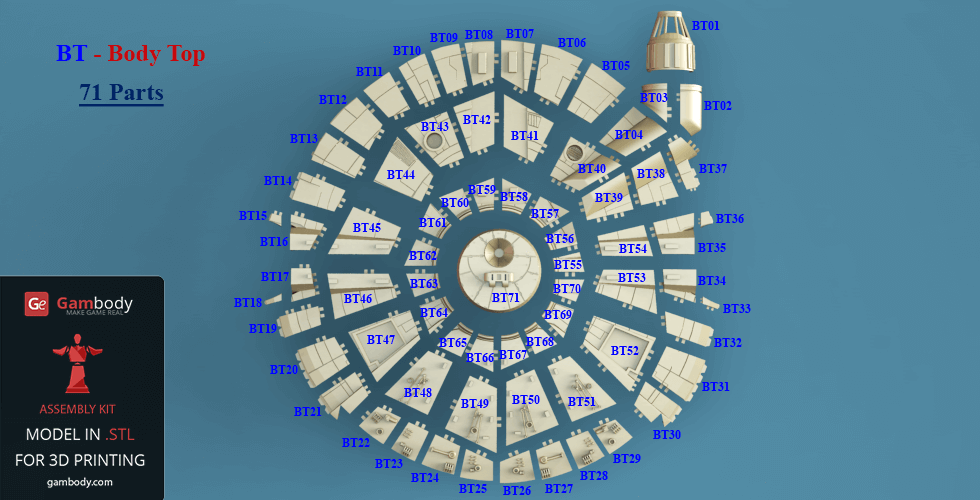
- The hull of the model, without the additional interior* and exterior** elements, is made up of 176 parts that are available for download in .STL file format, supported by all 3D printers.
- All parts are designed in such a way as to save 3D printer filament when being printed;
- Before starting 3D printing the model, read the Printing Details for CURA 3.4.1, Simplify3D or Slic3r Software.
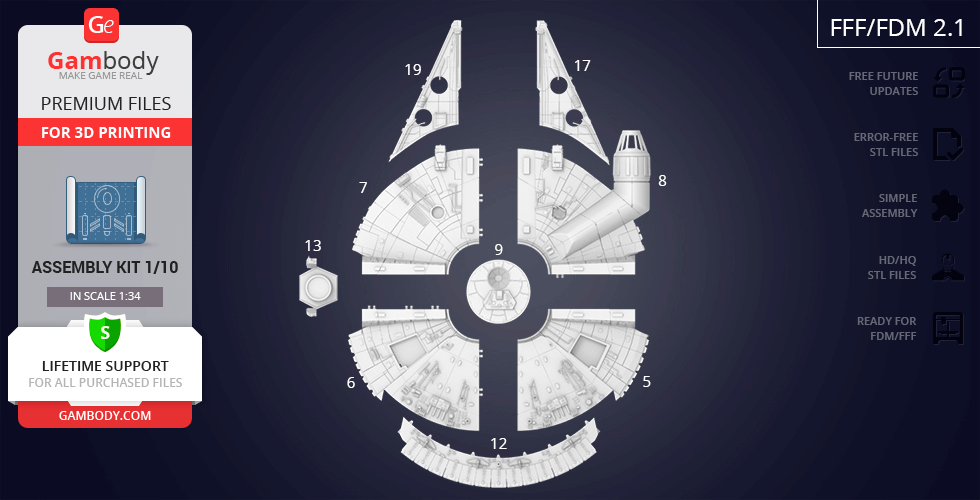
FFF/FDM 2.1:
- Сonsists of the top and bottom hullsonly;
- This version was prepared for FFF/FDM printers with larger build plates and consists of bigger 19 parts only.
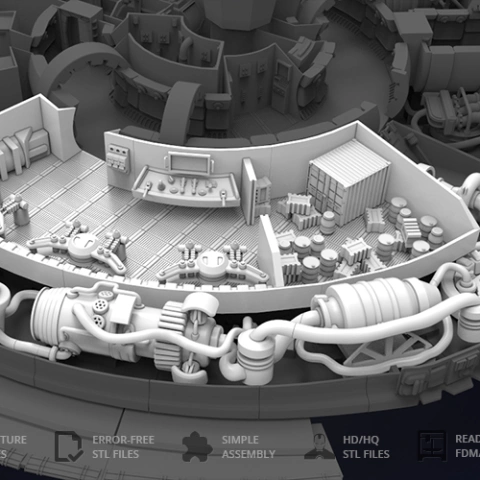
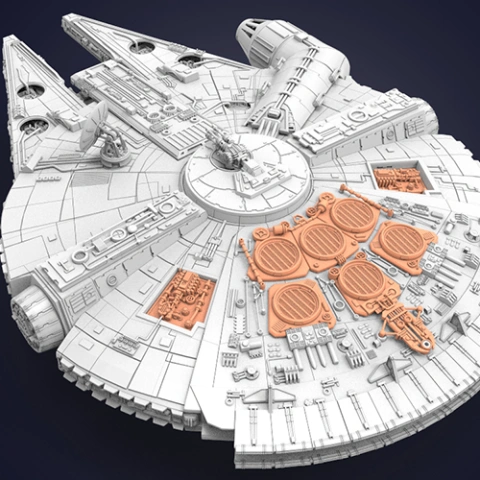
Aside from standard kit, there are other 9 kits of interior and exterior parts that can be printed and added to Millennium Falcon model to make it even more impressive and detailed.
*Millennium Falcon Interior Kit for 3D printing:
Kit 1: Crew Quarters, Cockpit Access Tube
Kit 2: Hyperdrive, Engine Parts, Engineering Bay
Kit 3: Main Hold, Lounge Seat, Technical Station
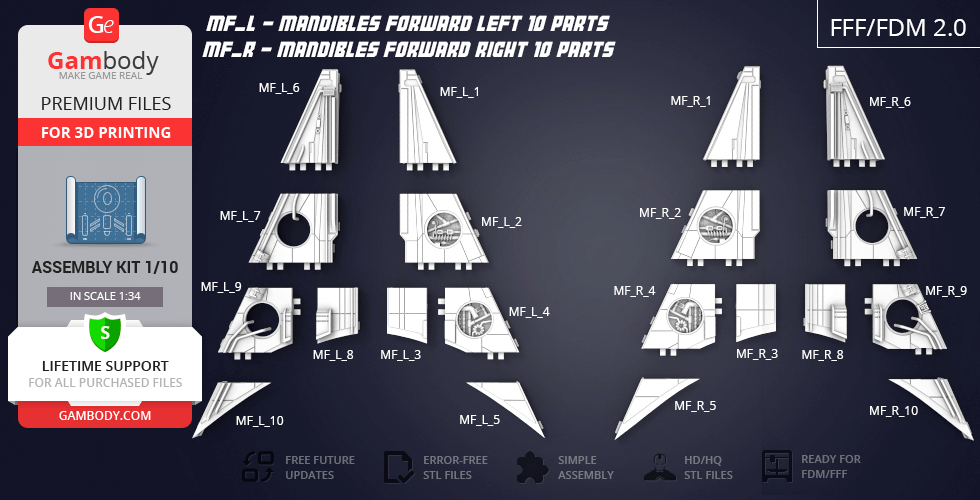
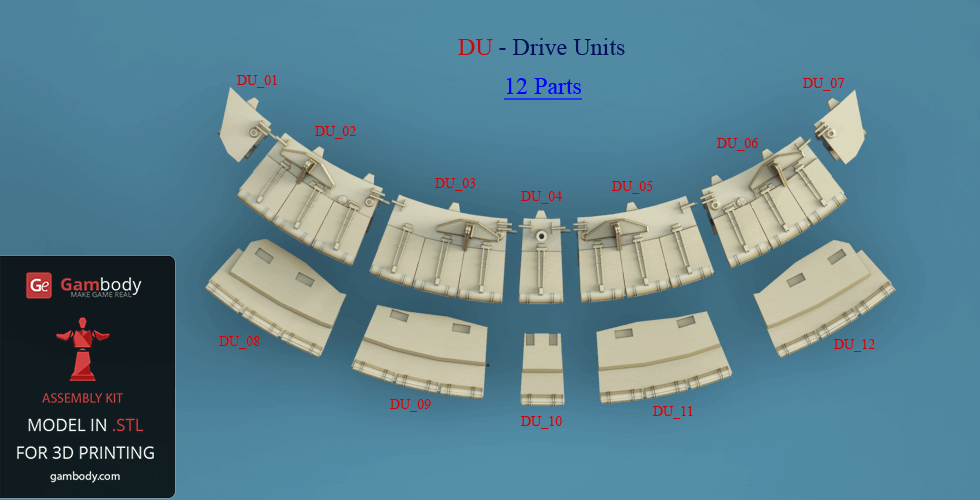
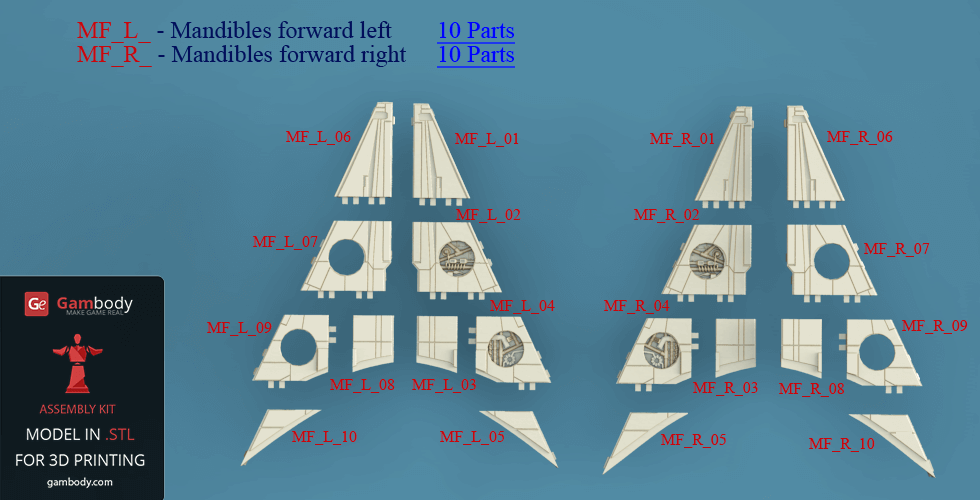
Kit 4: Mandibles, Engine, Quad Laser
**Millennium Falcon Exterior Kit for 3D printing:
Kit 1 - Landing Gear
Kit 2 - Engine Vents
Kit 3 - Gun, Antenna
Kit 4 - Tracery, Docking Ring
Kit 5 - Boarding Ramp, Gun
WHAT WILL YOU GET AFTER PURCHASE?
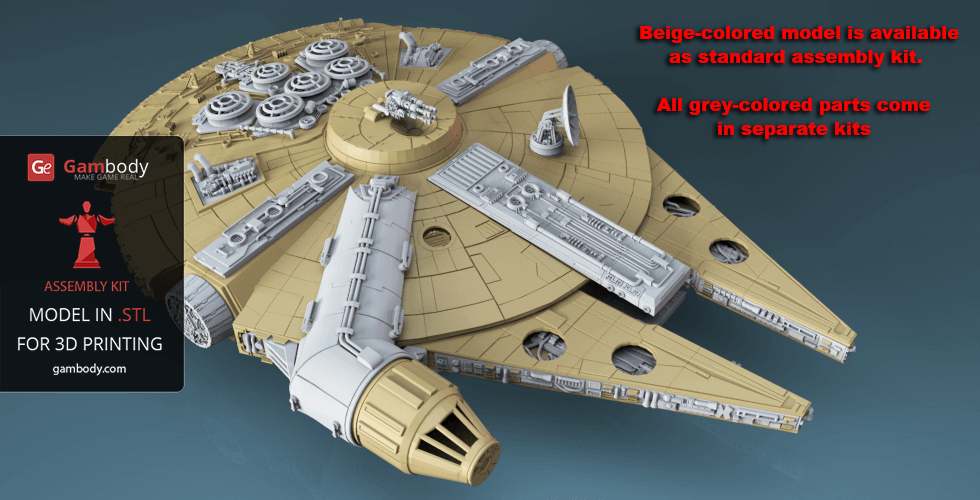
- STL files of Millennium Falcon 3D Model | Standard Kit for 3D printing which consist of 176 parts prepared for an average FFF/FDM 3D printer's build plate as well as the same kit that consists of 19 parts prepared for printers with larger build plates;
- Standard Kit that consists of the top and bottom hullsonly;
- High-poly detailed model of Millenium Falcon in Standard Kit;
- Free future updates for this model;
- A complete video guide on assembling all the details of this model;
- Detailed settings that we provide for Cura 3.3.1. and Simplify3D for the best print;
- Full technical support from the Gambody Support Team.
Watch the tutorial video of the assembly procedure on our official Gambody YouTube channel, or click on the ‘View Video’ button, in the bottom right corner of the model’s photo slider.
To buy STL files of the Millennium Falcon Standart Kit 3D model click on the “Buy for” button in the top-right corner of the model’s page. Proceed to checkout and insert your PayPal account or credit card details. Once the payment is processed, you will be able to download the files and print them on a 3D printer.
Also, you may like other Star Wars 3D Printing Miniatures for your collection.
Read the interview with the 3D designers who modeled the astonishing 1m+ Millennium Falcon scale model for 3D print.
_______
FAQ:
Where can I print a model if I have no printer?
How to get started with 3D printing?
How to set up my 3D printer?
How to choose right 3D model print bed positioning?
How to paint printed figurine?
Average customer rating (120 reviews)
4.1
Ratings breakdown
Click a star rating to filter reviews
Overall experience
Level of detail in the model
4.1
Model cut quality and assembly guide
4.1
Clarity and accuracy of the model page
4.1
Level of detail in the model
4.6
Model cut quality and assembly guide
4.6
Clarity and accuracy of the model page
4.4
The contributing artists spend hundreds of hours designing all the details, interiors, expansions, and optional kits, while the Gambody moderation team carefully adapts everything for both FDM and SLA printing types, cuts and optimizes the parts, tests assemblies and movement mechanisms, and makes sure the whole project prints and fits together properly.
The add-on kits are intentionally optional, because some makers prefer building the Falcon mainly as an exterior display piece, while others want fully detailed interiors with open sections and additional expansion kits. This way, people can choose exactly what they want and even build the full project gradually over time.
Moreover, every Premium STL file purchase also includes:
- Recommended print settings for major slicers like Bambu Studio, Cura, PrusaSlicer, Simplify3D, Slic3r, and Orca Slicer.
- Detailed PDF and video assembly guides
- Lifetime technical support from the Gambody team, ready to help with any questions or troubleshooting, starting from slicing to assembly
- Access to future model updates and improvements prepared by the moderation team
And for anyone getting this as their first purchase on Gambody, there is also the New Customer Double Offer. It actually works really well for large projects with multiple add-on kits like this one:
- 1st model added to the cart → 10% OFF
- 2nd model added to the cart → 30% OFF
- 3rd model added to the cart → 50% back into account in GECredits
Then the cycle repeats up to 9 products, which can reduce the total cost of larger projects quite a bit. And since 1 GE Credit equals $1, the cashback from every third product can later be applied as a pretty significant discount on future purchases. And aside from that, Gambody also runs regular promotions and sales on models and add-on kits too, so it’s definitely worth keeping an eye on future offers 🙂
Hope this gives a bit more context behind the project structure and pricing. And if you have any other questions, feel free to reach out anytime!
Level of detail in the model
0.6
Model cut quality and assembly guide
0.8
Clarity and accuracy of the model page
0.6
1. Go to the Source Files tab on the model’s page.
2. Select your 3D printer type from the drop-down menu – FFF/FDM.
3. Choose the model version you want (we recommend the latest one, e.g. 2.0 – Fully upgraded).
4. Click the topmost checkbox to select all files at once.
5. Press the Download button. The system will automatically zip all selected files and start the download.
You’ll see a loading bar while the archive is being created. If your internet connection is unstable, downloading the files in smaller groups or individually can sometimes work more reliably.
If this resolves the issue for you, we’d really appreciate it if you could update the model rating, as it helps other makers better understand the current state of the model and reflects the improvements more accurately.
If you face any issues with downloading or need assistance with your project, don’t hesitate to contact us at support@gambody.com – we’ll be happy to assist!
Level of detail in the model
3.9
Model cut quality and assembly guide
3.9
Clarity and accuracy of the model page
5
Anthony
We have passed your comment regarding the landing gear bays to the model’s author, Ale_x_x_x, for consideration in future updates. Feedback like this is always valuable, especially when it highlights specific details that may affect the overall impression of the model.
We appreciate your attention to the design and your interest in the project.
Level of detail in the model
4.7
Model cut quality and assembly guide
4.7
Clarity and accuracy of the model page
5
You’re absolutely right – the Falcon turns out to be much bigger than it first appears, and finishing the build really gives you a new appreciation for its scale. We’re very glad to hear that the effort paid off and that you enjoyed the result.
And as for the portable toilet in the cargo bay… well, let’s just say even smugglers and Wookiees have practical needs on long hyperspace runs! Your addition might just be the most realistic upgrade the Falcon has ever received. 🚀
Thank you again for sharing your build and your sense of humor – it’s makers like you who make the community so much fun.
Clear skies and safe hyperspace jumps!
Level of detail in the model
5
Model cut quality and assembly guide
5
Clarity and accuracy of the model page
5
Level of detail in the model
3
Model cut quality and assembly guide
3
Clarity and accuracy of the model page
3
Level of detail in the model
4
Model cut quality and assembly guide
4
Clarity and accuracy of the model page
4
Level of detail in the model
5
Model cut quality and assembly guide
5
Clarity and accuracy of the model page
5
Level of detail in the model
2
Model cut quality and assembly guide
2
Clarity and accuracy of the model page
2
Level of detail in the model
5
Model cut quality and assembly guide
5
Clarity and accuracy of the model page
5
Level of detail in the model
4
Model cut quality and assembly guide
4
Clarity and accuracy of the model page
4
Level of detail in the model
2
Model cut quality and assembly guide
2
Clarity and accuracy of the model page
2
Level of detail in the model
2
Model cut quality and assembly guide
2
Clarity and accuracy of the model page
2
Level of detail in the model
4
Model cut quality and assembly guide
4
Clarity and accuracy of the model page
4
Level of detail in the model
1
Model cut quality and assembly guide
1
Clarity and accuracy of the model page
1
Level of detail in the model
5
Model cut quality and assembly guide
5
Clarity and accuracy of the model page
5
Level of detail in the model
3
Model cut quality and assembly guide
3
Clarity and accuracy of the model page
3
Level of detail in the model
1
Model cut quality and assembly guide
1
Clarity and accuracy of the model page
1
Level of detail in the model
5
Model cut quality and assembly guide
5
Clarity and accuracy of the model page
5
Level of detail in the model
4
Model cut quality and assembly guide
4
Clarity and accuracy of the model page
4
Below you'll find detailed slicing settings for Bambu Studio 2.0+, Orca Slicer 2.0+, UltiMaker Cura 5.0+, PrusaSlicer 2.0+, Slic3r 1.3+, Simplify3D 5.0+ to help you get the best results when printing this model. These settings are optimized specifically for this 3D model, but please note they may need slight adjustments depending on your printer or filament. When in doubt, refer to your printer's user manual.
To avoid printing issues and achieve the best quality, we highly recommend applying the following settings:
For better quality use 0.12 mm layer height, for fast printing use 0.2 mm layer height. For pins and the Ge connectors, use 0.2 layer height.
120-150% of your Layer Height
But you can paint the seam if you want.
You have to calibrate this parameter
You have to calibrate this parameter
You have to calibrate this parameter
For pins and power elements of the structure, such as the vehicle frame, use 3 loop
Disabled for vehicles and enabled for characters
For 0,2 Layer Height
The parameters in this tab vary greatly, it all depends on the quality of your printer. For example, if you have a classic Ender3, stick to the minimum parameters, but if you have a newer printer, for example Anycubic cobra 3 v2, you can select the maximum recommended values
Settings for advanced users, change these parameters only if you have sufficient 3D printing expertise
Enable this parameter if your model requires supports
We also recommend placing and removing supports manually in some places using special button
1-2 loops for more thick support
Top Z distance = 1-1.3 layer Height. If the supports are hard to remove, try increasing this setting by 0.1-0,4 mm
Bottom Z distance = 1-1.3 layer Height. If the supports are hard to remove, try increasing this setting by 0.1-0,4 mm
You have to calibrate this parameter which one is better for your filament
Increase this parameter if the supports are hard to remove from walls
For PLA and PETG filament types
5-8 mm is optional for small prints that have bad adhesion to the build plate
You have to calibrate this parameter
Read the description on your filament roll
Read the description on your filament roll and increase this parameter for fast printers
Read the description on your filament roll and increase this parameter for fast printers
For better quality use 0.12 mm layer height, for fast printing use 0.2 mm layer height. For pins and the Ge connectors, use 0.2 layer height.
120-150% of your Layer Height
But you can paint the seam if you want.
0.01-0.05 You have to calibrate this parameter
0.01-0.05 You have to calibrate this parameter
0.1-0.2 You have to calibrate this parameter
For pins and power elements of the structure, such as the vehicle frame, use 3 loop
Disabled for vehicles and ships, enabled for characters
For 0,2 Layer Height
For 0,2 Layer Height
The parameters in this tab vary greatly, it all depends on the quality of your printer. For example, if you have a classic Ender3, stick to the minimum parameters, but if you have a newer printer, for example, Anycubic Kobra 3 Or Bambulab A1, you can select the maximum recommended values.
Settings for advanced users, change these parameters only if you have sufficient 3D printing expertise
Enable this parameter if your model requires supports
We also recommend placing and removing supports manually in some places using special button
Top Z distance = 1-1.3 layer Height. If the supports are hard to remove, try increasing this setting by 0.1-0,4 mm
Bottom Z distance = 1-1.3 layer Height. If the supports are hard to remove, try increasing this setting by 0.1-0,4 mm
Increase this parameter if the supports are hard to remove from walls
For PLA and PETG filament types
5-8 mm is optional for small prints that have bad adhesion to the build plate
Read the description on your filament roll
Read the description on your filament roll and increase this parameter for fast printers
You have to calibrate this parameter
Read the description on your filament roll and increase this parameter for fast printers
Read the description on your filament roll
This field is filled in according to your printer specifications when you add it to the slicer.
You can add custom G-code here for the start and end of the print. However, be careful - this is for advanced users only!
You have to calibrate your printer using Ge retraction test models
Retraction Length: For direct-drive setups use 0.5 mm to 2.5 mm; for Bowden extruders use 5 to 7 mm
This is how fast the filament is pulled back—40-60 mm/s for direct drive and 30-50 mm/s for Bowden setups.
You have to calibrate this parameter: Reduce it until the printer starts to hit the parts with the nozzle during printing, then increase it by 0.2.
For better quality use 0.12 mm layer height, for fast printing use 0.2 mm layer height. For pins and the Ge connectors, use 0.2 layer height.
120-150% of your Layer Height
To increase the strength of the print parts, use wall line count: 3
For pins and connectors use 50% Infill
These parameters are for standard PLA plastic. If you are using a different type of plastic, check the printing temperature recommended by the manufacturer. Also, read the description on your filament spool. For fast printers, add +30 °C to the current parameters.
The parameters in this tab vary greatly, it all depends on the quality of your printer. For example, if you have a classic Ender3, stick to the minimum parameters, but if you have a newer printer, for example Anycubic cobra 3 v3, you can select the maximum recommended values
Settings for advanced users, change these parameters only if you have sufficient 3D printing expertise.
You need to calibrate this parameter using Gambody test models. These values are average values for a Direct Drive extruder; for a Bowden extruder, the values should be increased.
You need to calibrate this parameter using Gambody test models. These values are average values for a Direct Drive extruder; for a Bowden extruder, the values should be increased.
Use this value other than 0 if your nozzle catches on the internal infill during travel moves. Try to keep this value as low as possible in height.
Use normal supports to support large, straight surfaces (most mechanical or technical parts).
You have to calibrate this parameter according to the capabilities of your printer and your filament, using a Gambody test models.
Use 1 instead of 0 if your supports are thin and tall. They will be harder to remove, but much stronger.
Top Z distance = 1-1.3 layer Height. If the supports are hard to remove, try increasing this setting by 0.1-0,4 mm
Increase this parameter if the supports are hard to remove from walls
Use tree supports to support complex objects, such as characters.
You have to calibrate this parameter according to the capabilities of your printer and your filament, using a Gambody test models.
Top Z distance = 1-1.3 layer Height. If the supports are hard to remove, try increasing this setting by 0.1-0,4 mm
Increase this parameter if the supports are hard to remove from walls
Use a skirt for all parts when printing on outdated printers.
Use a brim when printing thin but tall parts, as well as parts with a small bed adhesion area.
For better quality use 0.12 mm layer height, for fast printing use 0.2 mm layer height. For pins and the Ge connectors, use 0.2 layer height.
120-150% of your Layer Height
for 0.2 Layer Height
But you can paint the seam if you want.
(for PLA and PETG)
(5-8 mm is optional for small prints that have bad adhesion to the build plate)
Enable this parameter if your model requires supports
(45-50 degree)You have to calibrate this parameter according to the capabilities of your printer
and your filament, using a Gambody test models.
Top contact Z distance = 1-1.3 layer Height. If the supports are hard to remove, try
increasing this setting by 0.1-0,4 mm
Top contact Z distance = 1-1.3 layer Height. If the supports are hard to remove, try
increasing this setting by 0.1-0,4 mm
Increase this parameter if the supports are hard to remove from walls
The parameters in this tab vary greatly, it all depends on the quality of your printer. For example, if you have a classic Ender3, stick to the minimum parameters, but if you have a newer printer, for example Anycubic cobra 3 v3, you can select the maximum recommended values
Settings for advanced users, change these parameters only if you have sufficient 3D printing expertise. Use the minimum value for outdated printers without acceleration calibration, and the maximum value for modern printers if you need it.
These settings only work for 3D printers with multiple extruders
You can try setting all parameters in this section, except the First layer, to values between 0.75% of your nozzle diameter and 1.25% of your nozzle diameter. Adjusting them will help you work out the optimal parameters for the best quality for your print. As for the First layer, you can set it to 150% of the diameter of your nozzle for better adhesion to the build plate (for a nozzle with a diameter of 0.4 mm, the First layer extrusion width can be from 0.3 mm to 0.5 mm)
For better printing quality you have to calibrate this parameter using Gambody test model.
Check your filament manufacturer's temperature recommendations on the spool.
Cooling parameters depends on the material you use for printing.
*for PLA
For better quality use 0.12 mm layer height, for fast printing use 0.2 mm layer height. For pins and the Ge connectors, use 0.2 layer height.
120-150% of your Layer Height
For 0.12 Layer Height
For 0.12 Layer Height
For pins and connectors use 50% Infill
Use skirt for outdated 3d printers
(5-8 mm is optional for small prints that have bad adhesion to the build plate)
Enable this parameter if your model requires supports
(45-60 degree)You have to calibrate this parameter according to the capabilities of your printer and your filament, using a Gambody test models
Contact Z distance = 1-1.3 layer Height. If the supports are hard to remove, try increasing this setting by 0.1-0,4 mm
The parameters in this tab vary greatly, it all depends on the quality of your printer. For example, if you have a classic Ender3, stick to the minimum parameters, but if you have a newer printer, for example Anycubic cobra 3 v3, you can select the maximum recommended values
Settings for advanced users, change these parameters only if you have sufficient 3D printing expertise. Use the minimum value for outdated printers without acceleration calibration, and the maximum value for modern printers if you need it.
You have to calibrate this parameter from 0.9 to 1.1 according to the capabilities of your printer and your filament, using a Gambody test models.
Check your filament manufacturer's temperature recommendations on the spool.
Cooling parameters depends on the material you use for printing.
Calibrate this value if you need to reduce or improve the adhesion between the plastic and the heat bed
Your current nozzle diameter
You need to calibrate this parameter using Gambody test models. These values are average values for a Direct Drive extruder; for a Bowden extruder, the values should be increased.
Your current nozzle diameter
You have to calibrate this parameter using Gambody test models.
You need to calibrate this parameter using Gambody test models. These values are average values for a Direct Drive extruder; for a Bowden extruder, the values should be increased.
For better quality use 0.12 mm layer height, for fast printing use 0.2 mm layer height. For pins and the Ge connectors, use 0.2 layer height.
For 0,2 Layer Height
For 0,2 Layer Height
To increase the strength of the print parts, use Outline Perimeters: 3
You can enable this parameter to print rounded or spherical models, as well as character models.
Use this option only if your parts are too tight. but better calibrate your printer extrusion
Use this option only if your parts are too tight. but better calibrate your printer extrusion
Use 2 and more if you want to create skirt instead brim
1-2 for skirt and 10-20 for brim
Use for wipe nozzle if you need
Use For ABS filament
For pins and connectors use 50% Infill
Top Z distance = 1-1.3 layer Height. If the supports are hard to remove, try increasing this setting by 0.1-0,4 mm
Calibrate your filament and detect optimal temperature for it
Average temperature for PLA filament
The parameters in this tab vary greatly, it all depends on the quality of your printer. For example, if you have a classic Ender3, stick to the minimum parameters, but if you have a newer printer, for example Anycubic cobra 3 v3, you can select the maximum recommended values
Settings for advanced users, change these parameters only if you have sufficient 3D printing expertise.