Files
3D model format
Stereolithography (.stl)
Total files
Slicer settings
not available
Mesh error check
not specified
Support
Lifetime support from Gambody team
Update requests
not specified
Model versions
FFF/FDM
Assembly method
not specified
Features
DLP/SLA
Assembly method
not specified
Features
DLP/SLA
Assembly method
not specified
Features
Additional details
Part of diorama
No
Special pack included
No
You will get instant access to the STL files of Gravity Drive Diorama for 3D Printing | Assembly after completing your purchase. Simply add the model to your cart and check out using PayPal, credit or debit card, Apple Pay, Google Pay, Alipay, or other available payment methods.
Watch the assembly video for Gravity Drive Diorama for 3D Printing | Assembly, and explore more tutorials, behind-the-scenes content, 3D printing timelapses, and painting guides on the official Gambody YouTube channel.
This Gravity Drive diorama for 3D printing consists of files in StereoLithography (.Stl) format that is optimized for 3D printing.
Before printing the files, we strongly recommend reading the PRINTING DETAILS section.
WHAT WILL YOU GET AFTER PURCHASE?
- 3 versions of Gravity Drive STL files for FFF/FDM and DLP/SLA - files for all versions are available for download after the purchase;
- STL files of high-poly Gravity Drive diorama for 3D printing consist of 119 files;
- Sizes for:
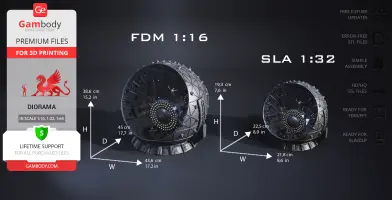
- FFF/FDM: 386 mm tall, 436 mm wide, 450 mm deep;
- DLP/SLA: 193 mm tall, 218 mm wide, 225 mm deep;
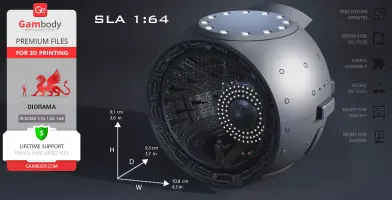
- DLP/SLA Add-On: 91 mm tall, 108 mm wide, 93 mm deep
- Assembly Manual for FFF/FDM 1.0, DLP/SLA 1.0 and DLP/SLA Add-On 1.0 versions in PDF and video formats;
- Detailed settings that we provide as a recommendation for Cura, Bambu Studio, Simplify3D, Slic3r and PrusaSlicer for the best print;
- Full technical support from the Gambody Support Team.
Detailed information about this 3D printing model is available in the DESCRIPTION section.
Before printing, take a look at Printing Details for recommended settings and tips to achieve better results.
ABOUT THIS 3D MODEL
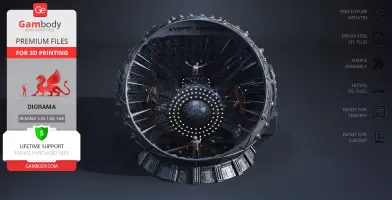
The story of the astronauts exploring the Event Horizon starship, which was absent for seven years, is full of mystery, paranormal phenomena, and cruelty. Gravity Drive, located in the aft section of the vessel, allows the Event Horizon to travel to distant parts of the universe by creating a black hole and singularity. Through its pilot travel, the ship, an inanimate object, seemed to develop a sadistic personality and became capable of manipulating the world around it.
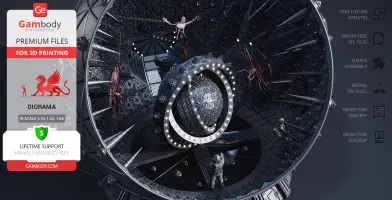
Our contributing artist was particularly inspired by the Gravity Drive and created this outstanding diorama for 3D printing that all horror fans will be crazy about. The module has an oval shape and features large spikes sticking out from the walls and reminds a torture room with dead bodies hanging on spikes, chains, and torture equipment. The central part of the diorama contains a drive’s core with three movable rings around it that was considered to be “the heart” of the ship. You can 3D print the Gravity Drive as a self-sufficient exhibit or print its “Add-On” version to use for the FFF/FDM version of the Event Horizon - independently of your choice, the diorama will capture your imagination!
ADAPTATION FOR 3D PRINTING
The Gravity Drive diorama for 3D printing is a static assembly model and its moderation and adaptation for different types of 3D printers took the Gambody team 80 hours in total.
For you to receive the cleanest 3D printing result possible, minimize the amount of filament needed for generated support, and make use of the active elements designed by Gambody Engineers, the diorama was divided into convenient assembly parts.
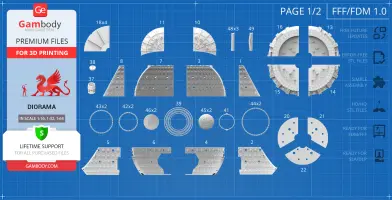
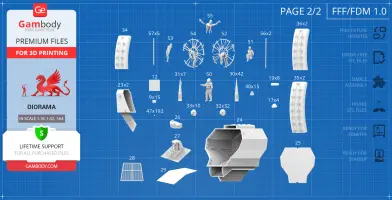
All assembly parts in the FFF/FDM 1.0 version are provided in STL files in recommended positions that were worked out in order to ensure the smoothness of the details’ surfaces after printing and that the 3D printing beginners won’t face difficulties when placing the parts on a build plate. When downloading any model’s file you will also receive “Assembly Manual” for FFF/FDM 1.0, DLP/SLA 1.0 and DLP/SLA Add-On 1.0 versions in PDF and video formats. We highly recommend that you get acquainted with the “Assembly Video” and “Assembly Manual” before getting down to the Gravity Drive 3D printing diorama.
The model is saved in STL files, a format supported by most 3D printers. All STL files for 3D printing have been checked in Netfabb and no errors were shown.
The scale for the diorama was calculated from the height of the Gravity Drive. The 3D printing model’s chosen scales are 1:16 for the FFF/FDM version, 1:32 for the DLP/SLA version and 1:64 for the DLP/SLA Add-On version.
VERSIONS’ SPECIFICATIONS
FFF/FDM 1.0 version features:
- Contains 57 parts;
- A printed model is 386 mm tall, 436 mm wide, 450 mm deep;
- The magnetic rings rotate;
- The core can be illuminated;
- 2 variants of the drive core: a sphere and a gateway;
- You can light up the room through the point light;
- You can light up the pool through the point light (the water must be printed with transparent PLA);
- The corridor floor and central door can be illuminated;
- The dead bodies are printed optionally and only on resin 3D printer (for the variant without dead bodies print the spikes without loops);
- The battery compartment is stored in the stand;
- All parts are divided in such a way that you will print them with the smallest number of support structures.
DLP/SLA 1.0 version features:
- Contains 46 parts;
- A printed model is 193 mm tall, 218 mm wide, 225 mm deep;
- The magnetic rings rotate;
- 2 variants of the drive core;
- You can light up the room through the point light;
- You can light up the pool through the point light (the water must be printed with transparent PLA);
- The corridor floor and central door can be illuminated;
- The dead bodies are printed optionally (for the variant without dead bodies print the spikes without loops);
- The battery compartment is stored in the stand;
- All parts are divided in such a way to fit the build plates and to ensure that support structures are generated where needed.
DLP/SLA Add-On 1.0 version features:
- Contains 16 parts;
- A printed model is 91 mm tall, 108 mm wide, 93 mm deep;
- The version features a simplified design;
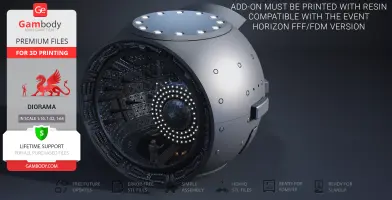
- The cutting and design of the version is adapted to install the Gravity Drive in the Event Horizon 3D printing model;
- The version is compatible with the FFF/FDM version of the Event Horizon, it should be printed on a resin 3D printer;
- All parts are divided in such a way to fit the build plates and to ensure that support structures are generated where needed.
You can get the Gravity Drive Diorama for 3D printing immediately after the purchase! Just click the green Buy button in the top-right corner of the model’s page. You can pay with PayPal or your credit card.
Watch the tutorial on how to assemble a Gravity Drive 3D Printing Diorama onGambody YouTube channel.
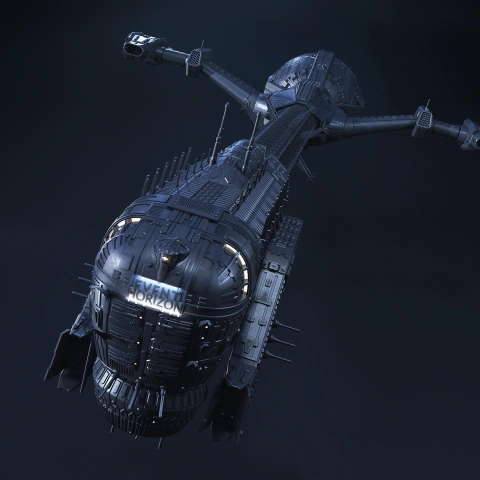
Also, you may like Event Horizon3D Printing Model and other Sci-Fi3D Printing Models.
________
FAQ:
Average customer rating (3 reviews)
5
Ratings breakdown
Click a star rating to filter reviews
Overall experience
Level of detail in the model
5
Model cut quality and assembly guide
5
Clarity and accuracy of the model page
5
Level of detail in the model
5
Model cut quality and assembly guide
5
Clarity and accuracy of the model page
5
Level of detail in the model
5
Model cut quality and assembly guide
5
Clarity and accuracy of the model page
5
Level of detail in the model
5
Model cut quality and assembly guide
5
Clarity and accuracy of the model page
5
To avoid printing issues and achieve the best quality, we highly recommend applying the following settings:
Generic
Below you can find printing recommendations for Cura, Bambu Lab, Simplify3D, Slic3r and PrusaSlicer software.
Disclaimer: The following printing settings are a recommendation, not an obligation. The parameters can vary depending on the peculiarities of your 3D printer, the material you use, and especially the particular assembly part you are working with. Each part that any model comprises often needs preliminary review, and you are free to tweak the settings the way you find suitable.
Note:
You can scale up the model (downscaling for FFF/FDM 3D printers is not recommended!);
All connectors should be printed at 100% Infill.
Bambu Lab printing recommendations:
These basic 3D printing settings recommendations for beginners were tested in Bambu Studio 1.9.1. Test models were printed on the Bambu Lab A1, Bambu Lab A1 Mini, Creality Ender 3 S1, Anycubic Kobra 2, and Anycubic Vyper using PLA and PETGfilaments.
To avoid printing problems, we recommend the following settings:download
Cura printing recommendations:
These are averaged settings which were tested in the Cura 5.2.1 slicer. Test models were printed on Anycubic Vyper, Creality Ender 3 Pro with PLA filament.
To avoid printing problems, we recommend the following settings:download
Simplify3D printing recommendations:
These are averaged settings which were tested in the Simplify3D 5.0.0 slicer. Test models were printed on Anycubic Vyper, FLSUN v400, Ender3 S1 with PLA filament.
To avoid printing problems, we recommend the following settings:download
Slic3r printing recommendations:
These basic 3D printing settings recommendations for beginners were tested in Slic3r 1.3.0 software. Test models were printed on Ultimaker 2, Creality Ender 3, Creality Cr-10S pro v2, Anycubic I3 Mega, Anycubic I3 MegaS, Anycubic Vyper with PLA and PetG filaments.
To avoid printing problems, we recommend the following settings:download
PrusaSlicer printing recommendations:
These basic 3D printing settings recommendations for beginners were tested in PrusaSlicer 2.3.1. Test models were printed on Ultimaker 2, Creality Ender 3, Creality Cr-10S pro v2, Anycubic I3 Mega, Anycubic I3 MegaS, Anycubic Vyper with PLA and PETG filaments.
To avoid printing problems, we recommend the following settings:download
